---
title: "Manage templates"
slug: "cloudoutboundmailer-use-template"
tags: ["Cloud Outbound Mailer"]
updated: 2026-10-08T06:49:33Z
published: 2026-10-08T06:49:33Z
canonical: "guide.ncloud-docs.com/cloudoutboundmailer-use-template"
---
> ## Documentation Index
> Fetch the complete documentation index at: https://guide.ncloud-docs.com/llms.txt
> Use this file to discover all available pages before exploring further.
# Manage templates
Available in Classic and VPC
You can create and manage templates to use when sending mails.
## Manage templates interface
Navigate to **Menu** > **All Services** > **Application Services** > **Simple & Easy Notification Service** > **MAIL** > **Manage templates** in the NAVER Cloud Platform console to access the Manage templates menu. The Manage templates interface includes the following components:
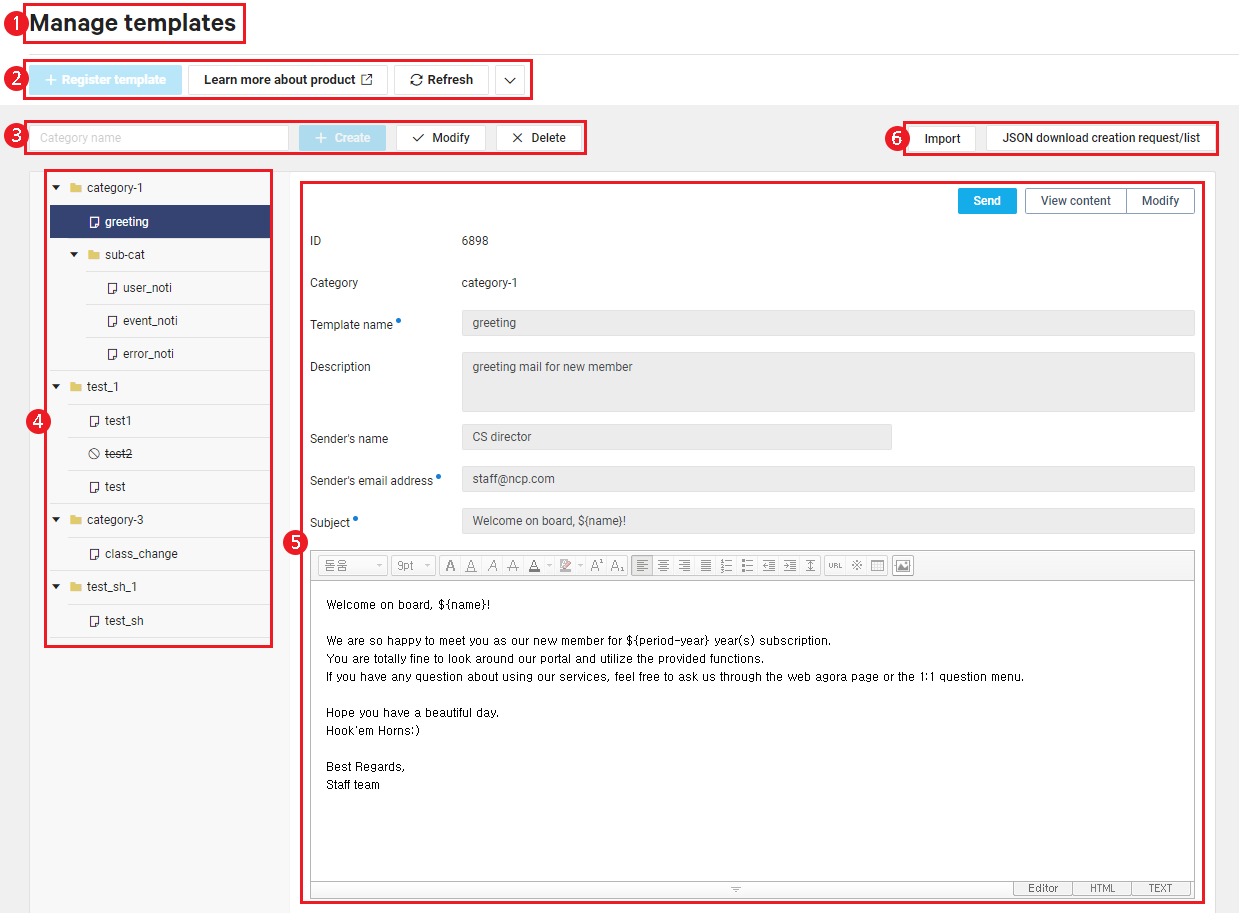
| Component | Description |
| --- | --- |
| ① Menu name | Current menu name. |
| ② Basic features | Features displayed when you first access the **Manage templates** menu. - **[Register template]**: Create a mail template (see [Create template](/docs/en/cloudoutboundmailer-use-template#%ED%85%9C%ED%94%8C%EB%A6%BF%EC%9E%91%EC%84%B1)). - **[Learn more]**: Go to the Simple & Easy Notification Service overview page. - **[Refresh]**: Reload the template list. |
| ③ Category feature | Category-related features for classifying templates. - **[Create]**: Enter a category name and click to create a new category (see [Create template category](/docs/en/cloudoutboundmailer-use-template#%ED%85%9C%ED%94%8C%EB%A6%BF%EC%B9%B4%ED%85%8C%EA%B3%A0%EB%A6%AC%EC%83%9D%EC%84%B1)). - **[Edit]**: Rename the category/template selected in the category tree. - **[Delete]**: Delete the category/template selected in the category tree (see [Delete category/template](/docs/en/cloudoutboundmailer-use-template#%EC%B9%B4%ED%85%8C%EA%B3%A0%EB%A6%AC%ED%85%9C%ED%94%8C%EB%A6%BF%EC%82%AD%EC%A0%9C)). |
| ④ Category tree | Created categories and the list of included mail templates |
| ⑤ Template details component | View template content - **[Send]**: Go to the mail sending interface to send mail using the selected template. - **[View content]**: Enter recipients and substitution tag values to view the mail content (see [View template content](/docs/en/cloudoutboundmailer-use-template#%ED%85%9C%ED%94%8C%EB%A6%BF%EB%82%B4%EC%9A%A9%ED%99%95%EC%9D%B8)). - **[Edit]**: Edit the template content. |
| ⑥ JSON conversion feature | - **[Import]**: Upload a template written in JSON to the console (see [Import template (JSON)](/docs/en/cloudoutboundmailer-use-template#%ED%85%9C%ED%94%8C%EB%A6%BF%EA%B0%80%EC%A0%B8%EC%98%A4%EA%B8%B0JSON)). - **[Request/list JSON download]**: Download registered templates as JSON (see [Export template (JSON)](/docs/en/cloudoutboundmailer-use-template#%ED%85%9C%ED%94%8C%EB%A6%BF%EB%82%B4%EB%B3%B4%EB%82%B4%EA%B8%B0JSON)). |
Caution
- Templates created before application of new editor on October 17, 2024 (GMT +09:00) may not retain their original content when edited and saved.
- While existing unedited templates continue to function normally, create a new template if you need to edit an existing one.
## Create template category
To create a template category:
1. In the NAVER Cloud Platform console, navigate to **Menu** > **All Services** > **Application Services** > **Simple & Easy Notification Service** > **MAIL**.
2. Click the **Manage templates** menu.
3. Enter the category name in the category name input field at the top of the page.
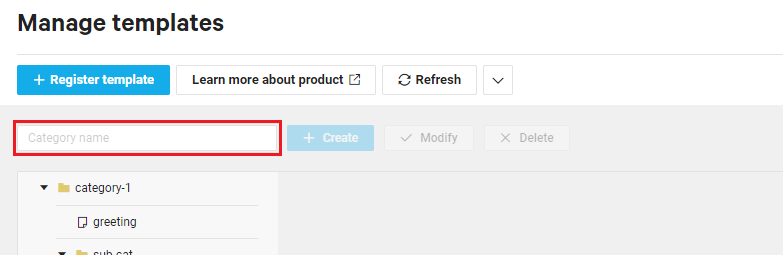
- You can enter up to 100 characters using Korean, English uppercase and lowercase letters, numbers, periods (.), underscores (_), and hyphens (-).
- Once a value is entered, the **[Create]** button is enabled.
4. Click **[Create]**.
## Create template
To create a new mail template:
1. In the NAVER Cloud Platform console, navigate to **Menu** > **All Services** > **Application Services** > **Simple & Easy Notification Service** > **MAIL**.
2. Click the **Manage templates** menu.
3. Click **[Register template]**.
- To add a template within a created category, select the category in the category tree and click **[Register template]**.
- If no category is selected, the template will be added without a category.
4. Create a template.
- **Template name**: Enter the template name.
- You can enter up to 100 characters using Korean, English uppercase and lowercase letters, numbers, periods (.), underscores (_), and hyphens (-).
- **Description**: Enter a template description.
- Up to 300 bytes can be entered.
- **Sender name**: Enter the sender's name that will be displayed when the mail is sent.
- Up to 69 bytes can be entered.
- **Sender mail address**: Enter the sender's mail address that will be displayed when the mail is sent.
- **Subject**: Enter the mail subject.
- Up to 500 bytes can be entered.
- Substitution tags in the ${tag name} format can be used.
- Enter the mail content in the input window.
- Select the input style among **Editor**/**HTML**/**TEXT**.
- Substitution tags in the ${tag name} format can be used.
5. Click **[Register]**.
- You can change the category of a registered template by dragging the template in the category tree.
Note
For more information on how to use substitution tags in the ${tag name} format, see [Using substitution tags](/docs/en/cloudoutboundmailer-use-mail#%EC%B9%98%ED%99%98%ED%83%9C%EA%B7%B8%EC%82%AC%EC%9A%A9).
## Create templates using HTML
You can create templates using HTML tags in the input window. When creating a template, you can only use the HTML tags and properties allowed by the provided editor as follows:
| **Types of tags** | **Allowed tags** |
| --- | --- |
| **Text content tags** | `blockquote`, `dd`, `div`, `dl`, `dt`, `figcaption`, `hr`, `li`, `ol`, `p`, `pre`, `ul` |
| **Inline text tags** | `a`, `b`, `br`, `cite`, `code`, `em`, `i`, `s`, `small`, `span`, `strong`, `sub`, `sup`, `time`, `u`, `del`, `font` |
| **Multimedia tags** | `img` |
| **Content section tags** | `address`, `article`, `aside`, `footer`, `h1`, `h2`, `h3`, `h4`, `h5`, `h6`, `header`, `hgroup`, `nav`, `section` |
| **Table tags** | `caption`, `col`, `colgroup`, `table`, `tbody`, `td`, `tfoot`, `th`, `thead`, `tr` |
| **Form tags** | `input`, `button` |
#### List of allowed properties
The following properties can be used with all tags:
- `align`, `bgcolor`, `border`, `checked`, `colspan`, `contenteditable`, `width`, `height`, `href`, `color`, `rowspan`, `span`, `src`, `style`, `target`, `class`, `cellpadding`, `cellspacing`, `type`
#### Allowed schemes
The following schemes can be used for URLs or links:
- `http`, `https`, `ftp`, `mailto`, `data`
Note
For information about using tags and properties, see the HTML References documentation below.
- [https://developer.mozilla.org/en-US/docs/Web/HTML/Element](https://developer.mozilla.org/en-US/docs/Web/HTML/Element)
- [https://developer.mozilla.org/en-US/docs/Web/HTML/Attributes](https://developer.mozilla.org/en-US/docs/Web/HTML/Attributes)
## View template content
To view a created template and enter recipient and substitution tag values to preview the actual mail that will be sent:
1. In the NAVER Cloud Platform console, navigate to **Menu** > **All Services** > **Application Services** > **Simple & Easy Notification Service** > **MAIL**.
2. Click the **Manage templates** menu.
3. Select the template whose contents you wish to check from the category tree and click **[View content]** when the template details interface appears.
4. In the content view popup window, enter the recipient's mail address.
- If the template contains substitution tags, enter the values for those tags as well.
5. Click **[Preview]**.
- You can view the mail that will be sent to the recipient.
## Export template (JSON)
To export a template registered in MAIL to a JSON file:
1. In the NAVER Cloud Platform console, navigate to **Menu** > **All Services** > **Application Services** > **Simple & Easy Notification Service** > **MAIL**.
2. Click the **Manage templates** menu.
3. Click **[Create JSON download request/list]**.
4. In the Template JSON download list popup window, click **[Request file creation]**.
- Depending on the data size, it may take some time to generate the file.
- The generated file can be downloaded for 1 week before it expires.
5. Click **[Download]**.
- The data is downloaded to your local PC.
6. Click **[OK]**.
## Import template (JSON)
To import a template written in JSON into MAIL:
1. In the NAVER Cloud Platform console, navigate to **Menu** > **All Services** > **Application Services** > **Simple & Easy Notification Service** > **MAIL**.
2. Click the **Manage templates** menu.
3. Click **[Import]**.
4. Locate and select the JSON file you wish to upload in the file explorer window and click **[Open]**.
- Uploaded templates can be viewed in the category tree.
- Example: JSON syntax for adding categories and templates.
```
{
"contents": [
{
"name": "test_1",
"type": "CATEGORY",
"childList": [
{
"name": "test1",
"type": "TEMPLATE",
"senderAddress": "test@test.com",
"title": "test",
"body": "test
",
"description": ""
},
{
"name": "test2",
"type": "TEMPLATE",
"senderAddress": "test@test.com",
"title": "test2",
"body": "test2
",
"description": ""
}
]
}
]
}
```
## Delete category/template
To delete a registered category or template:
Note
- Categories that contain a template or a subcategory cannot be deleted.
- Deleting a template makes it unavailable for mail sending, but the template itself will not be deleted. It remains in the tree with a strikethrough, and the **[Recovery]** button appears when the template is clicked. Clicking **[Recovery]** removes the strikethrough, making the template available for mail sending.
1. In the NAVER Cloud Platform console, navigate to **Menu** > **All Services** > **Application Services** > **Simple & Easy Notification Service** > **MAIL**.
2. Click the **Manage templates** menu.
3. To delete a category or template from the category tree, select the desired item and click **[Delete]**.
4. Click **[OK]** in the notification popup window.
- For templates, they will appear with a strikethrough in the category tree. When clicked, the **[Delete]** button switches to **[Recovery]** button.
- For categories, they will be immediately removed from the category tree.