---
title: "Install and manage agent"
slug: "devtools-devtools-4-4"
tags: ["SourceDeploy"]
updated: 2026-09-17T09:17:45Z
published: 2026-09-17T09:17:45Z
canonical: "guide.ncloud-docs.com/devtools-devtools-4-4"
stale: true
---
> ## Documentation Index
> Fetch the complete documentation index at: https://guide.ncloud-docs.com/llms.txt
> Use this file to discover all available pages before exploring further.
# Install and manage agent
Available in Classic and VPC
The Install and manage agent section describes agent specifications and the installation method. In addition, a description is offered about commands for the agent and how to troubleshoot any issues that could occur related to the agent.
## Agent specifications
The agent specifications are as follows:
- Korea
| Item | Specifications |
| --- | --- |
| Target server | Server or Auto Scaling Group created on NAVER Cloud Platform |
| OS | Ubuntu 24 or earlier, and Rocky version 9 or earlier |
| Python version | Version 3.6 or later, and version 3.12.7 or earlier |
- Singapore
| Item | Specifications |
| --- | --- |
| Target server | Server or Auto Scaling Group created on NAVER Cloud Platform |
| OS | Ubuntu 24 or earlier, and Rocky version 9 or earlier |
| Python version | Version 3.6 or later, and version 3.12.7 or earlier |
- Japan
| Item | Specifications |
| --- | --- |
| Target server | Server or Auto Scaling Group created on NAVER Cloud Platform |
| OS | Ubuntu 24 or earlier, and Rocky version 9 or earlier |
| Python version | Version 3.6 or later, and version 3.12.7 or earlier |
## Install and agent
To deploy to a server using SourceDeploy, the target server must have the agent for SourceDeploy installed.
To install the agent:
- [1. Create API authentication key](/docs/en/devtools-devtools-4-4#1API%EC%9D%B8%EC%A6%9D%ED%82%A4%EC%83%9D%EC%84%B1)
- [2. Write installation commands](/docs/en/devtools-devtools-4-4#2%EC%84%A4%EC%B9%98%EB%AA%85%EB%A0%B9%EC%96%B4%EC%9E%91%EC%84%B1)
### 1. Create API authentication key
You need an API authentication key to install and use the agent.
To create an API authentication key:
1. Access the NAVER Cloud Platform console.
2. In the upper-right corner of the interface, navigate to **My Account** > **Account and Security Management**.
3. Enter the login password, and then click **[OK]**.
4. Navigate to **Security Management** > **Access Management**.
5. Click **[Create new API authentication key]**.
- The created API is displayed in the list.
### 2. Write installation commands
You can access the server and write the installation commands, or write them in an Init Script.
See the following according to how to write:
- [Write after accessing the server](/docs/en/devtools-devtools-4-4#%EC%84%9C%EB%B2%84%EC%A0%91%EC%86%8D%ED%9B%84%EC%9E%91%EC%84%B1)
- [Write in Init Script](/docs/en/devtools-devtools-4-4#InitScript%EC%97%90%EC%9E%91%EC%84%B1)
Caution
If you are installing the agent by writing an Init Script from the console, write the installation commands in the Init Script before creating a project, and then register it when you create the Server or Auto Scaling, which is going to be the deployment target.
#### Write after accessing the server
To access a server and then write and run the installation commands:
1. Access the deployment target server set in the SourceDeploy deployment project.
2. Enter the commands by referring to the following:
```
echo $ 'NCP_ACCESS_KEY=accesskey\nNCP_SECRET_KEY=secretkey' > /opt/NCP_AUTH_KEY
chmod 400 /opt/NCP_AUTH_KEY
chmod 400 /opt/NCP_AUTH_KEY
wget --header="x-ncp-region_code:region" "Agent download address"
chmod 755 install
./install
rm -rf install
```
- In "accesskey," [enter the **Access Key ID** of the API authentication key created in 1. Create API authentication key](/docs/en/devtools-devtools-4-4#1API%EC%9D%B8%EC%A6%9D%ED%82%A4%EC%83%9D%EC%84%B1).
- In "secretkey," [enter the **Secret Key** of the API authentication key created in 1. Create API authentication key](/docs/en/devtools-devtools-4-4#1API%EC%9D%B8%EC%A6%9D%ED%82%A4%EC%83%9D%EC%84%B1).
Caution
You must use the API authentication key whose status is **In use**. If you use a **Disabled** key, the authentication will fail, even if the agent is running normally, and the deployment through SourceDeploy won't be performed properly. To use a **Disabled** key, click **[Use]** to change its status to **In use**.
- Click **[View]** to see the **Secret Key**.
- Enter the agent download address for the applicable Region and environmental requirements in the `Agent 다운로드 주소` field.
| Environment | Region | Agent download address | Header information |
| --- | --- | --- | --- |
| VPC | Korea (KR) | https://sourcedeploy-agent.apigw.ntruss.com/agent/vpc-v2/download/install | x-ncp-region_code:KR |
| Singapore (SGN) | https://sourcedeploy-agent.apigw.ntruss.com/agent/vpc-v2/download/install | x-ncp-region_code:SGN |
| Japan (JPN) | https://sourcedeploy-agent.apigw.ntruss.com/agent/vpc-v2/download/install | x-ncp-region_code:JPN |
| Classic | Korea (KR) | https://sourcedeploy-agent.apigw.ntruss.com/agent/v3/download/install | |
- `NCP_AUTH_KEY` must be created under the server's /opt directory as follows:

#### Write in Init Script
If you have written the installation commands in an Init Script, then it must be registered with Server or Auto Scaling.
To write the installation commands in an Init Script and register them with Server or Auto Scaling:
1. From the NAVER Cloud Platform console, navigate to **Menu** > **All Services** > **Compute** > **Server**.
2. Click the **Init Script** menu.
3. Click **[Create script]**.
4. Enter the **Script name** and then select the **OS type**.
5. Write the **Script** by referring to the following:
```
#!/bin/bash
echo $ 'NCP_ACCESS_KEY=accesskey\nNCP_SECRET_KEY=secretkey' > /opt/NCP_AUTH_KEY
chmod 400 /opt/NCP_AUTH_KEY
wget --header="x-ncp-region_code:region" "Agent download address"
chmod 755 install
./install
rm -rf install
```
- In `accesskey`, [enter the **Access Key ID** of the API authentication key created in 1. Create API authentication key](/docs/en/devtools-devtools-4-4#1API%EC%9D%B8%EC%A6%9D%ED%82%A4%EC%83%9D%EC%84%B1).
- In `secretkey`, [enter the **Secret Key** of the API authentication key created in 1. Create API authentication key](/docs/en/devtools-devtools-4-4#1API%EC%9D%B8%EC%A6%9D%ED%82%A4%EC%83%9D%EC%84%B1).
Caution
You must use the API authentication key whose status is **In use**. If you use a **Disabled** key, the authentication will fail, even if the agent is running normally, and the deployment through SourceDeploy won't be performed properly. To use a **Disabled** key, click **[Use]** to change its status to **In use**.
- Click **[View]** to see the **Secret Key**.
- Enter the agent download address for the applicable environmental requirements and Region in **Agent download address**.
| Environment | Region | Agent download address | Header information |
| --- | --- | --- | --- |
| VPC | Korea (KR) | https://sourcedeploy-agent.apigw.ntruss.com/agent/vpc-v2/download/install | x-ncp-region_code:KR |
| Singapore (SGN) | https://sourcedeploy-agent.apigw.ntruss.com/agent/vpc-v2/download/install | x-ncp-region_code:SGN |
| Japan (JPN) | https://sourcedeploy-agent.apigw.ntruss.com/agent/vpc-v2/download/install | x-ncp-region_code:JPN |
| Classic | Korea (KR) | https://sourcedeploy-agent.apigw.ntruss.com/agent/v3/download/install | |
6. Click **[Create script]**.
7. Register the Init Script created with Server or Auto Scaling.
- Click the **Server** menu to register it with Server.
- Click **[Create server]** to register the Init Script. For more information about how to create a server, see the [Server creation guide](/docs/en/compute-compute-1-1-v2).
- To register with Auto Scaling, navigate to **Menu** > **All Services** > **Compute** > **Auto Scaling** > **Launch Configuration**.
- Click **[Create Launch Configuration]** to register the Init Script. For more information about how to create Launch Configuration, see the [Launch Configuration creation guide (Classic)](/docs/en/autoscaling-lc-classic#LaunchConfiguration%EC%83%9D%EC%84%B1) and the [Launch Configuration creation guide (VPC)](/docs/en/autoscaling-lc-vpc#LaunchConfiguration%EC%83%9D%EC%84%B1).
## Agent run commands
The following are the run commands for the agent:
**Start the agent**
```
service sourcedeploy start
```
**Stop the agent**
```
service sourcedeploy stop
```
**Check the agent status**
```
service sourcedeploy status
```
**Restart the agent**
```
service sourcedeploy restart
```
**Check agent process**
You can check the agent process to view if the agent is running normally.
The normal run criteria for the agent process are as follows:
- Run 1 process.
```
ps -ef | grep main.py
```

## Delete agent
To delete an agent:
1. Access the server where the agent is installed, and then stop the agent.
- The following are the commands to stop the agent:
```
service sourcedeploy stop
```
2. Remove all live processes by checking the agent process.
- The following are the commands to check and eliminate the agent processes:
```
ps -ef | grep main.py
```
```
kill -9 PID(ex.3587)
```
3. Remove the installed agent file.
- The following are the commands to remove the agent file:
```
rm -rf /opt/sdagent
```
## Agent troubleshooting
**When the agent connection doesn't work**
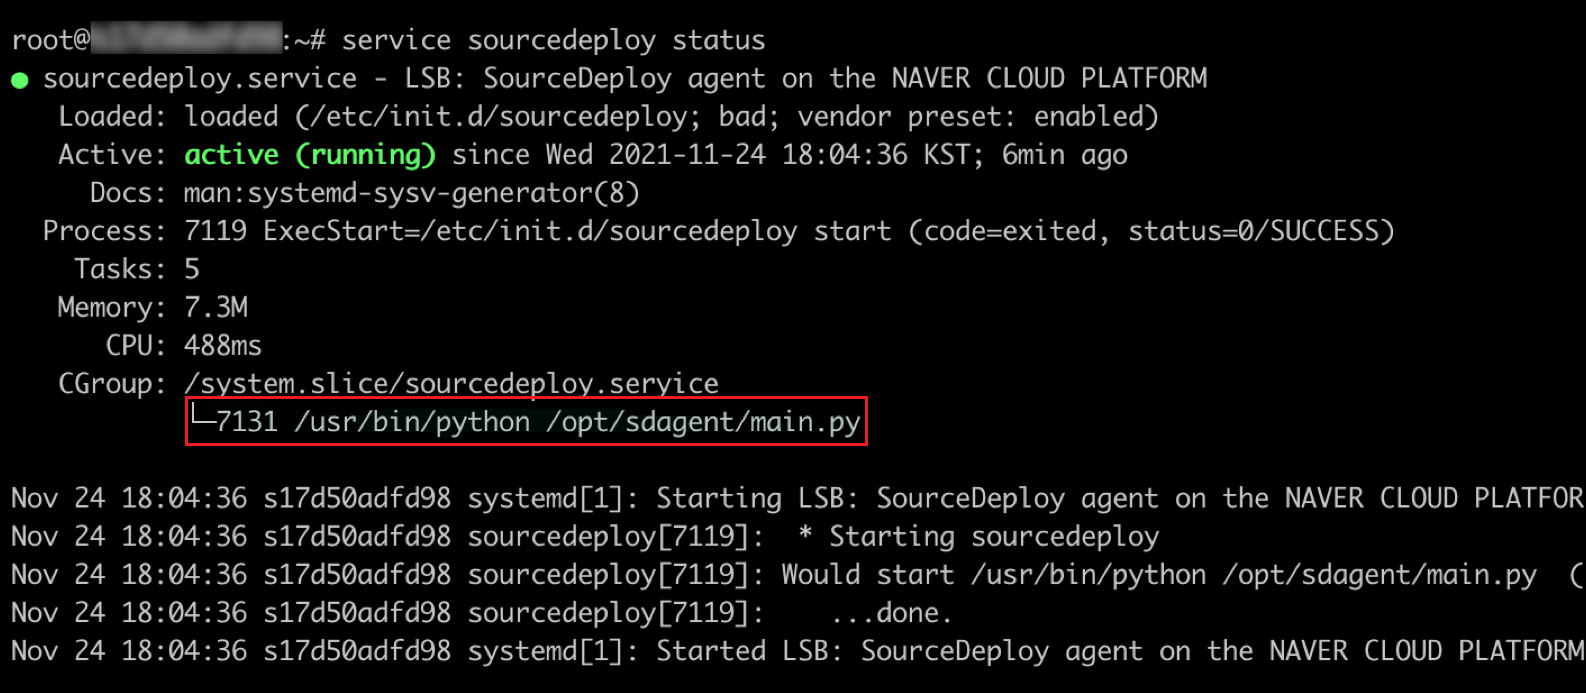
- Enter the agent status check commands and check if the agent has been installed normally.
```
service sourcedeploy status
```
- Check the installed version of the agent.
```
cat /opt/sdagent/Agent.ver
```
Example: As of May 27, 2021.
```
[VERSION]
ver=2021/05/18/01
```
- If the agent installed is an older version, then delete and reinstall the agent.
- For information on deleting the agent, see [Delete agent](/docs/en/devtools-devtools-4-4#%EC%97%90%EC%9D%B4%EC%A0%84%ED%8A%B8%EC%82%AD%EC%A0%9C).
- Check if the following agent installation URL is entered in the Init Script.
- The following are the addresses to download the agent for each environmental requirement and Region:
| Environment | Region | Agent download address | Header information |
| --- | --- | --- | --- |
| VPC | Korea (KR) | https://sourcedeploy-agent.apigw.ntruss.com/agent/vpc-v2/download/install | x-ncp-region_code:KR |
| Singapore (SGN) | https://sourcedeploy-agent.apigw.ntruss.com/agent/vpc-v2/download/install | x-ncp-region_code:SGN |
| Japan (JPN) | https://sourcedeploy-agent.apigw.ntruss.com/agent/vpc-v2/download/install | x-ncp-region_code:JPN |
| Classic | Korea (KR) | https://sourcedeploy-agent.apigw.ntruss.com/agent/v3/download/install | |
```
wget --header="x-ncp-region_code:region" "Agent download address"
```
- Check if the server status is **Running**.
**When the agent processes are not running normally**
Note
The normal run criteria for the agent process are as follows:
- Run 1 process.
- Enter the restart commands to restart the agent.
```
service sourcedeploy restart
```
- Install the following Linux packages and reinstall the agent if the agent does not operate normally even after restarting.
```
# CentOS, Rocky
sudo yum install -y epel-release ca-certificates openssl-devel zlib-devel
# Ubuntu
sudo apt-get install -y build-essential ca-certificates libssl-dev zlib1g-dev
```
**When the agent can't be installed**
- Check if the correct authentication key value has been entered.
```
cat /opt/NCP_AUTH_KEY
```
- Check if the path of the script you want to run has been specified in the first line of the Init Script, in the form of `#!/usr/bin/env python`, `#!/bin/perl`, `#!/bin/bash`, and so on.