---
title: "ONE Store"
slug: "game-gamepot3-one-store"
updated: 2026-10-08T02:15:59Z
published: 2026-10-08T02:15:59Z
canonical: "guide.ncloud-docs.com/game-gamepot3-one-store"
---
> ## Documentation Index
> Fetch the complete documentation index at: https://guide.ncloud-docs.com/llms.txt
> Use this file to discover all available pages before exploring further.
# ONE Store
Available in Classic and VPC
This is a console user guide for ONE Store builds. For instructions on using the console other than integrating with GAMEPOT, see the following:
- [ONE Store guide document](https://onestore-dev.gitbook.io/dev)
- ONE store Developers Console: [https://dev.onestore.co.kr/](https://dev.onestore.co.kr/)
## Add in-app product in console
1. Access ONE Store Developer Center > Click **Apps** > Select project > **In-app information** > **Managed product** > Click **[Register in-app product]**. 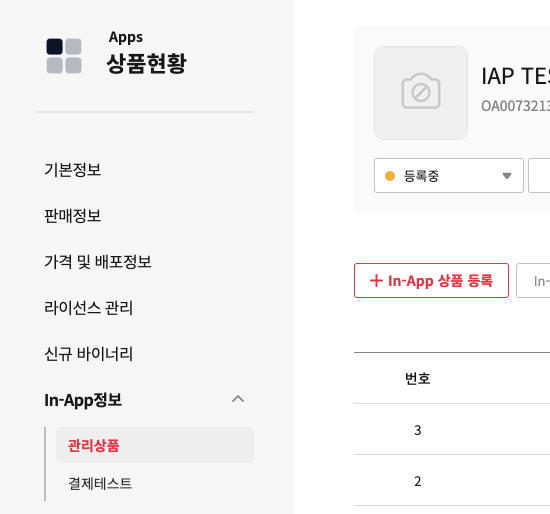
2. Enter the in-app product information, and click **[Save]**. 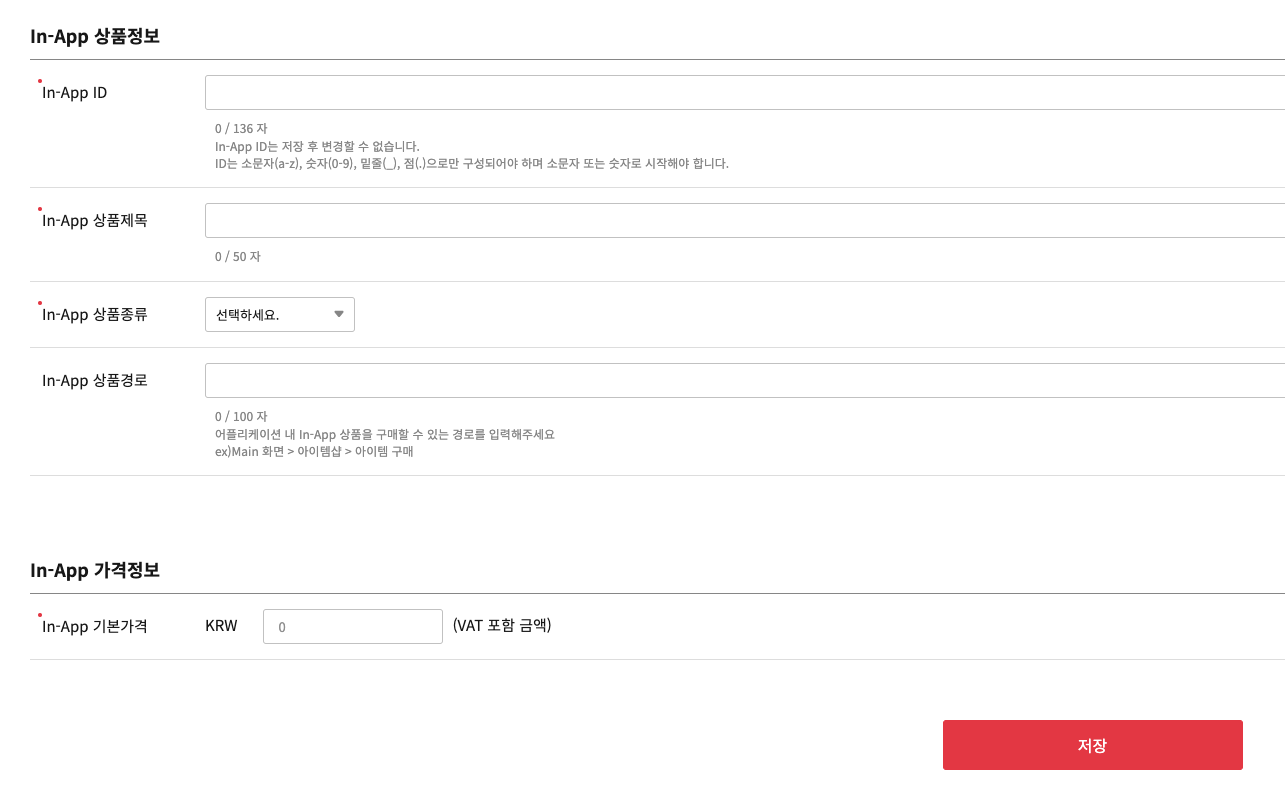
- In-app ID: Unique in-app ID (product id) value
- In-app product title: In-app product name (name displayed to users)
- In-app product type: GAMEPOT SDK only supports the "Managed product" type, so you must select "Managed product."
- In-app base price: Enter a price including VAT in KRW.
## Apply additional payment test
1. Access ONE Store Developer Center > Click **Apps** > Select project > **In-app information** > Click **Test payment**.
2. View test ID: Enter the ONE Store account (email information) to test the payment and click **[View]**.
- If your ONE Store account is retrieved, you'll see the "Test ID lookup results" section at the bottom.
3. Select "Sandbox or production payment" as your payment environment from the retrieved results and register.
- After adding an in-app product, you need to set it to a sandbox environment for initial testing.

## Register store information on GAMEPOT dashboard
1. Click the GAMEPOT dashboard > **Project settings** > **Store** > **ONE Store** menus, in that order. 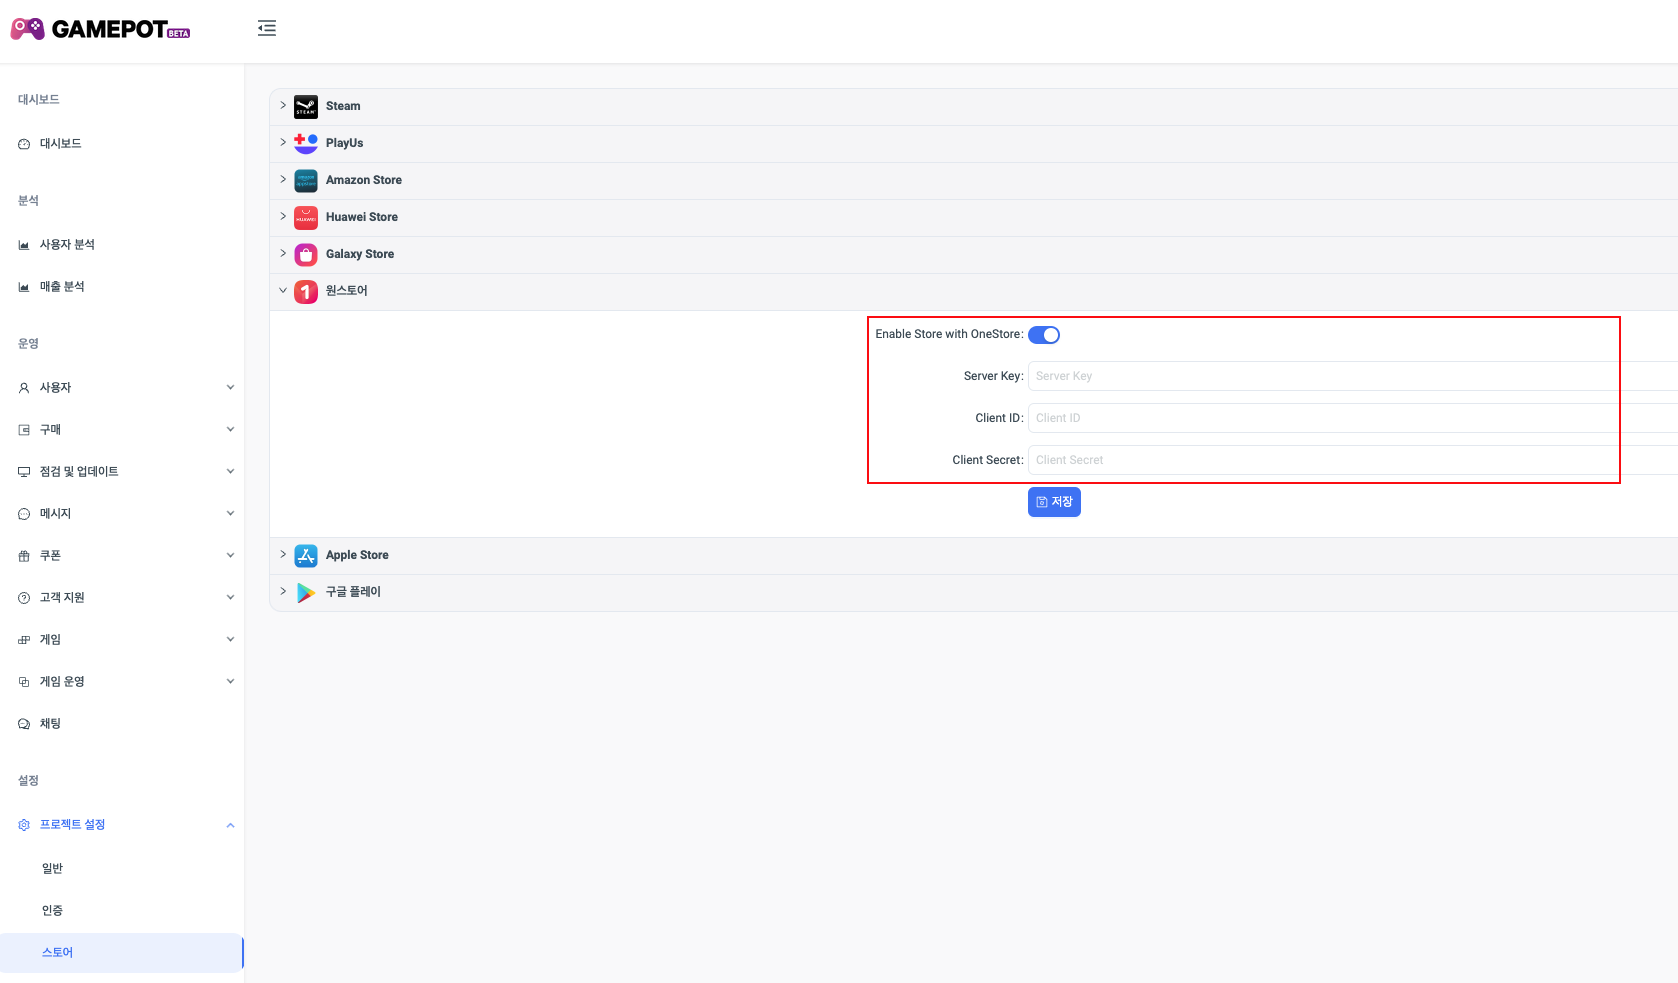
2. You can check the information required for store registration in **In-App information > Managed product > Manage in-app API**. 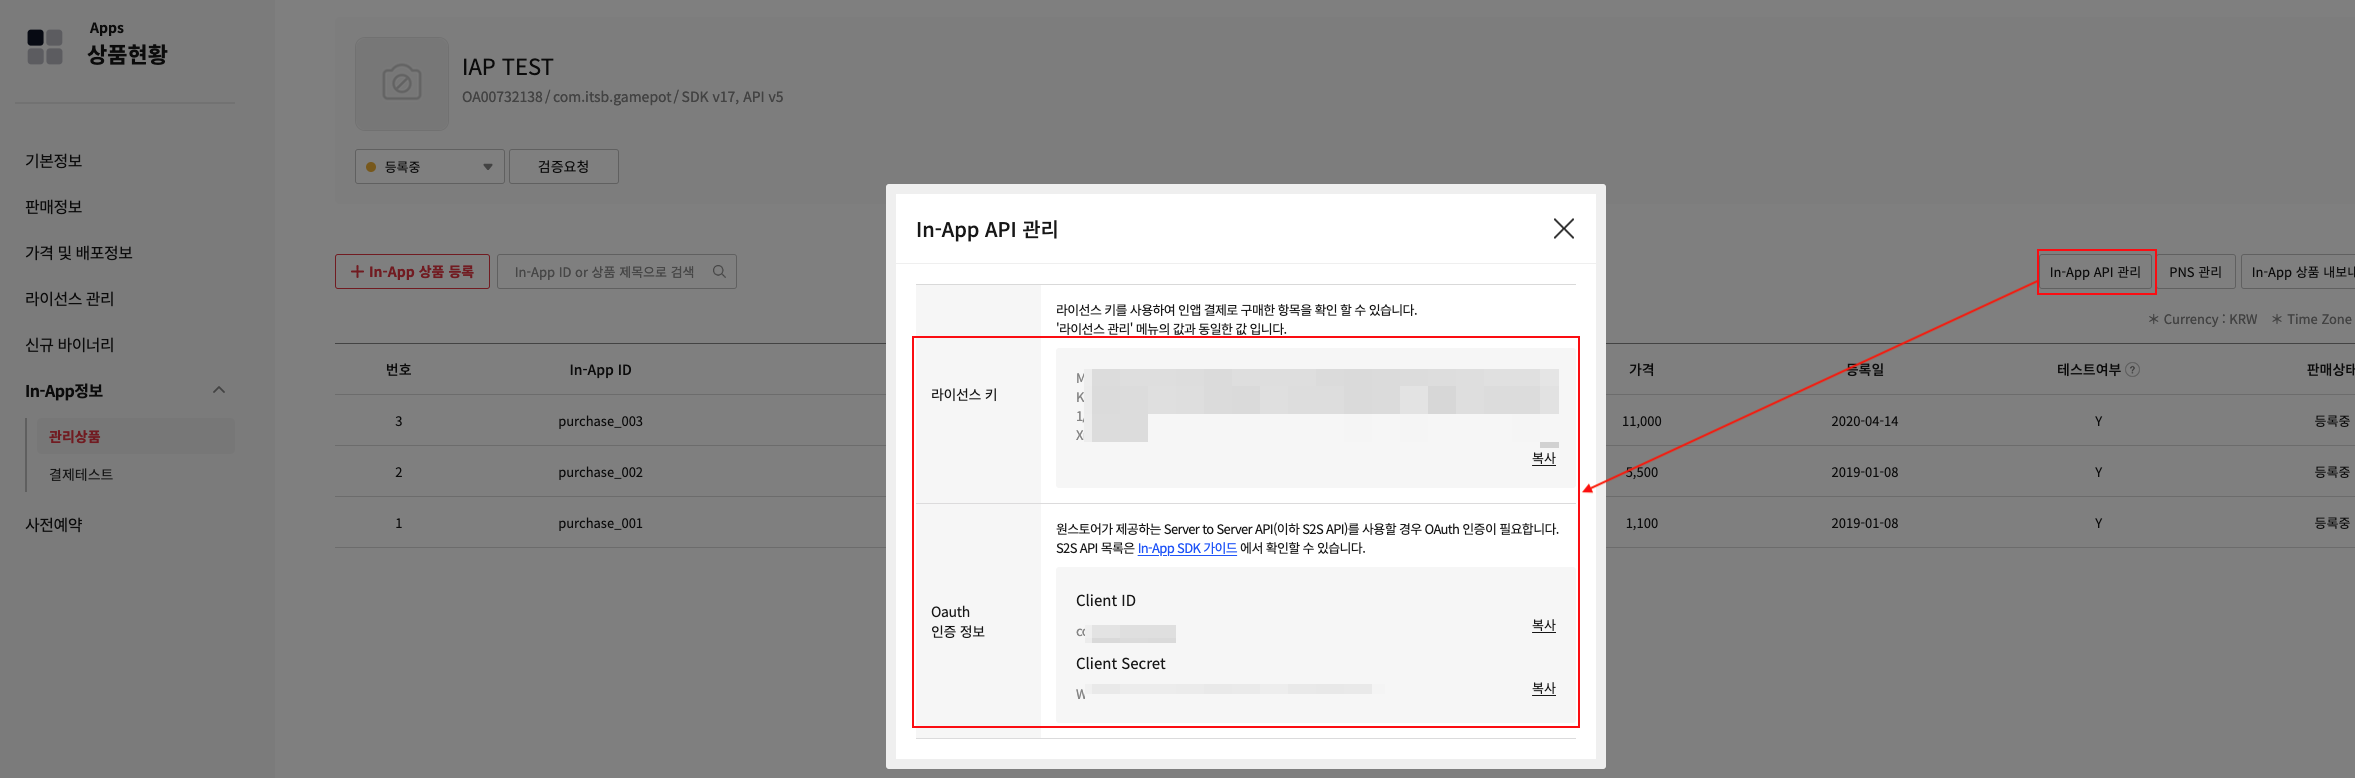
- Server key: Enter the license key value
- Client ID: Enter the client ID value of the OAuth authentication information.
- Client secret: Enter the client secret value of the OAuth authentication information.
### Add in-app product in GAMEPOT dashboard
Click the GAMEPOT dashboard > **Purchase** > **In-app purchase** > **[Add]** button.
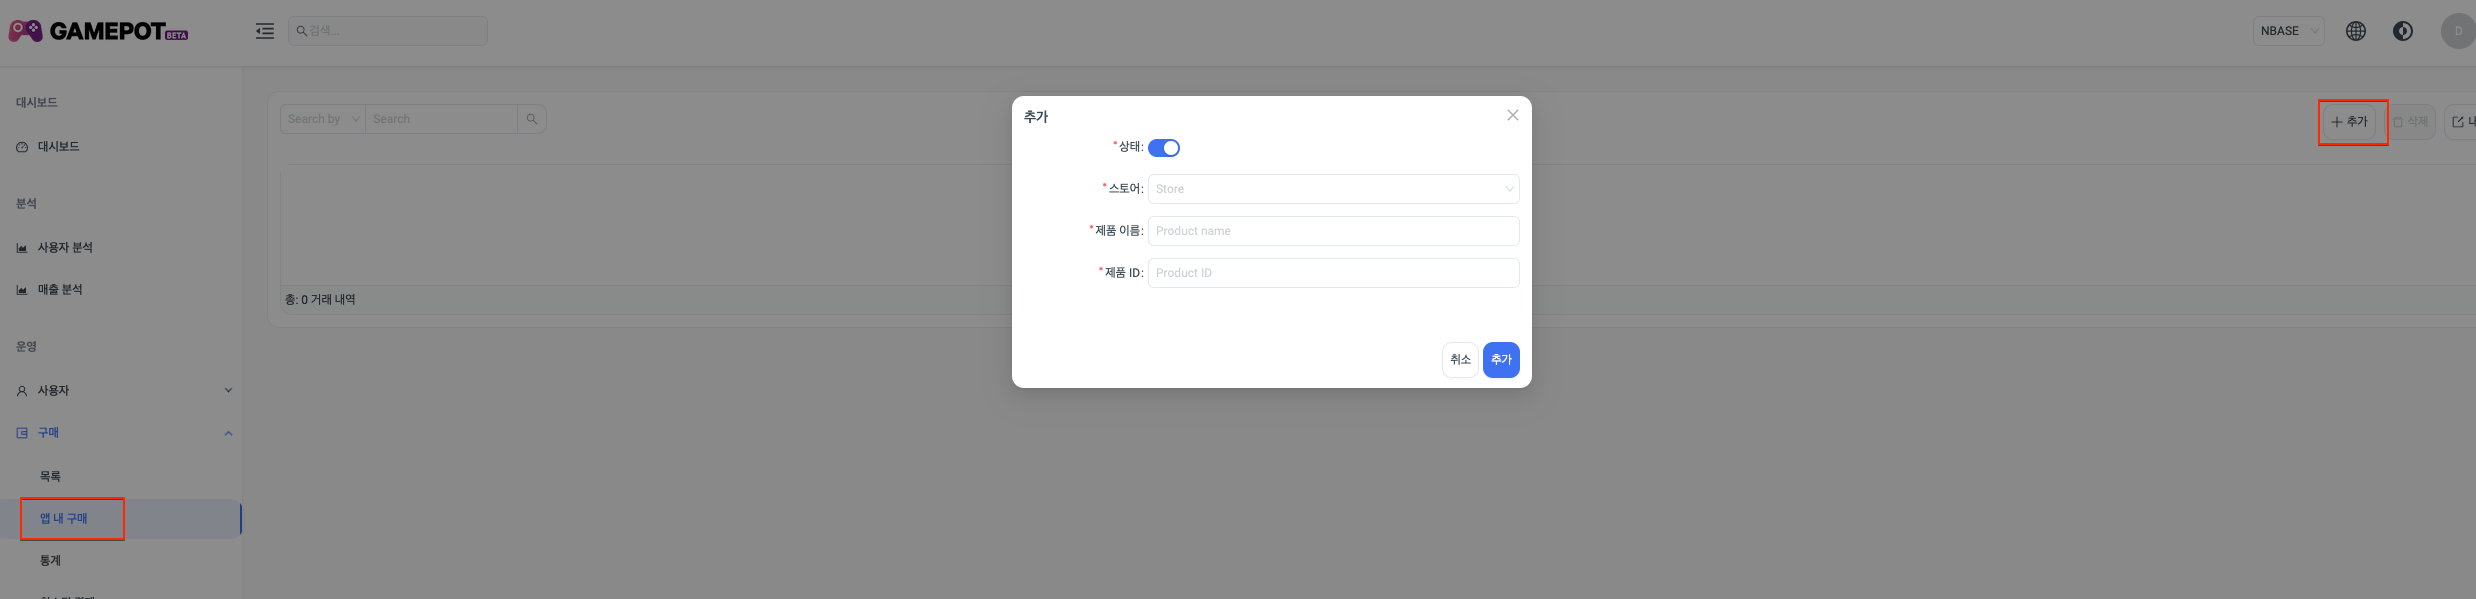
- Status: Register as Active status. (Unused products are deactivated.)
- Store: Select the store where you want to register the in-app
- Product name: In-app's product name
- Product ID: In-app ID (Product Id) that you entered in the store console
## Set up app
### Set Kotlin Gradle
1. Verify that Maven Central is included in the project's `settings.gradle.kts` file.
```
dependencyResolutionManagement {
repositories {
...
google()
mavenCentral()
maven(url = "https://repo.nbase.io/repository/nbase-releases")
}
}
```
2. Add the SDK dependencies to the build.gradle.kts file in (Module : app) of the project.
```
dependencies {
...
implementation("io.nbase:nbase-adapter-billing-onestore:3.0.5")
}
```
3. Add the following queries to the AndroidManifest.xml file.
```
...
...
```
### Set Gradle for Java
1. Add Maven Central and NBase repositories to the `build.gradle` file of the project (Module: project).
```
allprojects {
repositories {
...
google()
mavenCentral()
maven { url "https://repo.nbase.io/repository/nbase-releases" }
}
}
```
2. Add the SDK dependencies to the build.gradle file in (Module : app) of the project.
```
dependencies {
...
implementation("io.nbase:nbase-adapter-billing-onestore:3.0.5")
}
```
3. Add the following queries to the AndroidManifest.xml file.
```
...
...
```
### Set Gradle for Unity
For NBase SDK Unity version 3.0.18 or later, in the Unity Editor, go to **Tools** > **GamePotSDK** > **Dependency Manager**, select **OneStore Billing**, and then click **Apply Dependencies**. After applying, if the generated XML file includes the terminated `repo.onestore.co.kr` repository, remove the respective `<repository>` entry.
If you need to configure this manually, add the following definition to the `Assets/NBaseSDK/Editor/NBaseSDKDependencies.xml` file.
```
```xml
https://repo.nbase.io/repository/nbase-releases
```
```
Run **Assets > External Dependency Manager > Android Resolver > Force Resolve** once.
Add the following `queries` to the project's `AndroidManifest.xml` file. `xml <manifest> <queries> <intent> <action android:name="com.onestore.ipc.iap.IapService.ACTION"/> </intent> <intent> <action android:name="android.intent.action.VIEW"/> <data android:scheme="onestore"/> </intent> </queries> ... <application> ... </application> </manifest>`
Note
Due to a transitive dependency in the adapter, the ONE Store IAP SDK 21.02.01 is included. The ONE Store IAP SDK has been migrated to Maven Central; do not add the deprecated `https://repo.onestore.co.kr/repository/onestore-sdk-public` repository.
## Troubleshooting
Q. When trying to make a payment on ONE Store, I get an error that reads "responseCode: 3, message: An error occurred during the purchase process." A. Check if your ONE Store login account is added as a payment tester.