---
title: "Deployment and deployment management"
slug: "sourcedeploy-use-deploy"
tags: ["SourceDeploy", "Sub Account"]
updated: 2026-09-17T09:17:45Z
published: 2026-09-17T09:17:45Z
canonical: "guide.ncloud-docs.com/sourcedeploy-use-deploy"
stale: true
---
> ## Documentation Index
> Fetch the complete documentation index at: https://guide.ncloud-docs.com/llms.txt
> Use this file to discover all available pages before exploring further.
# Deployment and deployment management
Available in Classic and VPC
Deployment and deployment management describes how to deploy deployment scenarios created to deployment targets. Depending on the permission, a deployment can be done directly or by requesting deployment approval and subsequent approval.
## Run deployment
Note
To run the deployment, a customer account or a sub account with the doDeploy permission is required. For more information on permission setting instructions, see the [Sub Account user guide](/docs/en/subaccount-overview).
Caution
If the deployment target is Ncloud Kubernetes Service and the deployment strategy is Rolling or blue/green, then a deployment can't be canceled midway. Deploy only when it is necessary.
To run a deployment, follow these steps:
1. From the NAVER Cloud Platform console, navigate to **Menu** > **All Services** > **Developer Tools** > **SourceDeploy**.
2. Select a deployment project that contains the scenario to deploy, and then click the **[Go to deployment]** button or click the deployment project name.
3. Click the scenario to deploy.
4. Check the deployment scenario's information and settings.
Note
- The different scenario settings that can be viewed and changed depend on the deployment target.
- Changes made to the settings on the page are not saved, and they are applied to this deployment only.
- Click the **[OK]** button to check the details for the deployment target.
- Click the **deployment file**'s **[Change settings]** button to change the settings for the deployment file.
- Click the **deployment commands**'s **[Change settings]** button to change deployment commands.
- Click the **deployment path**'s **[Change settings]** button to change the deployment path.
- Click the **[Show file]** button to check the manifest file.
- Enable or disable the rollback on failed deployment.
5. Check the SourceBand issue connection information for this deployment run.
Note
- To connect a SourceBand issue, you must apply for the SourceBand product.
- The SourceBand issue connection information is not saved and only applies to this deploy run.
- To connect this deployment run to a SourceBand issue, select **Connection**.
- To select a SourceBand issue to connect, click the **[Select issue]** button.
- In the SourceBand issue connection popup window, search for and add the issue to connect.
6. Click the **[Start deployment]** button.
- The deployment will start, and you'll be directed to the deployment result page.
- To cancel the deployment, click the **[Cancel]** button.
Note
When deploying objects to the Ncloud Kubernetes Service cluster
- When updating objects, the update can only be done to the same namespace.
- SourceDeploy performs deployment according to the mechanism of the deployment strategy, regardless of the kind of manifest files.
- Pod, Deployment, ReplicaSet, ReplicationController, DaemonSet, and StatefulSet perform verification if deployment is conducted normally.
- If 1 of the manifest files fails among multiple manifests, then all objects are rolled back.
- For objects like Replica Set and Replication Controller, the images are not updated according to Kubernetes spec, even if they're updated. Make sure to check the following Kubernetes recommendations when you deploy.
- [Replica Set](https://kubernetes.io/docs/concepts/workloads/controllers/replicaset/)
- [Replication Controller](https://kubernetes.io/ko/docs/concepts/workloads/controllers/replicationcontroller/)
## Request deployment approval
Note
To request a deployment approval, a sub account that doesn't have the doDeploy permission, but has the requestDeploy permission, is required. For more information on permission setting instructions, see the [Sub Account user guide](/docs/en/subaccount-overview).
Caution
Deployment approval requests can't be canceled. Request approval only when a deployment is necessary.
To request deployment approval, follow these steps:
1. From the NAVER Cloud Platform console, navigate to **Menu** > **All Services** > **Developer Tools** > **SourceDeploy**.
2. Select a deployment project that contains the scenario to deploy, and then click the **[Go to deployment]** button or click the deployment project name.
3. Click the scenario to deploy.
4. Check the information and settings for the deployment scenario, and then click the **[Request deployment approval]** button.
Note
- The different scenario settings that can be viewed and changed depend on the deployment target.
- Changes made to the settings on the page are not saved, and they are applied to this deployment only.
- Click the **[OK]** button to check the details for the deployment target.
- Click the **deployment file**'s **[Change settings]** button to change the settings for the deployment file.
- Click the **deployment commands**'s **[Change settings]** button to change deployment commands.
- Click the **deployment path**'s **[Change settings]** button to change the deployment path.
- Click the **[Show file]** button to check the manifest file.
- Enable or disable the rollback on failed deployment.
5. Click the **[OK]** button in the deployment approval request popup window.
- A deployment approval will be requested to the user with the deployment approval permission (approveDeploy).
Caution
An email or SMS notification feature for deployment approval requests is not provided.
## Approve/Reject deployment
Note
To approve or reject a deployment approval request, a customer account or a sub account with the approveDeploy permission is required. For more information on permission setting instructions, see the [Sub Account user guide](/docs/en/subaccount-overview).
To approve or reject a deployment approval request, follow these steps:
1. From the NAVER Cloud Platform console, navigate to **Menu** > **All Services** > **Developer Tools** > **SourceDeploy**.
2. Select a deployment project that contains the scenario to approve or reject a deployment, and then click the **[Go to deployment]** button or click the deployment project name.
3. Click the **[Result]** tab.
4. Click the **[Approve]** button of the scenario whose status is **Deployment approval pending**.
5. Click the **[Approve]** or **[Reject]** button in the deployment approval popup window, according to whether you approve the scenario's deployment.
- The deployment will start.
- To cancel the deployment, click the **[Cancel]** button.
## Check deployment result
To check the deployment result, follow these steps:
1. From the NAVER Cloud Platform console, navigate to **Menu** > **All Services** > **Developer Tools** > **SourceDeploy**.
2. Select a deployment project to check the result, and then click the **[Go to deployment]** button or click the deployment project name.
3. Click the **[Result]** tab.
4. Click the details for which you want to view the result.
Caution
**Deployment log** is saved under the `/var/sourcedeploy/log` path. If you delete this path, then the deployment log can't be viewed.
- You can view the **deployment summary** and **deployment log** information.
- The logs are stored for up to 30 days.
### Deployment result page
The deployment result page is laid out as follows.
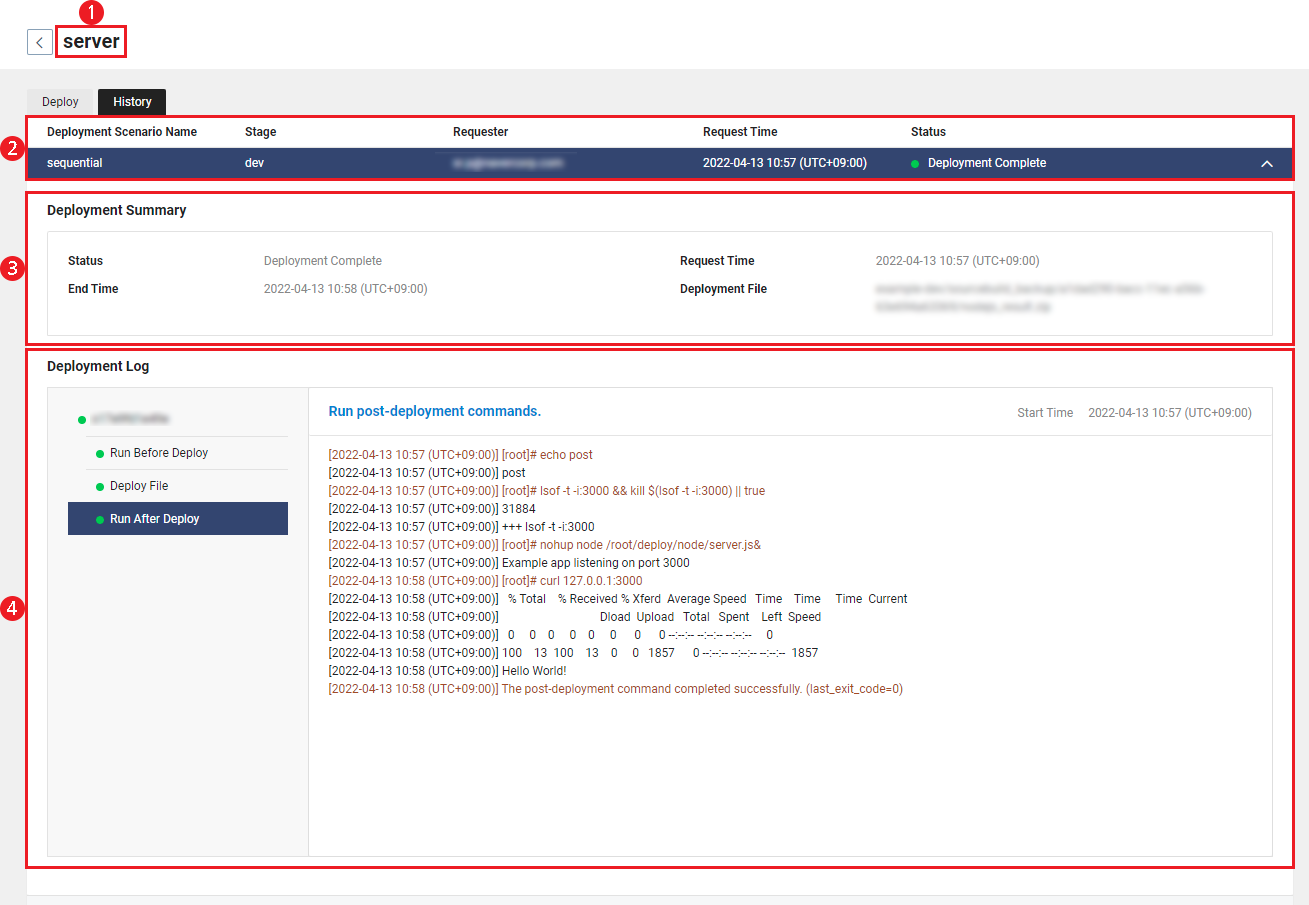
| Area | Description |
| --- | --- |
| ① Project name | Displays the deployment project's name. |
| ② Information of result list | The information displayed in the result list (deployment scenario name, deployment stage, deployment requested by, deployment request time, deployment status) - A button is displayed according to the deployment status. - The **[Cancel]** button is shown if the status is **Deployment in progress**. You can click this button to cancel the deployment. - The **[Approve]** button is shown if the status is **Deployment approval pending**. You can click the button to approve the deployment. (You can only approve the deployment if you have permission to approve deployment.) |
| ③ **Deployment summary** | The deployment summary information (deployment status, deployment request time, deployment end time, deployment file, canary analysis report, backup file) is displayed according to the deployment target. - Deployment status - **Deployment approval pending**: status in which a deployment approval is requested by a user without the deployment permission - **Deployment approval rejected**: status in which the deployment approval request is rejected - **Deploying**: status in which it is being deployed - **Deployment canceled**: status in which the deployment is canceled halfway - **Deployment complete**: status in which the deployment is complete - **Deployment failed**: status in which the deployment failed |
| ④ **Deployment log** | Displays the logs collected in each deployment stage. |
Note
- If the deployment is canceled, then the current stage proceeds until it is finished. Then the remaining stages that have yet to run are canceled.
- Auto Scaling Groups or servers created with blue/green deployment are not returned automatically in case of cancellation or deployment failure. If you no longer need the Auto Scaling Group or server, then return or delete it directly in the corresponding service.
- If you cancel a manual canary deployment, then the canary version will not be deployed, and the baseline and canary version applications will be closed.
### View deployment stages in detail
The following shows the deployment stages for each deployment target:
| Deployment target | Deployment stage | Description |
| --- | --- | --- |
| Server or Auto Scaling (default) | Server name | Check deployment agent status. |
| **Run before deployment** | Run commands before deployment. |
| **Deploy files** | Deploy files to the set path. |
| **Run after deployment** | Run commands after deployment. |
| Auto Scaling (blue/green) | **Prepare to deploy** | Perform preparations for blue/green deployment. Create a new Auto Scaling Group.Wait for the creation of servers in the new Auto Scaling Group. |
| **Deploy to a new group** | Check deployment agent status for servers in a new Auto Scaling Group. |
| **Verify a new group** | Verify a new Auto Scaling Group.Connect the servers created in the new Auto Scaling Group to the load balancerVerify that the load balancer health check is normal (all health checks must be successful to proceed to the next step; if any health check fails within the timeout (1 hour), the deployment ends in failure). |
| **Finalize deployment** | Finalize blue/green deployment.Process the server in the existing Auto Scaling Group according to the values set for the server in the existing group.Copy events if there are Cloud Insight events connected to an existing Auto Scaling Group. |
| Ncloud Kubernetes Service | **Prepare to deploy** | Prepare to deploy.Load kubectl.Access the cluster.Download the manifest file.Load the manifest file. |
| **Deploy** | Proceed with deployment. |
| Object Storage | **Prepare to deploy** | Prepare to deploy.Download backup files.Zip backup files.Upload backup files. |
| **Deploy** | Proceed with deployment.Download the deployment file.Unzip the deployment file.Upload the deployment file. |
Note
- SourceDeploy provides a deployment command feature. You can add a validation procedure in the deployment process.
- When you run the validation command in the deployment command and it fails, returning an exit code, such as exit 1, will mark the deployment as failed.
- To understand the cause of failure, check the error log that is output from the validation process.
### Check canary analysis report
You can view canary analysis reports if your deployment strategy is **Canary** and the analysis method is **automatic**.
Click **Report** under **Canary analysis report** on the Deployment result page. The canary analysis page will appear.
The canary analysis page is laid out as follows.

| Area | Description |
| --- | --- |
| ① Analysis stage | - Analysis stages are determined with the analysis time and cycle set in [Canary automatic analysis settings](/docs/en/sourcedeploy-use-scenario#Canary%EC%9E%90%EB%8F%99%EB%B6%84%EC%84%9D%EC%84%A4%EC%A0%95). - Analysis data are accumulated for analysis. : if the analysis time is 10 minutes and the analysis cycle is 3 minutes, then a total of 4 analysis stage scores will be calculated, every 3 minutes for 10 minutes. The last analysis stage will run for 1 minute. |
| ② Analysis score | Analysis stage score is displayed. - The analysis is only successful if the score meets the analysis success score or higher. If the analysis is a fail, then the next analysis will not r |
| ③ Analysis information | Displays analysis time, analysis success score (**Pass**), and metric collection cycle (**Step**). |
| ④ Metrics information | Metric and weight set in [Canary automatic analysis settings](/docs/en/sourcedeploy-use-scenario#Canary%EC%9E%90%EB%8F%99%EB%B6%84%EC%84%9D%EC%84%A4%EC%A0%95) are displayed. - Click the metric to view the canary analysis result. |
| ⑤ Analysis result list | Canary analysis result displayed - **Type**: **Baseline** (Baseline version queries’ result) and **Canary** (Canary version queries’ result) - **Start time**/**End time**: analysis start time/complete time - **Count**: number of actual data during the analysis time - **Avg**: data average value - **Max**: data maximum value - **Min**: data minimum value |
| ⑥ **Element result** | Element value of the data from the query result is displayed. - The analysis is run normally only if the baseline and canary query result elements are the same. - Click to view the element. |
| ⑦ **Deviation** | Displays increase/decrease rate for values of canary compared to those of baseline. |
| ⑧ **Result** | Displays the result calculated with a deviation of Baseline-based canary. - Determines the result (success/failure) in accordance with the success criteria set when [Creating metric](/docs/en/sourcedeploy-use-scenario#Metric%EC%83%9D%EC%84%B1). - When the result of the baseline version equals the result of the canary version, it is a success (an error range of 5%). : it's deemed successful if -5 ≤ deviation ≤ +5. |
Note
- You can view canary analysis reports only within the retention cycle set in Prometheus.
- How to calculate analysis stage scores
- Metric score: (successful query results/all query results)*(metric weights)
:
- Metric Name: success_rate1
Successful query results: 2 (#1, #3)
Total query results: 3 (#1, #2, #3)
Weight: 30
Metric score: (2/3)*30=20
- Metric Name: success_rate2
Successful query results: 1 (#1)
Total query results: 1 (#1)
Weight: 70
Metric score: (1/1)*70=70
- Analysis stage score: 20+70=90