Available in VPC
In DB Server, you can create or delete MySQL Servers and view the list of MySQL Servers in operation. In addition, you can change the specifications of the MySQL Server in operation or manage admin (user) accounts.
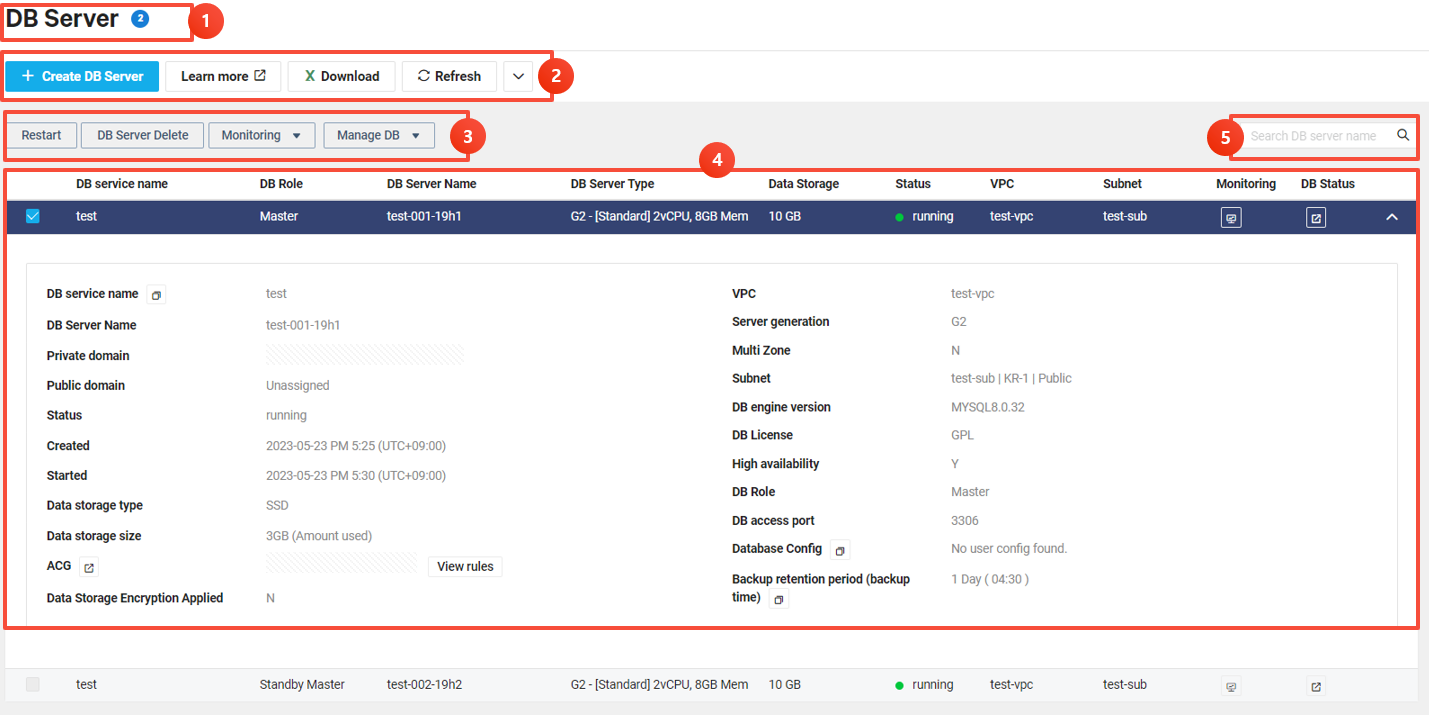
DB server interface
The basics of using MySQL Server are as follows:
| Component | Description |
|---|---|
| ① Menu name | Shows the current menu name and number of MySQL Servers in operation. |
| ② Basic features | Create MySQL Servers, view details of Cloud DB for MySQL, download the DB Server list, and reload the DB Server interface. |
| ③ Post-creation features | Restart, delete, monitor, and manage MySQL Servers in operation. |
| ④ MySQL Server list | View the list and information on MySQL Servers in operation. |
| ⑤ Search | Search for the desired server by server name from the MySQL Server list. |
View MySQL Server list
From the list of MySQL Servers that have been created and are currently operating, you can view the information on each server. To view the MySQL Server list:
You can view the list only when there are 1 or more servers in operation. If you do not have any servers created and operating, no list appears on the DB Server interface.
- In the VPC environment of the NAVER Cloud Platform console, navigate to Menu > Services > Database > Cloud DB for MySQL.
- Click the DB Server menu.
- When the list of MySQL Servers you created appears, view the summary information or click MySQL Server to view the details.

- DB Service name: Service name of MySQL, a group that classifies MySQL Server by role. This generally refers to a server group that consists of one Master Server, one Standby Master Server, or multiple Slave Servers. MySQL Servers with the same data are referred to as the same Service.
 : Click to change the service name.
- DB Role: MySQL Servers' role
- Master: Master Server when the Support high availability is selected.
- Standby Master: Standby Server when the Support high availability is selected. If Master Server fails, then it automatically performs the role of Master.
- Stand Alone: Unit Server when the Support high availability is not selected.
- Recovery: The read-only server restored using a backup. It can be changed to a new serviceable DB server upon creating a new DB service
- DB Server name: MySQL Server's name
- DB Server Type: Type of the MySQL Server and its available memory.
- Data storage: Size of the data storage in use (available capacity).
- Status: MySQL Server's status.
- Creating: Status in which the MySQL Server is being created with the information you entered.
- Configuring: Status in which the MySQL Server is being configured after being creating with the information entered by the user.
- Running: Status in which the creation and configuration of the MySQL Server has been completed with the information entered by user, and access to the MySQL from the application servers is available.
- Deleting: Status in which the created MySQL Server is being deleted with the information you entered.
- Stopping: Status in which the MySQL Server with the information you entered is being stopped.
- Restarting: Status in which the created MySQL Server is restarting with the information you entered.
- Restoring (standby master): Standby Master Server is being replaced due to a failure, but the Master Server is operating normally.
- Unknown: State in which MySQL Server is undergoing a problem and needs inspection.
- The master/ Slave Server is in unknown state: State in which MySQL Server is undergoing a problem and needs inspection.
If you need to operate the MySQL Server after inspection, use the restart feature. - The Standby Master server is in unknown state: State in which replication has stopped or been delayed for over one hour.
You need to either rebuild the Standby Master Server or resolve the replication delay.
- The master/ Slave Server is in unknown state: State in which MySQL Server is undergoing a problem and needs inspection.
- Subnet: Name of the subnet being used by the MySQL Server.
- Monitoring: Go to the Monitoring interface.
- DB Status: Go to MySQL Server's View details interface.
- Private domain: Private domain information.
- Public domain: Information of the public domain that allows external access.
- This is displayed only when Public domain is enabled through Public domain management features in the Manage DB menu.
- Creation date: Date when the MySQL Server was created and the initial point when the server status entered the creating status.
- Running date: Date when the MySQL Server operation started and the initial point when the DB server status entered the "running" status.
- Data storage type: Type of data storage in use.
- Data storage capacity: Usage of the data storage in use.
- DB access port: Name of the port used by the MySQL Server.
- ACG: ACG name and ID used in the MySQL Server.
 : Click to move to Server > ACG.
- [View rules]: Click to view the detailed rules applied.
- DB Service name: Service name of MySQL, a group that classifies MySQL Server by role. This generally refers to a server group that consists of one Master Server, one Standby Master Server, or multiple Slave Servers. MySQL Servers with the same data are referred to as the same Service.
- Data storage encryption is applied: Whether encryption is enabled for saving to the data storage (Y or N).
- Return protection: Return protection setting displayed as enabled or disabled.
- Backup storage period (backup time): The configured backup file storage period and backup cycle, if the backup feature is enabled.
: Click to enable or disable the backup feature or set the file retention period and backup cycle. - VPC: Name of the VPC being used by the MySQL Server.
- Server generation: Information of the server generation where the MySQL Server is installed.
- Multi Zone: Whether multizone is enabled (Y or N).
- Private IP: Private IP information applied to the MySQL Server.
- DB engine version: Version information of the MySQL installed on the Server.
- DB License: License information of the MySQL installed on the server.
- High availability: Whether to use the high availability feature with Y or N.
- DB access port: Name of the port used by the MySQL Server.
- Database Config: Config applied to the MySQL Server.
*: Click to go to the Database Config interface.
- Master Server is the server that is important for performing database-related operations.
- While MySQL Server is being operated normally, does not perform any roles and replicates the Master Server's data as it is.
- If Master Server fails and can no longer be operated normally, then it automatically performs a failover where Standby Master Server takes over the role of the Master Server.
- If you clear the backup, all existing backup files are deleted.
- Starting from October 17, 2024, the Rocky 8.10 operating system does not provide data storage encryption features, and as a result, Cloud DB for MySQL will no longer offer this feature. Clusters created before October 17, 2024, can continue to be used unless they are returned.
Create MySQL Server
To create a MySQL Server in VPC:
- In the VPC environment of the NAVER Cloud Platform console, navigate to Menu > Services > Database > Cloud DB for MySQL.
- Click the DB Server menu.
- Click [Create DB Server].
- When the service subscription interface appears, take the following steps in order:
Click [Subscribe] from NAVER Cloud Platform portal's Services > Database > Cloud DB for MySQL to directly go to the interface in step 3.
1. Server settings
To create a server to install MySQL by entering the settings:

- When the server settings interface appears, view the DBMS type to install on the server and the server generation.
- DBMS type: Type of DBMS to install on the server
- Server generation: Server generation that can be created on NAVER Cloud Platform
- View the version and license information of the MySQL version to be installed.
- DB engine version: Information of the MySQL version that can be created on NAVER Cloud Platform
- DB license: Open-source license information of MySQL that can be created on NAVER Cloud Platform.
- Set additional options for the availability of the server to be created.
- Support high availability: Click to select whether to use the Failover feature for automatic recovery in the event of a failure.
- When you select it, set redundancy with 2 MySQL Servers, a Master Server and a Standby Master Server.
- When selected, set backup file retention period and backup time (default: 1 day, automatic)
- When selected, disabling the storage of backup files is not possible.
- When selected, additional fees will be incurred.
- The Standby Master Server is not accessible by individual users.
- Proceed with DB backup on the Standby Master Server at the point of performing backup.
- Multi Zone: To secure advanced high availability, click to select whether to create a Master Server and standby Master Server separately in 2 different zones, with 1 in each zone.
- Support high availability: Click to select whether to use the Failover feature for automatic recovery in the event of a failure.
- Set items related to VPC and MySQL Server required to create the MySQL Server.
- VPC: Select the VPC to be used for the creation of the server and MySQL.
- [Refresh]: Click to refresh the list of the created VPC list.
- [Create VPC]: Click if you haven't created any VPC and need to create one.
- Subnet: Select a subnet to be used when accessing the VPC.
A public domain can only be applied for usage on the DB server created in Public Subnet.
Subnet transfer is not available after creating a DB Server.- [Refresh]: Click to refresh the list of the created Subnet list.
- [Create Subnet]: Click if you haven't created any subnet and need to create one.
- DB Server Type: Select the MySQL Server type to be created and available memory according to the server type.
- Data storage encryption is applied: Click to select the usage status of encryption when saving DB data to storage.
- Starting from October 21, 2024, new services will no longer provide data storage encryption features.
- Data storage type: Storage type for DB data storage
- The settings can't be changed after the creation of the MySQL Server.
- When you select G2 as the server generation: Select SSD or HDD.
- When you select G3 as the server generation: Automatically set to SSD
- Data storage capacity: Check storage capacity for DB data storage.
- 10 GB is allocated upon initial creation of the MySQL Server.
- The capacity is automatically added in 10 GB units and charged as data increases.
- Supports up to 6000 GB.
- VPC: Select the VPC to be used for the creation of the server and MySQL.
- View the applicable pricing plan information when using Cloud DB for MySQL.
- Pricing plan: An hourly pricing plan, which is billed based on the hours used, is applied by default, and it is changed depending on the server specifications and storage capacity.
- For more information, click Pricing information.
- Set the rest of the items required to create the MySQL Server.
- DB Server name: Enter the name of the MySQL Server to create
- Enter between 3 and 20 characters using lowercase English letters, numbers, and hyphens (-).
- It must start with an English letter and end with an English letter or a number.
- To identify servers, random text and a 3-digit number are assigned automatically after the name you entered. Example: mysql-001-xxxx.
- Duplicate names are not allowed.
- DB name: Enter the group name that classifies MySQL Servers to be created by its role. Example: mysql-service.
- Enter between 3 and 30 characters using Korean letters, English letters, numbers, and hyphens (-).
- Duplicate names are not allowed.
- Private Sub domain: Enter the sub domain to be added to the private domain.
When adding a slave or recovery, the same sub domain policy is added.- Enter between 3 and 15 characters using lowercase English letters, numbers, and hyphens (-).
- It must start with an English letter and end with an English letter or a number.
- Return protection: Click to select whether to enable return protection for the MySQL Server to be created.
- If return protection is enabled, the Master Server and stand alone server cannot be deleted.
- Set ACG: Access Control Group (ACG) is created automatically.
- The detailed settings for the ACG are available from Server > ACG in the console.
- DB Server name: Enter the name of the MySQL Server to create
- Click [Next].
2. DB settings
To set the information for the MySQL to be installed:
- When the DB settings interface appears, enter the information required to create a MySQL Server.

- USER_ID: Enter the account ID of the MySQL Server admin.
- Enter between 3 and 16 characters using English letters, numbers, and special characters such as _ and -.
- The first character must be an English letter.
- You cannot use predefined reserved words.
- HOST (IP): Enter the IP address to access the MySQL Server.
- Enter "%" to permit access from all IP addresses.
- For specific IP access only, enter the designated address. Example: 123.123.123.123.
- For specific IP range permissions, enter the range pattern. Example: 123.123.%.
- USER password: Enter the account password of the MySQL Server admin.
- Enter 8 to 20 characters using at least 1 English letter, number, and special character.
- The special characters ` & + \ " ' / or spaces can't be used.
- DB access port: Enter a number between 10,000 to 20,000 as a TCP port number to allow access to the MySQL Server that will be created
- Default: 3306
- The port number can't be changed after it is specified.
- DB Data Load: Select the data load method when creating a new DB.
- Create new: Create a DB Server without data.
- Import from Object Storage: Restore the DB from the backup file uploaded to Object Storage.
- Bucket: Select the Object Storage bucket where the restore file is located.
- Restoration file: Select a backup file to restore within the selected bucket.
- Table case sensitivity: Select the lower_case_table_names value in the backup file.
- Default DB name: Enter the default DB name.
- Enter between 1 and 30 characters using English letters, numbers, and special characters such as _ and -.
- The first character must be an English letter.
- DB Config settings: Select the config template to use for creation.
- Can be created in the Config Template menu.
- After creation, you can view and change the applied settings in View details > DB Config.
- Collect DB log: View the provision of log collection and viewer features for error logs and slow query logs.
- Cloud Log Analytics integrations.
- USER_ID: Enter the account ID of the MySQL Server admin.
- Set whether to use backup for the server.
- Backup settings: Set whether to use the backup, backup file retention period, and backup time.
- Use the backup settings for the MySQL Server: Click and select to use for backup.
- Backup file retention period: Select by clicking the period to store the backup file in a separate backup storage.
- For point-in-time recovery, the backup file is stored for the maximum of the set retention period + 24 hours.
- Only backups for tables created with the InnoDB engine are supported.
- Backup time: Select the backup time between automatic and user-defined.
- If you select this, additional fees will be incurred depending on the storage capacity used.
- Automatic: Backup is automatically started every day.
- User-defined: The backup is started every day within 15 minutes from the time specified by the user.
- Backup settings: Set whether to use the backup, backup file retention period, and backup time.
- Click [Next].
- When the Request subscription to Cloud Log Analytics appears, view the content, and click [OK].
- If you need to subscribe to Cloud Log Analytics, click [Subscribe to Cloud Log Analytics].
- For more information about Cloud Log Analytics, see Cloud Log Analytics user guide.
When restoring from a backup file in Object Storage, all of the following contents are deleted from the created DB Server:
- Storage engine tables that are not allowed in Cloud DB for MySQL.
- All DB Config and plug-ins.
- All DB ACL, events, triggers, stored procedures, and stored functions.
If the backup in Object Storage is invalid, a new DB Server is created without restoring the data.
The Object Storage backup file for recovery must meet the following requirements:
- The name of the backup file uploaded to Object Storage must not be changed, and the total length including the directory path must be 100 characters or less.
- The backup file size must be greater than 800 MiB and less than 500 GiB.
- The backup file's
innodb_data_file_pathmust beibdata1:512M:autoextend. - The backup file's
innodb_file_per_tablemust beON. - The backup file for recovery must be a single file created with Xtrabackup's xbstream.
- The backup file must not be any of the following:
- Partial backup
- Incremental backup
- Compressed backup
- Encrypted backup
- The xbstream file must contain the following files:
- xtrabackup_info
- xtrabackup_checkpoints
- xtrabackup_logfile
- The MySQL major version of the backup file must be the same as the MySQL major version selected during creation.
- The MySQL minor version of the backup file must be equal to or lower than the MySQL minor version selected during creation.
- The value of lower_case_table_names in the backup file must match the value selected during creation.
3. Final confirmation
- When the final confirmation interface appears, view the configured server information, DB information, and backup information.

- Click [Previous] to edit the settings.
- Click [Create].
- View the status of the MySQL Server that was created from the server list on the DB Server interface.
- Creating: Status in which the MySQL Server is being created with the information you entered.
- Configuring: Status in which the MySQL Server is being configured after being creating with the information entered by the user.
- Running: Status in which the creation and configuration of the MySQL Server has been completed with the information entered by user, and access to the MySQL from the application servers is available.
- To view the latest status from step 3, click [Refresh].
- It may take several minutes or longer until it enters the Running status, and is available for actual use, after going through Creating and Configuring statuses.
Restart MySQL Server
You can easily and conveniently restart MySQL Servers. You can't access servers while they're being restarted. To restart:
- In the VPC environment of the NAVER Cloud Platform console, navigate to Menu > Services > Database > Cloud DB for MySQL.
- Click the DB Server menu.
- Click the MySQL Server you want to restart, and then click [Restart].
- When the Restart DB Server popup window appears, view the name of the MySQL Server to restart, and then click [Yes].
- View the status of the MySQL Server from the MySQL Server list on the DB Server interface.
- Stopping: status in which the MySQL Server operation is being stopped
- Restarting: status in which the MySQL Server is restarting
- The process may take a few minutes as the system progresses through stopping and restarting states before reaching the running status where actual usage becomes available.
- Restarting Master Server will not cause failover to proceed. Failover will automatically proceed only if a failure occurs.
Delete MySQL Server
You can delete a MySQL Server that has been created and is in operation.
If you're using high availability, then both Master Server and Standby Master Server will be deleted. If you have Slave Servers, you must first delete all Slave Servers from the DB Service before deleting the Master Server. If you're using the backup feature, then the backup files are also deleted.
To delete MySQL Servers:
- In the VPC environment of the NAVER Cloud Platform console, navigate to Menu > Services > Database > Cloud DB for MySQL.
- Click the DB Server menu.
- Click the MySQL Server you want to delete and click [Delete DB Server].
- When the Delete DB Server popup window appears, enter the name of the MySQL Server to delete, and then click [Yes].
- View the status of the MySQL Server from the MySQL Server list on the DB Server interface.
- Deleting: status in which a MySQL Server is being deleted
- The actual deletion from the list after going through the Deleting status may take several minutes.
Monitoring MySQL Server
NAVER Cloud Platform's Cloud DB for MySQL provides a monitoring service through the dashboards on each server. This allows you to intuitively view servers in operation and data status, and efficiently manage them.
For more information on Monitoring, see Monitoring.
To go to the monitoring interface of the MySQL Server that has been created and is in operation:
- In the VPC environment of the NAVER Cloud Platform console, navigate to Menu > Services > Database > Cloud DB for MySQL.
- Click the DB Server menu.
- Click the MySQL Server you want to monitor, and then click [Monitoring].
- Click and select the dashboard you want to monitor.

Manage MySQL Server
While operating the created MySQL Server, you may need to change the options of the server or DB configured upon creation. Cloud DB for MySQL supports changes or upgrades of a certain number of specifications simply through a few clicks, even for MySQL Servers that have already been created.
By default, managing a MySQL Server is available when the server status is running.
To manage a MySQL Server that has been created and is in operation:
- In the VPC environment of the NAVER Cloud Platform console, navigate to Menu > Services > Database > Cloud DB for MySQL.
- Click the DB Server menu.
- Click the MySQL Server you want to manage, and then click [Manage DB].
- Click and select the item you want to manage.

- View DB Service details
- View DB Server details
- Add Slave
- Create new DB Service (see Backup)
- Change Multi Zone configuration (VPC)
- Change high availability settings
- Change DB specifications
- Manage DB Config
- Manage public domain
- Manage DB user
- Change DB Server Log settings
- Master DB Failover
- MySQL Engine Upgrade
- Change DB Server name
- Change return protection settings
- Manage operation system
View DB Service details
You can enable or disable Swap Memory for the MySQL Server within the selected DB Service, or initialize the DB Service.
Set Swap Memory
To set the MySQL Server belonging to the selected DB Service to use or not use Swap Memory, navigate to [Edit] on the Swap Memory settings interface, change the settings, click [Change], and then click [Save].
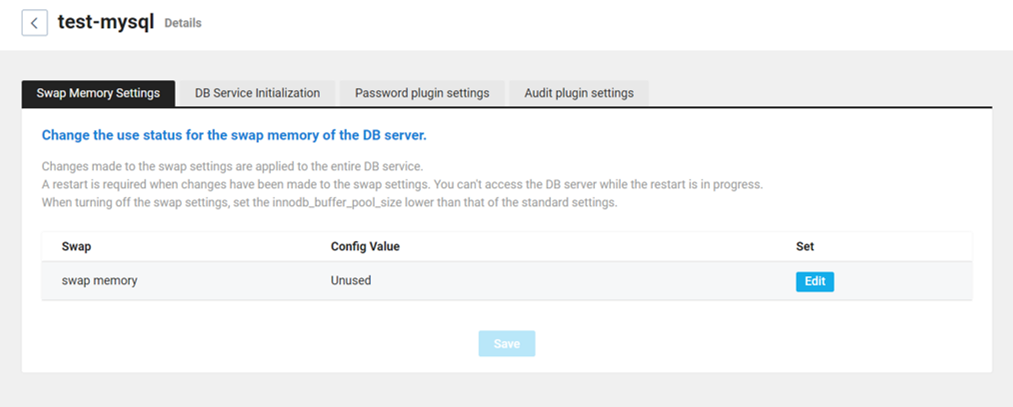
Consider the following items when you change the Swap Memory settings:
- When you change the Swap Memory settings, all MySQL Servers in that DB Service are restarted.
- 2 GB is added to the Swap Memory.
- The task for changing the Swap Memory settings is carried out sequentially 1 by 1, and it takes about 1 minute for each server.
- In the case of a high availability server, master DB failover is automatically performed to minimize impact on the service. (After the task is completed, master and standby master role are changed.)
- The settings change task is conducted in the following order: Recovery -> slave -> master.
- While the swap settings task is in progress, connection errors to the service may occur due to the access block to the DB. Thus, conducting server checks is recommended upon completion of the change task.
Reset DB Service
Initialize the DB Service required when changing the lower_case_table_names DB Config setting in MySQL 8.0.
To initialize a DB Service:
When you change the lower_case_table_names DB Config settings after the initialization, the data restoration to any preceding point in time becomes unavailable. Make sure to review carefully before initializing and changing.
In MySQL 5.7, you can change the lower_case_table_names settings in the Manage DB Config menus.
- Delete all tables, and retain 1 DB in lowercase letters.
- In the initialize DB Service interface, click [Edit], change the settings, and then click [Change].
- Click [Save].
- From the confirmation popup window, click [Yes].
- The initialization is processed. The access to the MySQL Server becomes unavailable while the initialization is being processed.
Set password plugin
- This is a plugin that sets the password complexity of the created MySQL Server DB account.
- You can improve password security by setting a DB account password policy.
- When changing the password_policy setting, the password config setting variable is automatically changed.
- Click Manage DB > View DB Service details.
- After changing the detailed setting value to [Enable] on the password plugin setting interface, specify the desired config value.
- Click [Save].
- On the popup window, view the DB Service name and click [Yes].
- If there is a config value to be edited, edit only the config value in the enabled status and click [Save].
- To delete a plugin, change the detailed setting value to [Disabled] and click [Save].
- Password plugin config variable list
| Config Name (name of the config variable) | Description |
|---|---|
| validate_password_policy | Password complexity policy settings
|
| validate_password_length | Sets the minimum password length.
|
| validate_password_check_user_name | When enabled, the name of the DB account cannot be used for the password. |
| validate_password_mixed_case_count | Set the number of uppercase and lowercase letters in a password. For example, when set to 1, 1 uppercase letter and 1 lowercase letter are required. |
| validate_password_number_count | Set numbers in a password. |
| validate_password_special_char_count | Specify the number of special characters that must be in the password. |
- For more information on config variables for the password plugin, see password plugin config variables guide.
- Changes to password plugin config values are immediately applied to existing connections.
- If you enable the password plugin, there may be limits in using Cloud DB for MySQL integrations.
Set Audit Plugin
- This plugin enables comprehensive logging of DDL and Connections occurring in the DB.
- Stores account information accessing the DB Server.
- Audit plugin exclusively supports MySQL 8.0 version and requires a DB restart following plugin configuration.
- Click Manage DB > View DB Service details.
- On the audit plugin settings interface, change the detailed setting value to Enabled and set the config value as desired.
- Click [Save].
- On the confirmation popup window, view the DB Service name and details and then click [Yes].
- If there is a config value to be edited, edit only the config value in the enabled status and click [Save].
- To delete a plugin, change the detailed setting value to Disabled and click [Save].
| Config Name (name of the config variable) | Description |
|---|---|
| audit_log_policy | Definition of an event to log to the audit log file.
|
| audit_log_rotate_on_size | Maximum size of the audit log file. |
| audit_log_rotations | The number of files to store among the rotated audit log files
|
-
Audit log management and backup method
- The audit log file provided by Cloud DB for MySQL is rotated by the "audit_log_rotate_on_size" and "audit_log_rotations" config values when setting the "audit_log" plugin.
- You can backup and manage the audit log file by referring to the postfix value and the last edited date of the audit log file.
- The last edited date is based on the date the existing audit log file was rotated and the log was created.
| Field name | Description |
|---|---|
| NAME | Audit event's name |
| RECORD | Audit event's unique ID |
| TIMESTAMP | Time when the audit event occurred
|
| CONNECTION_ID | Client connection ID |
| STATUS | Status result value of the commands you ran |
| USER | User value sent by Clients |
| PRIV_USER | User value used by the server to authenticate the client
|
| OS_LOGIN | External user name used in the authentication process
|
| PROXY_USER | Proxy user value |
| DB | Default DB specified when accessing |
| COMMAND_CLASS | Type of action performed |
| SQL_TEXT | SQL statement actually performed |
- Collected logs are saved as files in the same way as DB Server logs, and can be viewed on the monitoring interface.
- When installing or deleting a plugin, or changing the plugin config settings, DB Service is automatically restarted and applied.
- When configuring high availability, about 1 MB of the Health check log is created per hour to maintain high availability. (Health check DB account name: ha_admin)
Logs incur additional expenses for capacity by using DB Server data storage and the Cloud Log Analytics service.
Set DB Server
You can change system-level settings applied to the DB Server in DB Server Settings. These settings are applied to a DB Server process separate from DB Config (MySQL parameters).
- Malloc-lib: You can change the memory allocation library provided by default (GLIBC) in the MySQL engine to TCMalloc or jemalloc. Changing the memory allocation library can affect memory management methods, and the effects may vary depending on the workload characteristics.
- Semi-sync: You can set semi-synchronous replication ON/OFF. When semi-sync is enabled, the commit is completed after the Replica DB server receives an ACK acknowledging receipt of the relay log. This setting is only supported in MySQL versions 8.4 and higher.
- If all Replicas are offline or an ACK timeout occurs, the setting is automatically changed to asynchronous.
- If there is no Replica response, the Source waits until it receives an ACK. It will wait until the rpl_semi_sync_source_timeout value is exceeded, during which time write requests may be delayed.
- Semi-sync detailed parameters (timeout, etc.) can be changed in DB Config Management.
To change the DB Server system settings that are included in the selected DB service, navigate to [Edit] to change settings, then click [Change], and [Yes] on the popup window.
.png?sv=2026-02-06&spr=https&st=2026-07-18T14%3A02%3A32Z&se=2026-07-18T15%3A19%3A32Z&sr=c&sp=r&sig=TgYnwhPnToZzV11Ni%2FNjO%2Fe8CimjVIX%2FRPdlLVYC3Bk%3D)
Consider the following items when you change the DB Server system settings:
- DB Server setting is only supported in MySQL version 8.0.
- Server setting changes are performed on the entire server, 1 by 1, in order.
- For a high availability server, the master DB failover process proceeds automatically to minimize the service effect. (After completing the task, master and standby master role change.)
Malloc-lib
- A DB Server restart is required.
Semi-sync
- Supported only in MySQL version 8.4 or higher.
- Applied without restarting the DB process.
- Data synchronization is paused while settings are being changed, and automatically resumes once the changes are complete.
- If there are ongoing transactions, the settings will be changed once these have been completed. (There may be a long wait time.)
- Write latency may increase when enabled.
Auto failover settings:
Set the automatic failover detection method and detection time for the Master DB.
The method for determining whether the Master and Standby Master DBs are down is as follows:
| Setting value | Description |
|---|---|
| Server check | Determined by the server's network response. Since it only checks the response from the server itself, it does not detect abnormalities in the MySQL process. |
| DB process check | Determined by whether the MySQL process responds. If the MySQL process is not functioning properly, failover is executed. |
| DB query check | Determined by whether the SELECT query responds. Since it is based on whether the actual query can be executed, it is the strictest health check method. |
When DB query check is enabled, failover may be executed in the following situations in addition to actual DB failures:
- If the Access Control List (ACL) for DB access is deleted
- If the permissions of the internal account used for health checks are changed or deleted
- When new query connections are not possible due to excessive load increase or reaching
max_connections
When failover is executed, the Standby Master switches to become the Master. A temporary service interruption may occur during this process.
How to change auto failover settings
- Navigate to the Cloud DB for MySQL > DB Server interface.
- Click DB management > View DB service details for the DB Server whose settings you want to change.
- Click the Auto failover settings tab.
- Click Edit for the item you want to change.
- Select the desired value from the dropdown list and click Change.
- Failover detection time: The waiting time until failover is executed when no response persists. A shorter detection time allows for faster failover execution, but may result in unnecessary failover due to temporary network delays.
- Auto failover settings only apply to DB servers running in a High Availability (HA) configuration.
View MySQL Server details
You can view the details related to the server to check if the selected MySQL Server is operating properly. The details are as follows:
| View details tab | Description | Item |
|---|---|---|
| Process list | View the sessions currently accessed to the selected MySQL Server. |
|
| Replication (Standby Master, Slave Server) |
View the items and values of variables applied to the replication of the selected MySQL Server. | See View replication status |
| Variables | View the items and values of the variables applied to the selected MySQL Server |
|
| Status | View the items and values of the status variables of the selected MySQL Server |
|
| Manage Database | Add DB to selected MySQL Server or delete them. | For more information, see Manage Database. |
| Manage DB Config | Change settings for selected MySQL Server. | For more information, see Manage DB Config. |
| Manage DB user | Add or delete users to selected MySQL Server. | For more information, see Manage DB user. |
| Manage Backup settings | Set backup file retention period and backup time for selected MySQL Server. |
|
| DB Server Logs | View log file information for the selected MySQL Server. |
|
- When sending to Object Storage, unlocking bucket, appropriate access control, and ACL settings are required.
- For the Japan Region, disable access control settings for the Object Storage bucket.
- Exporting to Object Storage may take several minutes to be completed.
Additional fees apply when you subscribe to Object Storage. For more information about Object Storage and pricing, see Services > Storage > Object Storage on the NAVER Cloud Platform portal.
Kill Process execution through user-provided Stored Procedure
You can perform a kill process in the form of a stored procedure with a user account with the DDL permissions from the Master Server and Slave Server. You can only kill an existing process ID but cannot kill a process that is being run by system account. The user ID "agent," "radmin," "ha_admin," "repl_admin," and "system user" do not have the Kill Process permission.
Run the following command to perform kill process through the user-provided stored procedure:
mysql> call sys.ncp_kill_session (session ID);
- A procedure that allows you to use the kill connection feature with super privileges
mysql> call sys.ncp_kill_query (session ID);
- A procedure that allows you to use the kill query feature with super privileges
View Replication status
You can view the replication status of the Standby Master and Slave Servers, take action to skip query with replication errors, or reinstall the DB. Replication delays can occur if the Master Server has query that takes a long time to perform write, or if an excessive number of write tasks occur. The detailed descriptions on the replication interface are as follows:
- This is the same as the result of the
show slave status;commands used in MySQL. - In the event menu, you can set notifications for replication delays.
- In the case of the Standby Master Server, you can go to the page through the DB status icon.
If failover occurs due to a master DB failure while replication is stopped on the Standby Master Server, there is a possibility that data during the replication downtime may be lost. To prevent this, swift and proactive measures are necessary if replication downtime occurs.
Variables Name / Value
Displays the variable items and values for the replication.
[Skip Replication Error]
Skips the query where a replication error occurred. However, data inconsistency with the Master Server may occur during the skipping process, so it is recommended to proceed with the following methods to ensure that the data remains the same:
- For Standby Master Server
- Reinstall the applicable Standby Master DB.
- For Slave Server
- Add a new Slave and delete the current Slave.
- Reinstall the applicable Slave DB.
[Reinstall Standby Master]
Reinstalls the Standby Master DB. DB reinstallation takes backup data from the Master DB and configures a Standby Master DB again. You cannot control the console until reinstallation is completed. The task may take anywhere from dozens of minutes to a few hours depending on the data size.
[Reinstall Slave DB]
Reinstall the Slave DB. The access to the Slave Server is not available during the reinstallation. The access domain for the Slave Server does not change after the reinstallation.
[View running binary log]
Displays the currently running binary logs.8 If replication is operating normally, the message "There is no binary log running." is shown. If the replication is delayed or stopped, then the currently running binary log is displayed.
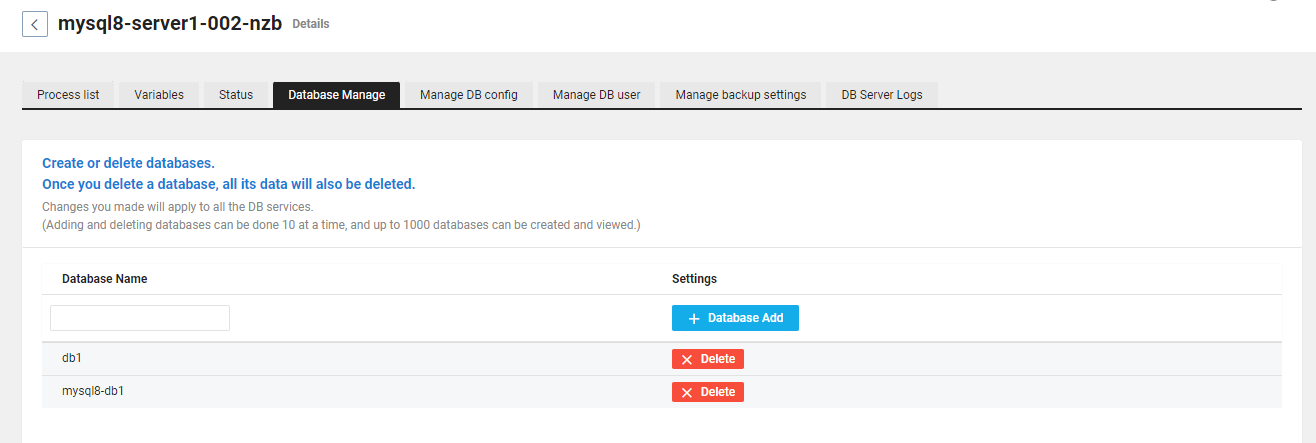
Manage Database
You can add a DB to the selected MySQL Server or delete a DB you created. Up to 1,000 DB can be added, and the addition or deletion tasks can be performed for up to 10 DB at a time.
To perform a DB addition or creation task, click [Add Database] to add a DB, or click [Delete] in the same row as the created DB to delete the DB.
Add DB using user-provided Stored Procedure
You can add DB more conveniently from the Master Server by using the DB addition feature in the form of a stored procedure with a user account with DDL permissions. Such an account has all permissions for the added DB, and it can grant permissions for the DB to other user accounts through GRANT commands. The added DB is also created automatically in the connected Slave Servers.
Run the following command to add a DB using the user-provided stored procedure:
mysql > call sys.ncp_create_db('name of DB to be created [required]','Character Set [select]','Collation [select]');
--Examples
① All character sets and collations are user-specified.
mysql> CALL sys.ncp_create_db('testdb','utf8','utf8_general_ci');
② Character set and collation are specified as mysql server default.
mysql> CALL sys.ncp_create_db('testdb','','');
③ Character set: User-specified; collation: mysql server default
mysql> CALL sys.ncp_create_db('testdb','utf8','');
Add Slave Server
You can add Slave Servers to your MySQL Servers that use the high availability settings. Up to 10 Slave Servers can be added per Master Server, and added Slave Servers could be integrated into NAVER Cloud Platform's Load Balancer to be configured for read load balancing.
- You can't add Slave Server to the Stand Alone Server.
- For more information on read load balancing, see read load balancing settings.
- For clusters using a Load Balancer, you can register the Slave Server with the existing Load Balancer when adding it.
The settings of the Master Server are identically applied to the Slave Servers.
- MySQL Server type
- Data storage type
- Data storage capacity
- DB Config settings
The same fees apply to the Slave Servers as to the Master Server, and the fees are charged based on the hours used. To add Slave Server:
- When the Add Slave DB Server popup window appears, view the Master Server and the Slave Server information.
- For Multi Zone configurations, select the subnet where you want to create the Slave Server.
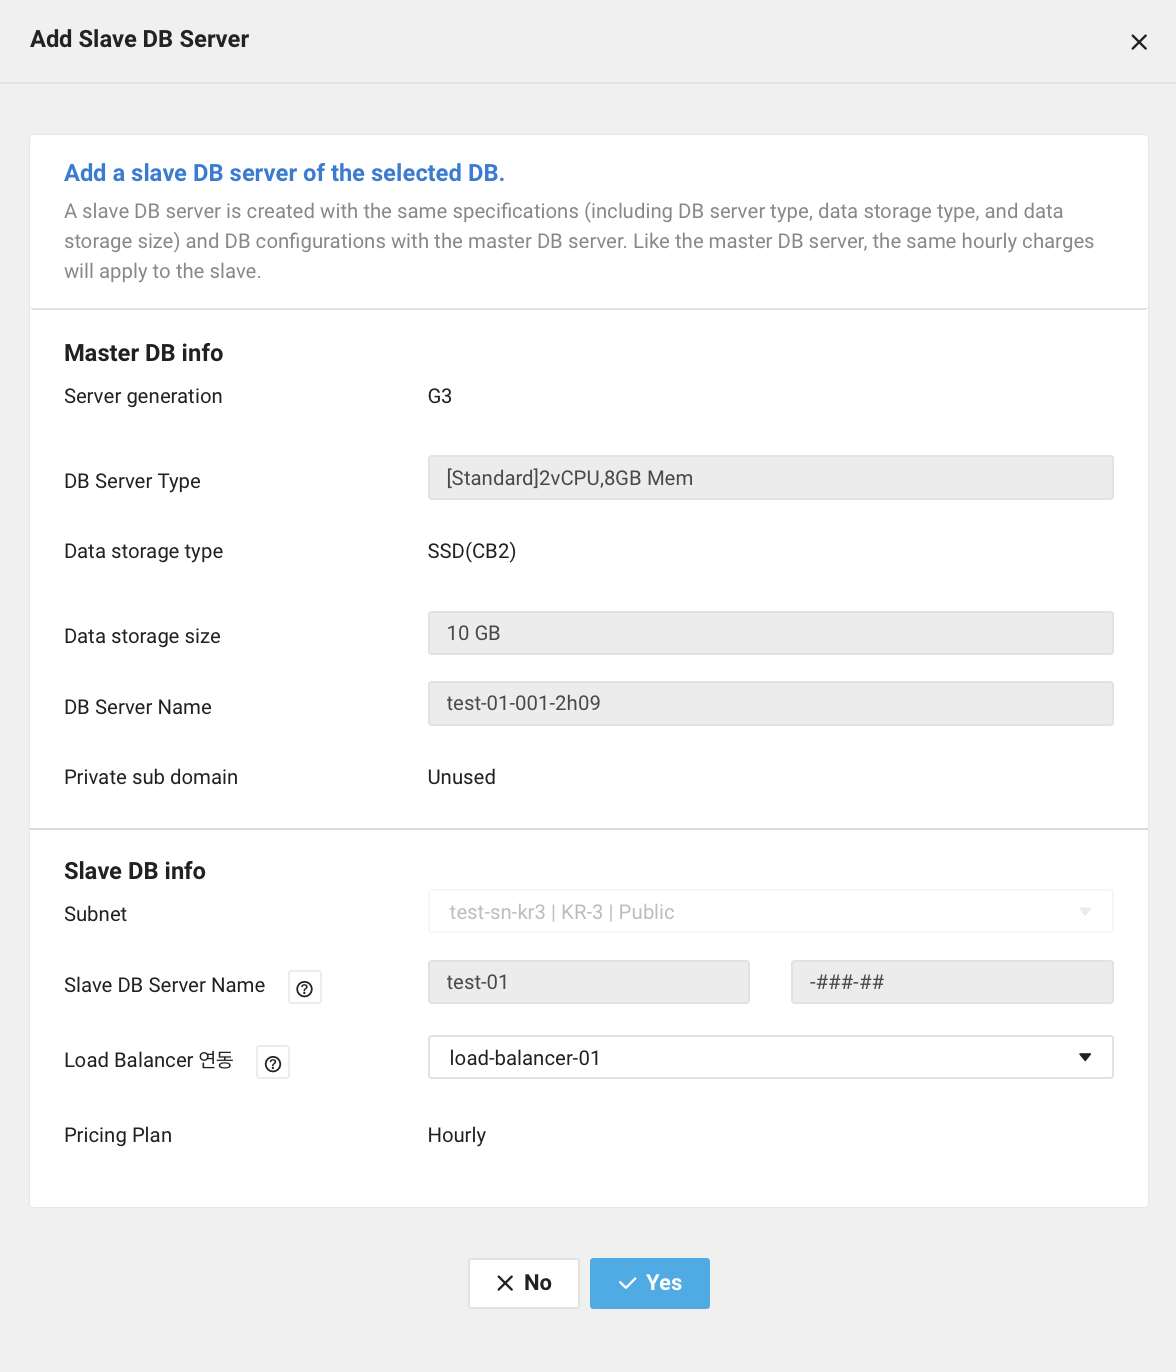
- For Multi Zone configurations, select the subnet where you want to create the Slave Server.
- Click [Yes].
- View the status of the Slave Server that was created from the MySQL Server list on the DB Server interface.
- Creating: Status in which the Slave Server is created with the information you entered.
- Configuring: Status in which the Slave Server is created and configured with the information you entered.
- Running: Status in which the creation and configuration of the Slave Server has been completed with the information entered by user, and access to the Slave Server from the application server is available
Change Multi Zone configuration
You can select a Master Server and create it in another zone. To change:
- When the Change multi zone configuration popup window appears, view or enter the information necessary for editing.
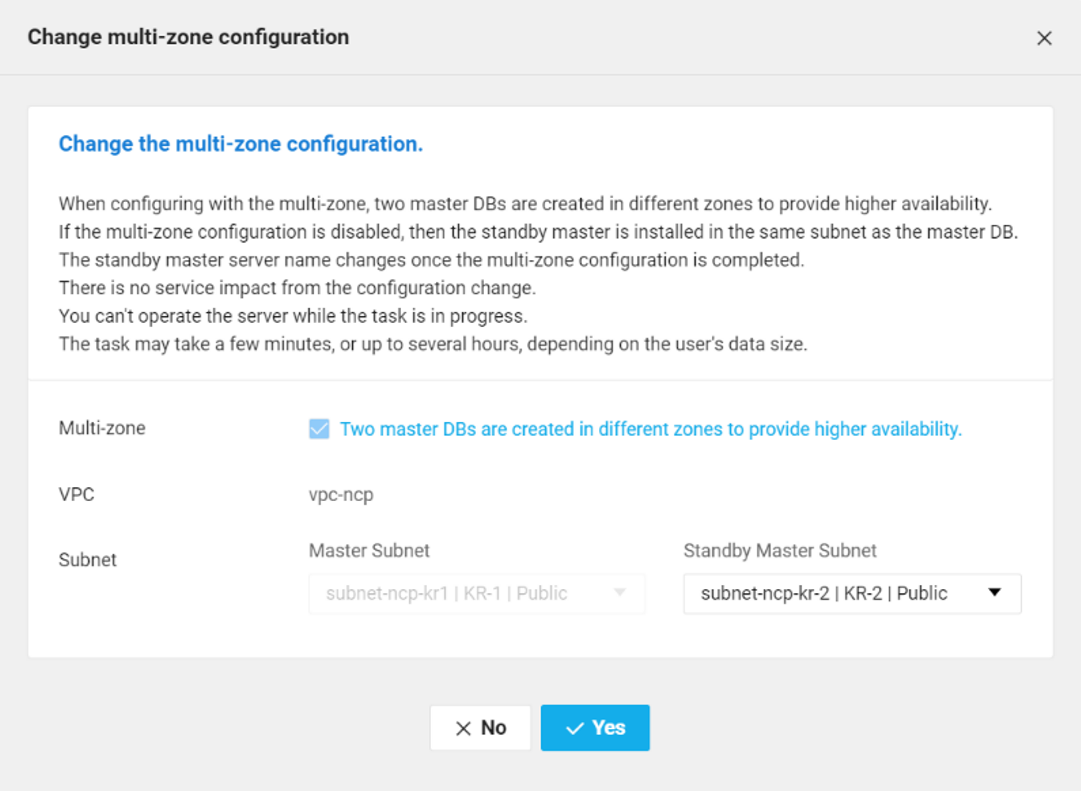
- Click [Yes].
- If multi zone is not in use, multi zone will be enabled.
- If multi zone is already in use, multi zone will be disabled.
- View the status of the MySQL Server from the MySQL Server list on the DB Server interface.
- Configuring: Status in which the MySQL Server is being configured after being creating with the information entered by the user.
- Running: Status in which the creation and configuration of the MySQL Server has been completed with the information entered by user, and access to the MySQL Server from the application server is available.
Change high availability settings
You can change the selected MySQL Server into a Stand Alone or high availability configuration. To change:
- When the Change high availability settings popup window appears, view the basic server information.
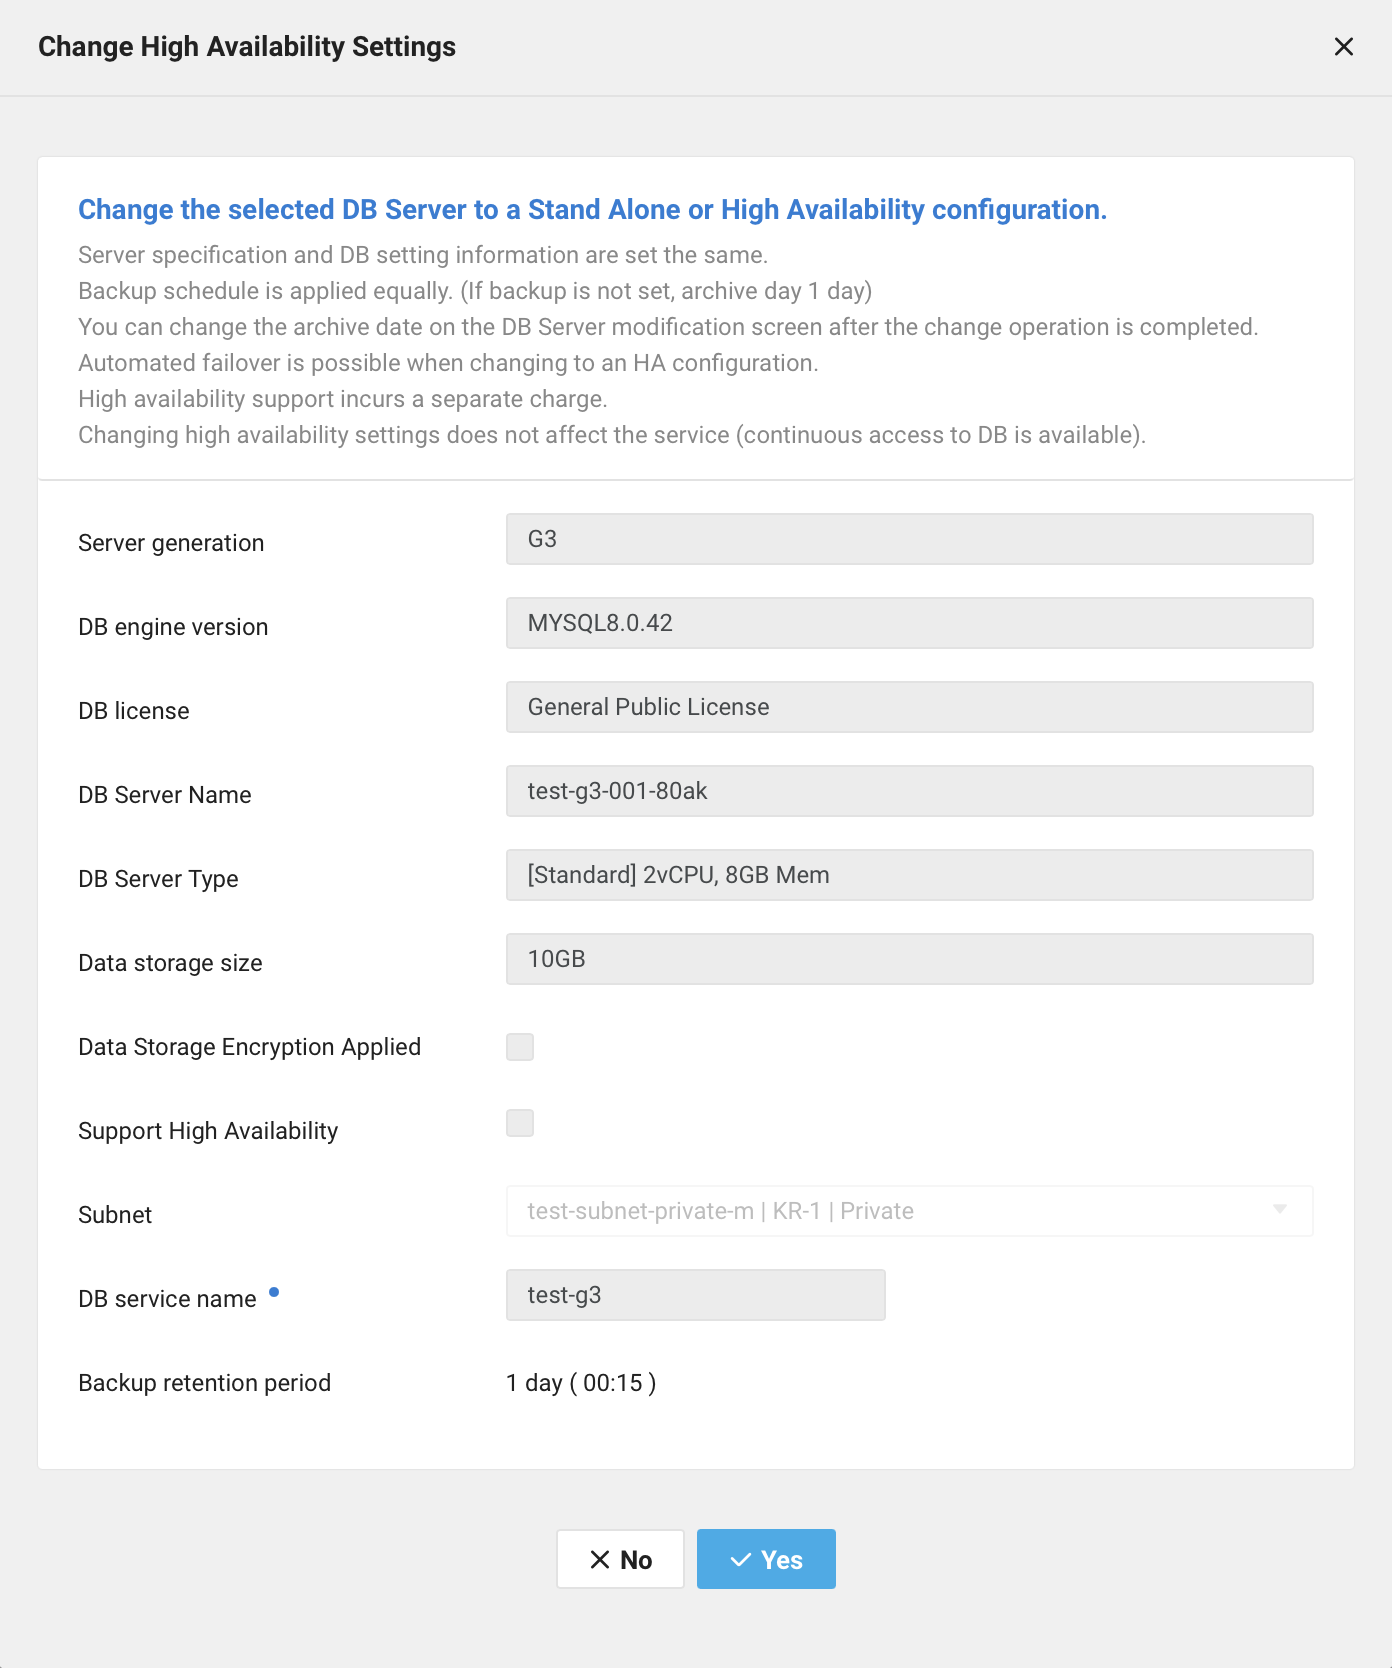
- Enable to set Stand Alone if the existing high availability setting is Y, and high availability if the existing high availability setting N.
- If changing to a high availability configuration, click and select whether to use a Multi Zone.
When selected, 1 Primary DB and 1 Secondary DB are created in different zones to provide higher availability.
- If changing to a high availability configuration, click and select whether to use a Multi Zone.
- Click [Yes].
- View the status of the MySQL Server from the MySQL Server list on the DB Server interface.
- Configuring: Status in which the MySQL Server is being configured after being creating with the information entered by the user.
- Running: Status in which the creation and configuration of the MySQL Server has been completed with the information entered by user, and access to the MySQL Server from the application server is available.
DB backup is performed on the standby master at the point of performing backup. Therefore, even if the master is changed while using the product, backup is not performed at the master.
Change MySQL Server specifications
You can change the server specifications for the MySQL Server you've created. When changing the server specifications, the specifications for the Master, Standby Master, Slave, and Recovery Servers are also changed. Additional fees are incurred for upgrading specifications.
-
The servers will restart when you upgrade server specifications. As access is unavailable during the restart, it is recommended to view the data after the restart is completed.
-
G3 servers support rolling specification changes. The process proceeds in the order of Standby Master → Master → Slave → Recovery server.
To change the specifications:
- You can change the specifications only within the same type of MySQL Servers.
- For G3 servers, the type can be changed when changing specifications.
- G3 servers support rolling specification changes by processing servers one at a time to maintain high availability.
- When the Change DB Server specifications popup window appears, view the current server specifications.
- Click and select the server specifications you want to change to.
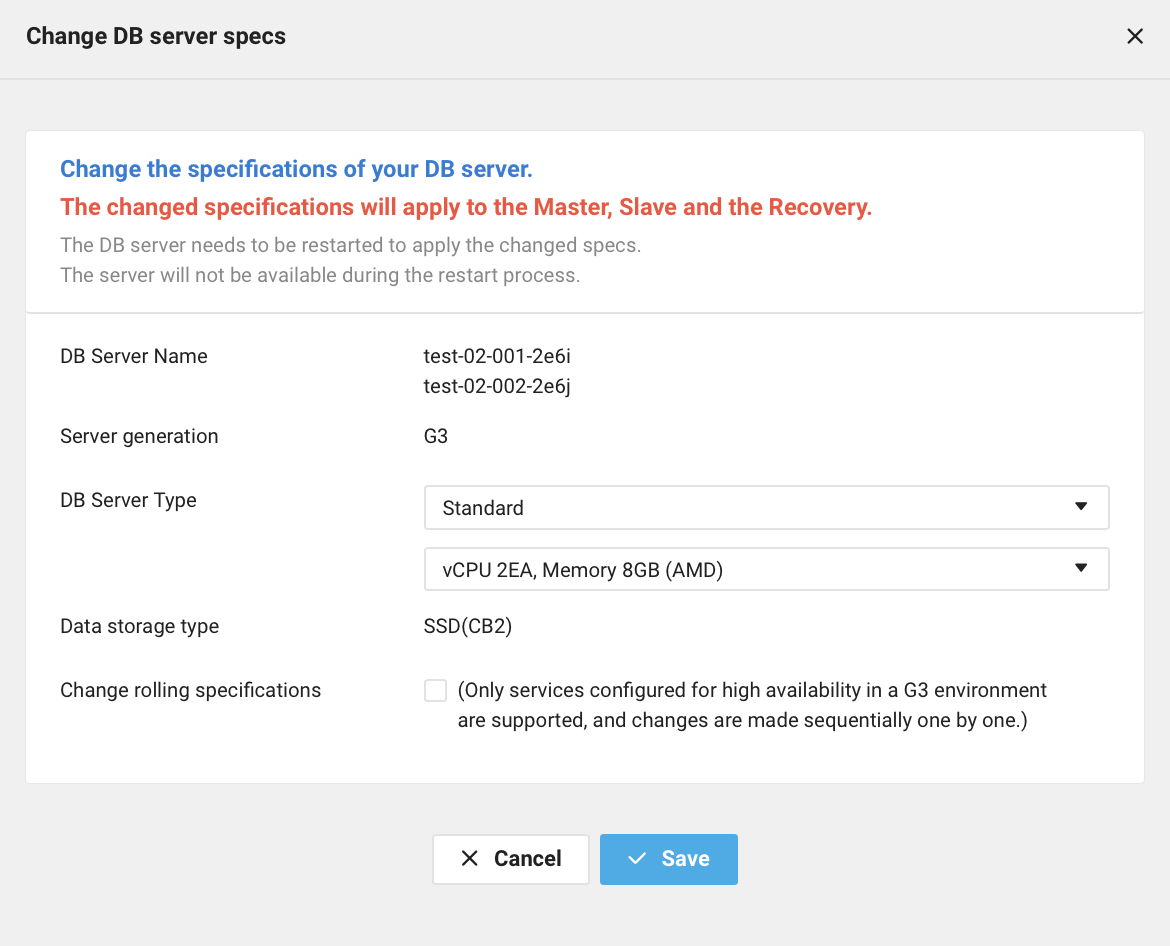
- Click [Save].
- View the status of the MySQL Server with the modified specifications from the MySQL Server list on the DB Server interface.
- Configuring: Status in which the MySQL Server is configured with the information you entered.
- Running: Status in which the configuration of the MySQL Server has been completed with the information entered by user, and access to the MySQL Server from the application server is available
Manage DB Config
You can change various settings for the created MySQL Server. The changed settings are applied to the entire DB Service, and some config variables are applied after an automatic restart of the DB Service upon the change. To change:
You can perform the same task from View DB server details > Manage DB Config.
- When the Database config popup window appears, view or enter the required information for editing.

- Config Name: Name of config variable to set.
- Config Value: Variable value.
- Click [Add].
- When editing the added config variable: Click [Edit].
- When deleting the added config variable (setting it to default): Click [Delete].
- Click [Save].
- If the config includes items that require a restart, a DB Server restart confirmation popup appears.
- Whether to proceed with failover: If you check Proceed with failover before restarting Master DB, the operation proceeds in the order of Slave → Standby Master → Failover → Existing Master.
- The DB Server cannot be accessed while the restart is in progress. (May take several minutes.)
- If the config includes items that require a restart, a DB Server restart confirmation popup appears.
- View the status of the MySQL Server with the modified config from the MySQL Server list on the DB Server interface.
- Configuring: Status in which the MySQL Server is configured with the information you entered.
- Running: Status in which the configuration of the MySQL Server has been completed with the information entered by user, and access to the MySQL Server from the application server is available
- If the set config values are not appropriate, then the MySQL Server may not operate properly. Make sure to fully understand the action of the config variable before applying the settings. If a problem occurs in the server operation due to incorrect settings, contact the customer center.
- If logs (binary, error, slow, general log) are set to be collected through manage DB Config, they are stored in the data storage component of the DB Server, and fees will occur according to the usage.
Config variable list
The following are descriptions of config variables:
For more information on setting config variables, see MySQL official documentation (English).
| Config Name | Description |
|---|---|
| autocommit | If set to 1, all changes to a table take effect immediately. If set to 0, you must use COMMIT to accept a transaction or ROLLBACK to cancel it. |
| binlog_expire_logs_seconds | Sets the binary log expiration period in seconds. |
| block_encryption_mode | This variable controls the block encryption mode for block-based algorithms such as AES. |
| bulk_insert_buffer_size | This variable limits the size of the cache tree in bytes per thread. |
| character_set_server | The servers default character set. |
| collation_connection | The collation of the connection character set. |
| collation_server | The server's default collation. |
| connect_timeout | The number of seconds that the mysqld server waits for a connect packet before responding with Bad handshake. |
| cte_max_recursion_depth | The common table expression (CTE) maximum recursion depth. |
| default-time-zone | Set the default server time zone. |
| default_authentication_plugin | The default authentication plugin. |
| default_collation_for_utf8mb4 | This variable is set by the server to the default collation for the utf8mb4 character set. |
| event_scheduler | This variable enables or disables, and starts or stops, the Event Scheduler. |
| explicit_defaults_for_timestamp | This system variable determines whether the server enables certain nonstandard behaviors for default values and NULL-value handling in TIMESTAMP columns. |
| general_log | Whether the general query log is enabled. |
| group_concat_max_len | The maximum permitted result length in bytes for the GROUP_CONCAT() function. |
| innodb_adaptive_flushing_lwm | Defines the low water mark representing percentage of redo log capacity at which adaptive flushing is enabled. |
| innodb_buffer_pool_chunk_size | innodb_buffer_pool_chunk_size defines the chunk size for InnoDB buffer pool resizing operations. |
| innodb_buffer_pool_dump_at_shutdown | Specifies whether to record the pages cached in the InnoDB buffer pool when the MySQL server is shut down, to shorten the warmup process at the next restart. |
| innodb_buffer_pool_dump_pct | Specifies the percentage of the most recently used pages for each buffer pool to read out and dump. |
| innodb_buffer_pool_instances | The number of regions that the InnoDB buffer pool is divided into. |
| innodb_buffer_pool_load_at_startup | Specifies that, on MySQL server startup, the InnoDB buffer pool is automatically warmed up by loading the same pages it held at an earlier time. |
| innodb_buffer_pool_size | The size in bytes of the buffer pool, the memory area where InnoDB caches table and index data. |
| innodb_doublewrite | The innodb_doublewrite variable controls doublewrite buffering. |
| innodb_doublewrite_pages | The number of doublewrite pages per thread for batch writes. |
| innodb_flush_log_at_timeout | Write and flush logs every N seconds. |
| innodb_flush_log_at_trx_commit | Controls the balance between strict ACID compliance for commit operations and higher performance that is possible when commit-related I/O operations are rearranged and done in batches. |
| innodb_flush_method | Defines the method used to flush data to InnoDB data files and log files. |
| innodb_ft_enable_stopword | Specifies that a set of stopwords is associated with an InnoDB FULLTEXT index at the time the index is created. |
| innodb_ft_max_token_size | Maximum character length of words that are stored in an InnoDB FULLTEXT index. |
| innodb_ft_min_token_size | Minimum length of words that are stored in an InnoDB FULLTEXT index. |
| innodb_ft_num_word_optimize | Number of words to process during each OPTIMIZE TABLE operation on an InnoDB FULLTEXT index. |
| innodb_ft_result_cache_limit | The InnoDB full-text search query result cache limit (defined in bytes) per full-text search query or per thread. |
| innodb_io_capacity | The innodb_io_capacity variable defines the number of I/O operations per second (IOPS) available to InnoDB background tasks, such as flushing pages from the buffer pool and merging data from the change buffer. |
| innodb_io_capacity_max | If flushing activity falls behind, InnoDB can flush more aggressively than the limit imposed by innodb_io_capacity, up to the limit defined by innodb_io_capacity_max. |
| innodb_lock_wait_timeout | The length of time in seconds an InnoDB transaction waits for a row lock before giving up. |
| innodb_log_buffer_size | The size in bytes of the buffer that InnoDB uses to write to the log files on disk. |
| innodb_log_file_size | The size in bytes of each log file in a log group. |
| innodb_log_files_in_group | The number of log files in the log group. |
| innodb_lru_scan_depth | A parameter that influences the algorithms and heuristics for the flush operation for the InnoDB buffer pool. |
| innodb_max_dirty_pages_pct | The innodb_max_dirty_pages_pct setting establishes a target for flushing activity. |
| innodb_max_dirty_pages_pct_lwm | The low water mark representing the percentage of dirty pages where preflushing is enabled to control the dirty page ratio. |
| innodb_max_undo_log_size | Defines a threshold size for undo tablespaces. |
| innodb_online_alter_log_max_size | Specifies an upper limit in bytes on the size of the temporary log files used during online DDL operations for InnoDB tables. |
| innodb_open_files | Specifies the maximum number of files that InnoDB can have open at one time. |
| innodb_optimize_fulltext_only | Changes the way OPTIMIZE TABLE operates on InnoDB tables. |
| innodb_page_cleaners | The number of page cleaner threads that flush dirty pages from buffer pool instances. |
| innodb_parallel_read_threads | Defines the number of threads that can be used for parallel clustered index reads. |
| innodb_print_all_deadlocks | When this option is enabled, information about all deadlocks in InnoDB user transactions is recorded in the mysqld error log. |
| innodb_print_ddl_logs | Enabling this option causes MySQL to write DDL logs to stderr. |
| innodb_purge_threads | The number of background threads devoted to the InnoDB purge operation. |
| innodb_read_io_threads | The number of I/O threads for read operations in InnoDB. |
| innodb_redo_log_capacity | Defines the amount of disk space that is occupied by redo log files. |
| innodb_sort_buffer_size | This variable defines the amount by which the temporary log file is extended when recording concurrent DML during an online DDL operation, and the size of the temporary log file read buffer and write buffer. |
| innodb_stats_auto_recalc | Causes InnoDB to automatically recalculate persistent statistics after the data in a table is changed substantially. |
| innodb_stats_include_delete_marked | When innodb_stats_include_delete_marked is enabled, ANALYZE TABLE considers delete-marked records when recalculating statistics. |
| innodb_temp_data_file_path | Defines the relative path, name, size, and attributes of global temporary tablespace data files. |
| innodb_thread_concurrency | Defines the maximum number of threads permitted inside of InnoDB. |
| innodb_write_io_threads | The number of I/O threads for write operations in InnoDB. |
| interactive_timeout | The number of seconds the server waits for activity on an interactive connection before closing it. |
| internal_tmp_mem_storage_engine | The storage engine for in-memory internal temporary tables. |
| join_buffer_size | The minimum size of the buffer that is used for plain index scans, range index scans, and joins that do not use indexes and thus perform full table scans. |
| local_infile | This variable controls server-side LOCAL capability for LOAD DATA statements. |
| lock_wait_timeout | This variable specifies the timeout in seconds for attempts to acquire metadata locks. |
| log_error_suppression_list | The log_error_suppression_list system variable applies to events intended for the error log and specifies which events to suppress when they occur with a priority of WARNING or INFORMATION. |
| log_error_verbosity | The log_error_verbosity system variable specifies the verbosity for handling events intended for the error log. |
| log_output | The destination or destinations for general query log and slow query log output. |
| log_queries_not_using_indexes | If you enable this variable with the slow query log enabled, queries that are expected to retrieve all rows are logged. |
| long_query_time | If a query takes longer than this many seconds, the server increments the Slow_queries status variable. |
| max_connections | The maximum permitted number of simultaneous client connections. |
| max_digest_length | The maximum number of bytes of memory reserved per session for computation of normalized statement digests. |
| max_heap_table_size | This variable sets the maximum size to which user-created MEMORY tables are permitted to grow. |
| max_prepared_stmt_count | This variable limits the total number of prepared statements in the server. |
| max_sp_recursion_depth | The number of times that any given stored procedure may be called recursively. |
| net_read_timeout | The number of seconds to wait for more data from a connection before aborting the read. |
| net_write_timeout | The number of seconds to wait for a block to be written to a connection before aborting the write. |
| ngram_token_size | Defines the n-gram token size for the n-gram full-text parser. |
| open_files_limit | The number of files that the operating system permits mysqld to open. |
| optimizer_switch | The optimizer_switch system variable enables control over optimizer behavior. |
| password_history | This variable defines the global policy for controlling reuse of previous passwords based on required minimum number of password changes. |
| password_reuse_interval | This variable defines the global policy for controlling reuse of previous passwords based on time elapsed. |
| performance_schema_consumer_events_statements_history_long | The most recent statement events that have ended globally (across all threads). |
| performance_schema_consumer_events_waits_current | This variable contains current wait events. |
| performance_schema_digests_size | The maximum number of rows in the events_statements_summary_by_digest table. |
| performance_schema_max_digest_length | The maximum number of bytes of memory reserved per statement for computation of normalized statement digest values in the Performance Schema. |
| performance_schema_max_sql_text_length | The maximum number of bytes used to store SQL statements. |
| range_optimizer_max_mem_size | The limit on memory consumption for the range optimizer. |
| read_buffer_size | Each thread that does a sequential scan for a MyISAM table allocates a buffer of this size (in bytes) for each table it scans. |
| read_rnd_buffer_size | This variable is used for reads from MyISAM tables, and, for any storage engine, for Multi-Range Read optimization. |
| replica_max_allowed_packet | Sets the maximum packet size in bytes that the replication SQL (applier) and I/O (receiver) threads can handle. |
| replica_parallel_type | Specifies the policy used to decide which transactions are allowed to execute in parallel on the replica. |
| replica_parallel_workers | Enables multithreading on the replica and sets the number of applier threads for executing replication transactions in parallel. |
| rpl_semi_sync_source_timeout | The number of milliseconds that the source waits on a commit for acknowledgment from a replica before timing out and reverting to asynchronous replication. |
| sort_buffer_size | Each session that must perform a sort allocates a buffer of this size. |
| sql-mode | The current server SQL mode, which can be set dynamically. |
| sql_require_primary_key | Whether statements that create a new table or alter the structure of an existing table enforce the requirement that the table has a primary key. |
| sql_safe_updates | If this variable is enabled, UPDATE and DELETE statements that do not use a key in the WHERE clause or a LIMIT clause produce an error. |
| sync_binlog | Controls how often the MySQL server synchronizes the binary log to disk. |
| table_definition_cache | The number of table definitions that can be stored in the definition cache. |
| table_open_cache | The number of open tables for all threads. |
| table_open_cache_instances | The number of open tables cache instances. |
| temptable_max_ram | Defines the maximum amount of memory that can be occupied by the TempTable storage engine before it starts storing data to disk. |
| thread_cache_size | How many threads the server should cache for reuse. |
| thread_stack | The stack size for each thread. |
| tmp_table_size | Defines the maximum size of internal in-memory temporary tables created by the MEMORY and TempTable storage engines. |
| wait_timeout | The number of seconds the server waits for activity on a noninteractive connection before closing it. |
Manage DB user
When you create a MySQL Server, the ID and password for the account that will use the server are created by default. However, while operating the server, you may need to add users or reset the passwords of existing user accounts. You may also need to delete user accounts. Cloud DB for MySQL provides a user management features that enables you to conveniently add, edit, and delete user accounts that use the server. The results of the user account change through the user management features are applied to the entire DB Service. Up to 1,000 user accounts can be added.
- You can only use this feature in Master Servers and Stand Alone Servers.
- You can perform the same task from View DB server details > Manage DB user.
To add or delete user accounts or change the password of the existing admin account:
-
When the Manage DB user popup window appears, perform the required tasks for the user account.
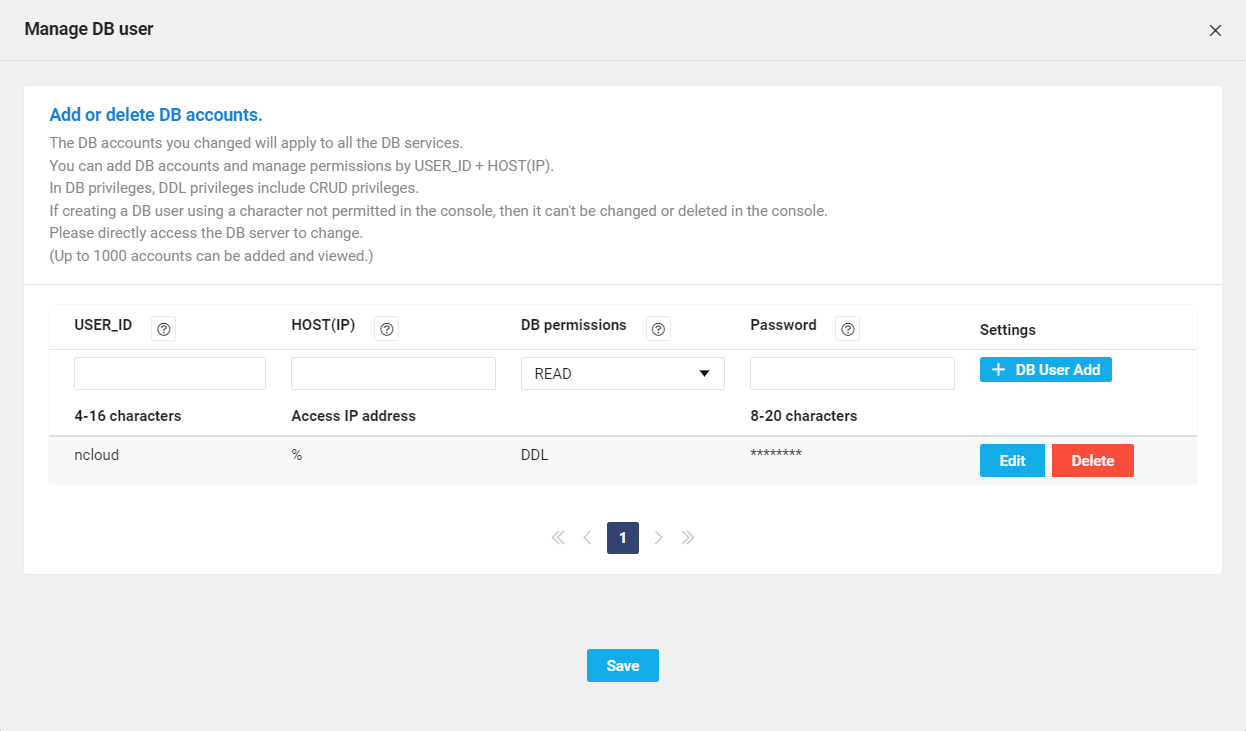
- Add user account: enter information in USER_ID, HOST (IP), DB permissions, password, and system table, and click [Add DB User].
- All DB permissions include the execute permission of the system DB.
- The CRUD permission includes the READ permission, and the DDL permission includes the READ and CRUD permissions.
- View procedure can be performed by any account regardless of permissions. For more information, see Official MySQL document (English).
- Selecting a system table allows you to grant/reclaim SELECT permission for
mysqlDB.
- Delete user account: Click [Delete] in the same row as the user account to be deleted.
- Edit user account password: Click [Edit] in the same row as the user account to be edited, and click [Save] after editing.
- Add user account: enter information in USER_ID, HOST (IP), DB permissions, password, and system table, and click [Add DB User].
-
Click [Save].
-
View the status of the MySQL Server to set user from the MySQL Server list on the DB Server interface.
- Configuring: Status in which the MySQL Server is configured with the information you entered.
- Running: Status in which the configuration of the MySQL Server has been completed with the information entered by user, and access to the MySQL Server from the application server is available
- When deleting a user account, note that the applications using the account being deleted can't be accessed.
- If creating a DB user ID with characters not permitted on the console, it cannot be edited or deleted. Directly access the DB Server to make a change.
List of permissions for an account with DDL/CRUD/READ permissions
[List of permissions for an account with DDL permissions]
- If MySQL DB version is below 8.0.23
GRANT PROCESS, SHOW DATABASES, REPLICATION SLAVE, REPLICATION CLIENT, CREATE USER ON *.* TO '[user name]'@'[HOST IP]' WITH GRANT OPTION
GRANT SELECT ON `mysql`.* TO '[user name]'@'[HOST IP]' WITH GRANT OPTION
GRANT SELECT, EXECUTE ON `sys`.* TO '[user name]'@'[HOST IP]' WITH GRANT OPTION
GRANT ALL PRIVILEGES ON `[사용자 DB]`.* TO '[user name]'@'[HOST IP]' WITH GRANT OPTION
GRANT SELECT ON `performance_schema`.* TO '[user name]'@'[HOST IP]' WITH GRANT OPTION
GRANT INSERT, UPDATE, DELETE ON `mysql`.`time_zone_transition_type` TO '[user name]'@'[HOST IP]'
GRANT INSERT, UPDATE, DELETE ON `mysql`.`time_zone` TO '[user name]'@'[HOST IP]'
GRANT INSERT, UPDATE, DELETE ON `mysql`.`time_zone_name` TO '[user name]'@'[HOST IP]'
GRANT INSERT, UPDATE, DELETE ON `mysql`.`time_zone_transition` TO '[user name]'@'[HOST IP]'
GRANT INSERT, UPDATE, DELETE ON `mysql`.`time_zone_leap_second` TO '[user name]'@'[HOST IP]'
- If MySQL DB version is 8.0.23 or higher
GRANT PROCESS, SHOW DATABASES, REPLICATION SLAVE, REPLICATION CLIENT, CREATE USER ON *.* TO '[user name]'@'[HOST IP]' WITH GRANT OPTION
GRANT BACKUP_ADMIN,FLUSH_TABLES,SHOW_ROUTINE,XA_RECOVER_ADMIN ON *.* TO `[사용자명]`@`[HOST IP]` WITH GRANT OPTION
GRANT SELECT ON `mysql`.* TO `[사용자명]`@`[HOST IP]` WITH GRANT OPTION
GRANT ALL PRIVILEGES ON `[사용자 DB]`.* TO `[사용자명]`@`[HOST IP]` WITH GRANT OPTION
GRANT SELECT, EXECUTE ON `sys`.* TO `[사용자명]`@`[HOST IP]` WITH GRANT OPTION
GRANT SELECT ON `performance_schema`.* TO `[사용자명]`@`[HOST IP]` WITH GRANT OPTION
GRANT INSERT, UPDATE, DELETE ON `mysql`.`time_zone_leap_second` TO `[사용자명]`@`[HOST IP]`
GRANT INSERT, UPDATE, DELETE ON `mysql`.`time_zone_name` TO `[사용자명]`@`[HOST IP]`
GRANT INSERT, UPDATE, DELETE ON `mysql`.`time_zone_transition_type` TO `[사용자명]`@`[HOST IP]`
GRANT INSERT, UPDATE, DELETE ON `mysql`.`time_zone_transition` TO `[사용자명]`@`[HOST IP]`
GRANT INSERT, UPDATE, DELETE ON `mysql`.`time_zone` TO `[사용자명]`@`[HOST IP]`
[List of permissions for an account with CRUD permissions]
GRANT PROCESS, SHOW DATABASES, REPLICATION CLIENT ON *.* TO `[사용자명]`@`[HOST IP]`
GRANT SELECT ON `mysql`.* TO `[사용자명]`@`[HOST IP]`
GRANT SELECT, INSERT, UPDATE, DELETE, REFERENCES, CREATE TEMPORARY TABLES, LOCK TABLES, EXECUTE, SHOW VIEW, EVENT ON `[사용자 DB]`.* TO `[사용자명]`@`[HOST IP]`
GRANT SELECT, EXECUTE ON `sys`.* TO `[사용자명]`@`[HOST IP]`
GRANT SELECT ON `performance_schema`.* TO `[사용자명]`@`[HOST IP]`
[List of permissions for an account with READ permissions]
GRANT PROCESS, SHOW DATABASES, REPLICATION CLIENT ON *.* TO `[사용자명]`@`[HOST IP]`
GRANT SELECT ON `mysql`.* TO `[사용자명]`@`[HOST IP]`
GRANT SELECT, EXECUTE ON `sys`.* TO `[사용자명]`@`[HOST IP]`
GRANT SELECT, LOCK TABLES, EXECUTE, SHOW VIEW ON `[사용자 DB]`.* TO `[사용자명]`@`[HOST IP]`
GRANT SELECT ON `performance_schema`.* TO `[사용자명]`@`[HOST IP]`
Cloud DB for MySQL management account
The Cloud DB for MySQL management account information used for the user virtual machine is as follows:
| Account name | Account description |
|---|---|
| radmin | Account that applies details requested by users on the console to the actual database |
| ha_admin | Database account used for auto failover when the master DB fails |
| repl_admin | replication account for MySQL Slave Server synchronization |
| agent | Account that collects database monitoring metrics |
- USER_ID of an account that is the same as that of the management account can't be used.
- If the management account is edited or deleted, then the use of the Cloud DB for MySQL product features is limited.
Create accounts with permissions for specific tables
If you want to add a user account with permissions only for a specific table, then create an account with DDL permission, access the system with the account, and create a new account.
To create a new account while accessing a user account that has DDL permission, run the following command:
create user '[user name]'@'[HOST IP]' identified by '[password]';
grant SELECT on [DB name].[table name] to 'user name'@'[HOST IP]';
flush privileges;
-- Example
create user 'test'@'1.1.1.1' identified by 'test123';
grant SELECT on test_db.test_table to 'test'@'1.1.1.1';
For more information on how to directly create an account from the MySQL Server, see Official MySQL documentation (English).
Expiration of Cloud DB for MySQL account passwords
You can directly set the password expiration period for the DB account.
- The expiration period can be set only in number of days (DAY, 1 to 65535).
- The expiration period is based on when the account was created or when the account's password was last changed.
- Expiration settings can only be performed with a user account with DDL privileges.
- Expiration removal can be performed only for yourself and other users when executing with a user account with DDL privileges, and only for yourself when executing with a user account with CRUD and READ privileges.
Run the following command when setting password expiration:
# Set expiration immediately upon execution
CREATE USER '[user name]'@'[HOST IP]' IDENTIFIED BY '[password]' PASSWORD EXPIRE;
ALTER USER '[user name]'@'[HOST IP]' PASSWORD EXPIRE;
ㅤ
# Set with custom value
CREATE USER '[user name]'@'[HOST IP]' IDENTIFIED BY '[password]' PASSWORD EXPIRE INTERVAL [ ] DAY;
ALTER USER '[user name]'@'[HOST IP]' PASSWORD EXPIRE INTERVAL [ ] DAY;
Run the following command when removing password expiration:
ALTER USER '[user name]'@'[HOST IP]' IDENTIFIED BY '[password]';
- When removing expiration with the above statement, the password expiration period is reset to the previously set lifetime value.
Run the following command to view the expiration period set for a password:
SELECT password_last_changed, password_lifetime
FROM mysql.user
WHERE user='[user name]' AND host='[HOST IP]';
- password_last_changed: The time when the account was created or the password was last changed
- password_lifetime: Expiration period set for the password
- password_last_changed + password_lifetime: time when the password expires
- When password_lifetime is "0," the password never expires.
- When password_lifetime is "NULL," it automatically has the default value of the MySQL Server. Currently, the default value for Cloud DB for MySQL is "0."
Cloud DB for MySQL may not operate normally when password expiration is set for the following accounts:
- ha_admin, repl_admin, agent, radmin, MySQL.*
- If you are using jdbc, set "disconnectOnExpiredPasswords" of jdbc to false to reuse an account whose expiration date has passed. Then log in and remove the expiration period settings to use it.
- MySQL 5.7 disconnect_on_expired_password reference guide (English)
- MySQL 8.0 disconnect_on_expired_password reference guide (English)
- MySQL 8.4 disconnect_on_expired_password reference guide (English)
Tracking login failures and account locking in Cloud DB for MySQL
Users can set up tracking for login failures and account locking directly on the DB account.
- This setting is available from Cloud DB for MySQL version 8.0.19 and above.
- Only user accounts with DDL privileges can run this setting.
- If the DB Server restarts, the login failure count will be initialized, and any locked accounts will be unlocked.
To configure login failure tracking and account locking, run the following command:
CREATE USER '[user name]'@'[HOST IP]' IDENTIFIED BY '[password]' FAILED_LOGIN_ATTEMPTS [number of allowed failures] PASSWORD_LOCK_TIME [days of lockout];
ALTER USER '[user name]'@'[HOST IP]' FAILED_LOGIN_ATTEMPTS [number of allowed failures] PASSWORD_LOCK_TIME [days of lockout];
Run the following command to immediately unlock an account:
ALTER USER '[user name]'@'[HOST IP]' ACCOUNT UNLOCK;
Run the following command to check the values set for an account:
SELECT User_attributes
FROM mysql.user
WHERE user='[user name]' AND host='[HOST IP]';
Cloud DB for MySQL may not operate normally when setting login failure tracking and account locking for the following accounts:
- ha_admin, repl_admin, agent, radmin, MySQL.*
For detailed specifications of login failure tracking and account locking, see Official MySQL guide.
Apply and reclaim Role with user-provided Stored Procedure
In MySQL 8.0 and later, in VPC, you can apply and reclaim role in a stored procedure form with a user account with DDL permissions. You cannot use Cloud DB for MySQL administration accounts and MySQL default accounts, and you must create Role and grant permission to role directly.
Use the following commands to apply role to a user account with the user-provided stored procedure, or to reclaim an applied role:
- Apply role to user account.
mysql> call sys.ncp_grant_role('role user[required]', 'role host[required]', 'user account user[required]', 'user account host[required]');
- Reclaim applied role to user account.
mysql> call sys.ncp_revoke_role('role user[required]', 'role host[required]', 'user account user[required]', 'user account host[required]');
- Example
① Create role and grant permissions to role.
mysql> CREATE ROLE 'new_role';
mysql> GRANT SELECT, INSERT ON `testdb`.* TO 'new_role';
② Apply role to user account.
mysql> CALL sys.ncp_grant_role('new_role', '%', 'ddl_user', '10.100.%');
③ Enable role.
mysql> SET ROLE 'new_role';
④ Reclaim role from user account.
mysql> CALL sys.ncp_revoke_role('new_role', '%', 'ddl_user', '10.100.%');
When creating role without specifying the host portion like CREATE ROLE 'Role User';, all hosts (%) are automatically added.
mandatory_roles, activate_all_roles_on_login, and edit variables features are not supported.
For each variable, see the following:
- mandatory_roles: use it after granting permission with ncp_grant_role before using DB account.
- activate_all_roles_on_login: specify role to enable access on log in using the SET DEFAULT ROLE syntax.
Import DB account information
By importing account information, you can view and delete the information of accounts created directly by users in MySQL Server from the console.
To import DB account information:
- Select the MySQL Server from which the account information is to be fetched, and then navigate to Manage DB > View DB Server details > Manage DB user.
- Click [Import DB account].
- On the confirmation popup window, click [Import].
Change DB Server Log settings
You can change the log rotation and storage settings for the MySQL Server you created. The changes are applied to the entire DB Service. To change:
- When the Change DB Server log settings popup window appears, see the following to change the settings:

- Log: View server log name
- Log Rotate: Set the log rotation to be performed daily or by size.
- Log file: Number of log files to be stored
- Click [Save].
- View the status of the MySQL for which you've set server logs from the server list on the DB Server interface.
- Configuring: Status in which the MySQL Server is configured with the information you entered.
- Running: Status in which the configuration of the MySQL Server has been completed with the information entered by user, and access to the MySQL Server from the application server is available
- General query log is loaded only when enabled
general_logfrom Manage DB > Manage DB Config. - To load logs into TABLE, you must use Cloud DB for MySQL 8 or later and change
log_outputto TABLE from Manage DB Config. - Only slow query log and general query log can be stored in table. The rest of the logs are stored to file regardless of the
log_outputsettings. - If
log_outputis set as TABLE, it is unable to check the logs from Cloud Log Analytics and Monitoring > DB Logs. - If
log_outputis set as TABLE, the log table retains data for 7 days, and the retention count cannot be edited. - Previous logs cannot be automatically deleted when changing the log rotate type. Delete unnecessary logs using the [DB status] > [DB Server logs] tab > [Delete log] feature.
Log table backup with user-provided stored procedure
User account that has the DDL permission can execute log table backup feature in the form of stored procedure. This can be executed in the slow query log and general query log, which can store logs in table. Log table backup is stored in mysql database.
If you want to backup the current log table with manual rotation, run the command below:
mysql> call sys.ncp_backup_log_table('Log Table name[required]');
- Log Table name: enter slow_log or general_log
-- Example
CALL sys.ncp_backup_log_table('slow_log');
If you want to delete the backup log table run the command below:
mysql> call sys.ncp_drop_log_backup_table('backup Log Table name[required]');
- Log the backup table name: ^(slow_log|general_log)_([0-9]{4}(0[1-9]|1[012])(0[1-9]|[12][0-9]|3[01])|backup)$
-- Example
CALL sys.ncp_drop_log_backup_table('slow_log_backup');
If disk usage issue occurs due to the capacity of backup log table, execute log rotation with ncp_backup_log_table() and delete existing log table with ncp_drop_log_backup_table().
Manage public domain
You can request a Public domain to allow access to a MySQL Server from the outside of NAVER Cloud or to remove a configured public domain. Upon configuring a public domain, the data communicated from the outside is charged based on network usage.
To set or remove a Public domain, click the Manage public domain, and then click [Yes] from the popup window that appears.
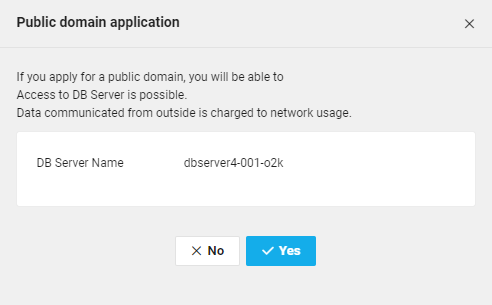
Master DB Failover
If the Master Server fails, you can directly use the failover feature to switch from the master to Standby Master Servers. The switch takes approximately 3 minutes, and the server access is unavailable during the switch. To switch:
- When the Master DB failover popup window appears, view the displayed information.
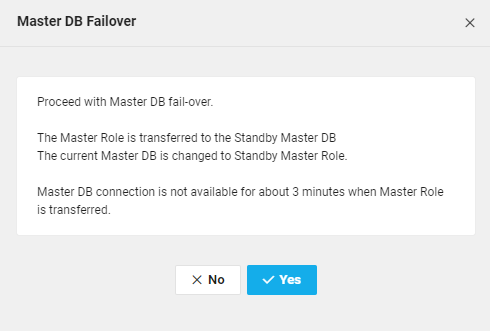
- Click [Yes].
- View the status of the MySQL for which you've set the DB failover from the MySQL Server list on the DB Server interface.
- Configuring: Status in which the MySQL Server is configured with the information you entered.
- Running: Status in which the configuration of the MySQL Server has been completed with the information entered by user, and access to the MySQL Server from the application server is available
MySQL Engine Upgrade
MySQL Engine's Minor version upgrade
The MySQL Engine minor version can be upgraded. The version upgrade is applied to the entire DB Service, and the upgrade is performed 1 server at a time in the following order: Recovery -> Slave -> Master. The server access becomes unavailable during the upgrade, and the Master Server is switched to the Standby Master Server to keep the service access block to a minimum.
To upgrade the minor version of the MySQL Engine, click the MySQL engine upgrade, select the version you want to upgrade to from the popup window that appears, and then click [Yes].
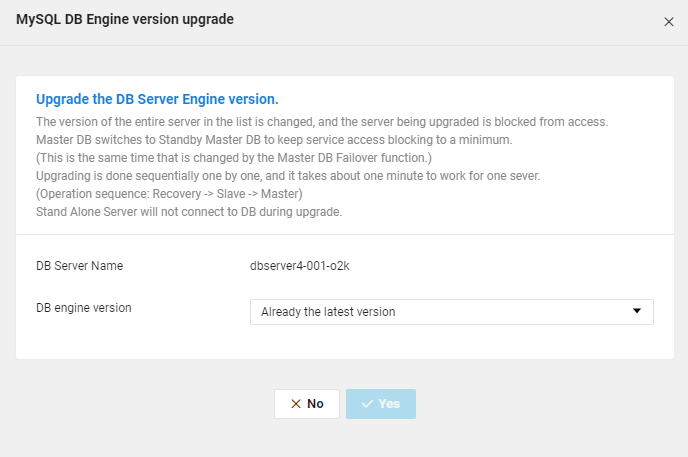
MySQL Engine's major version upgrade
You can upgrade major version of the MySQL Engine. The version upgrade is applied to the entire DB Service, and the upgrade is performed 1 server at a time in the following order: Recovery -> Slave -> Master. The server access becomes unavailable during the upgrade, and the Master Server is switched to the Standby Master Server to keep the service access block to a minimum.
- It is recommended to proceed with the upgrade after the application version compatibility review due to major version upgrade.
- Major version upgrade is only available when it is in the high availability configuration.
- While major version upgrade is in progress, the automatic recovery failover feature does not work in case of failure.
- When you upgrade major version, rollback to the previous major version is not possible.
- When you upgrade major version, the DB Config's default value may change.
- When you upgrade major version, point-in-time recovery before the upgrade is not possible.
- When you upgrade major version, the backup file of the version before the upgrade can only be made for new service creation.
- New creations are made with the major version of the backup, not the major version of the current cluster.
To upgrade major version of the MySQL Engine, click the MySQL engine upgrade, select major version upgrade and select the version you want to upgrade to from the popup window that appears, then click [Upgrade inspection].
- The inspection duration for major version upgrades may extend depending on the total number of DB objects.
- Prior to executing major version upgrades, all stored procedures, stored functions, triggers, and events created within the DB must be created or changed to ensure compliance with ANSI_QUOTES.
- As the quantity of Recovery Servers increases, the duration required for major version upgrade execution correspondingly extends.
- Starting with MySQL 8.4, the default password plugin has changed. Therefore, before performing a major version upgrade, the
default-authentication-pluginmust be changed tocaching_sha2_password. - The available MySQL major versions depend on the OS version of the VM.
- Ex) MySQL 8.4 cannot be used on CentOS 7, and a major version upgrade from MySQL 8.0 to MySQL 8.4 is not supported. If a major version upgrade to 8.4 is required, upgrade the OS version first using
운영 체제 관리feature.
- Ex) MySQL 8.4 cannot be used on CentOS 7, and a major version upgrade from MySQL 8.0 to MySQL 8.4 is not supported. If a major version upgrade to 8.4 is required, upgrade the OS version first using

When the following error occurs after the upgrade inspection, the upgrade is not possible:
- Upgrade inspection result: Error example
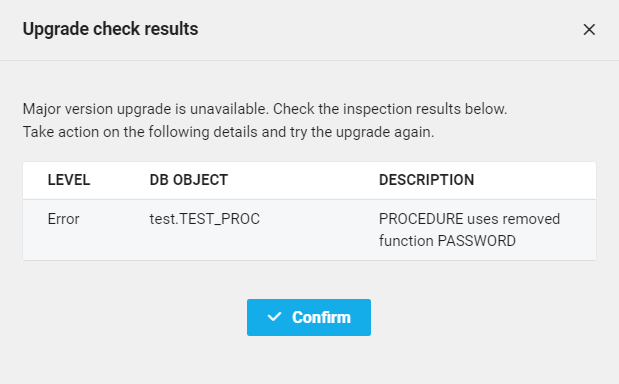
Once the upgrade inspection is completed, click [Yes] on the precaution popup window.
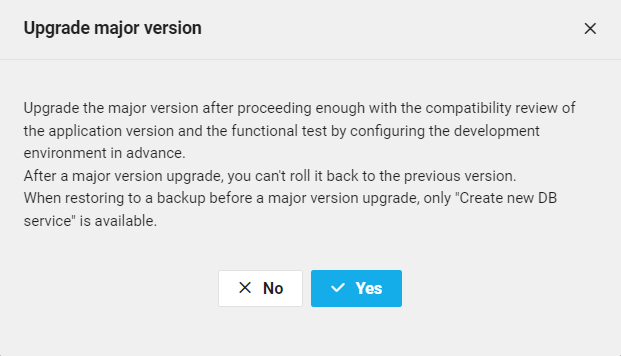
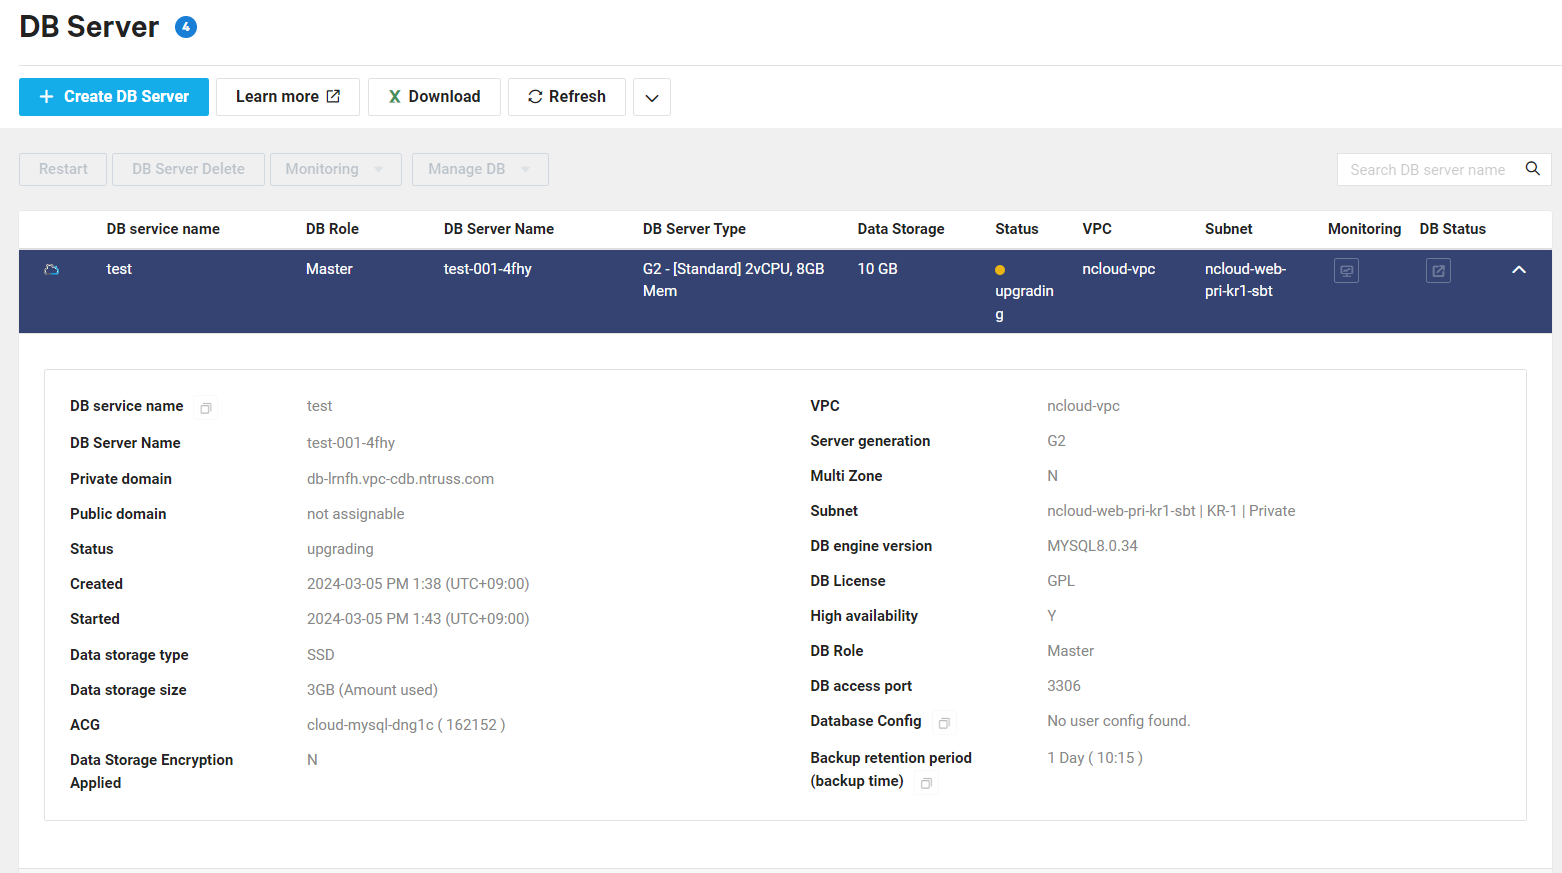
You can view the upgrade in progress through DB Server status.
Change DB Server name
You can change the selected MySQL Server name. All DB Server names in the DB Server list are changed, and sections that are automatically generated after the server name are not changed. All servers stop operating while DB Server names are changed, so access to the DB Server is limited while names are being changed.
To change:
If the server name is changed, then the DB Server Log before the change can't be viewed (Monitoring > DB Logs)
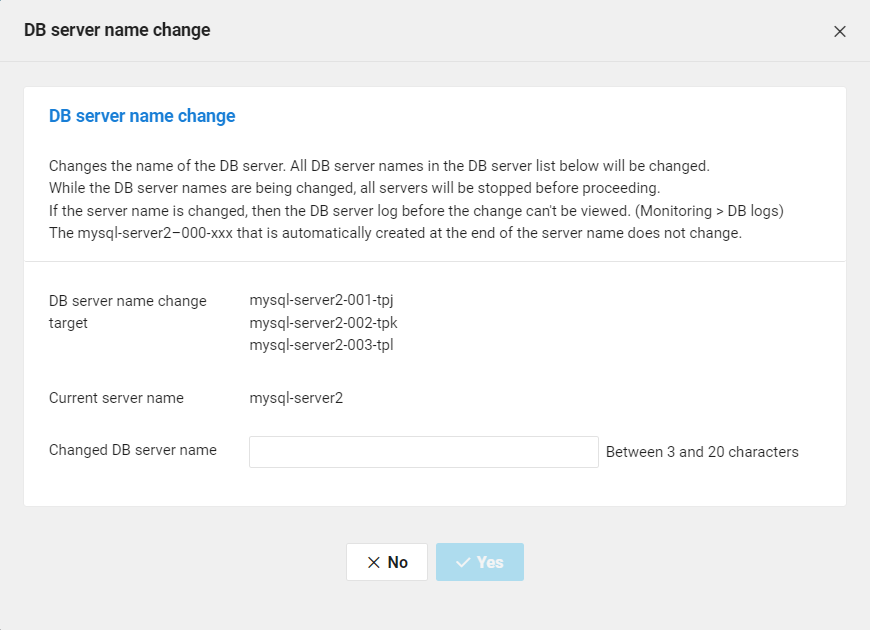
- When the Change DB Server name popup window appears, view the applicable DB Server and its current server name.
- Enter the DB Server name to change.
- Enter between 3 and 20 characters using lowercase English letters, numbers, and hyphens (-).
- It must start with an English letter and end with an English letter or a number.
- Duplicate names are not allowed.
- Click [Yes].
- View the status of the MySQL Server for which the DB Server name was set in the server list on the DB Server interface.
- Configuring: Status in which the MySQL Server is configured with the information you entered.
- Running: Status in which the configuration of the MySQL Server has been completed with the information entered by user, and access to the MySQL Server from the application server is available
Change return protection settings
You can change the return protection settings of the selected MySQL Server. The return protection settings apply only to master DB and stand alone DB Servers. When return protection is enabled, the corresponding DB Server cannot be deleted. During the change of return protection settings, no server downtime occurs, and the DB Server remains accessible.
To change:
-
For DB Servers with return protection disabled, the Configure return protection popup window appears. Confirm the DB Service name and click [Yes].
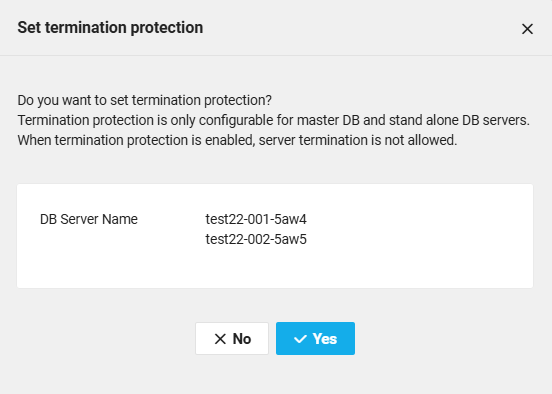
-
For DB Servers with return protection enabled, the Disable return protection popup window appears. Confirm the DB Service name and click [Yes].
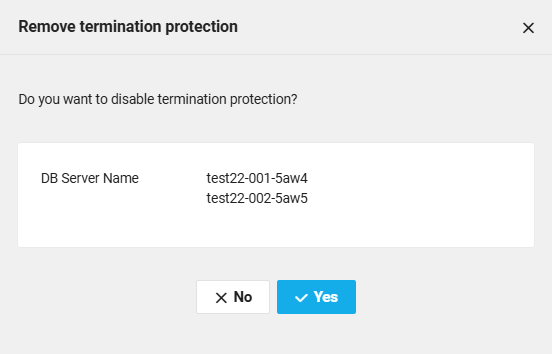
For servers with high availability enabled, return protection can only be set on the Master Server. The Master Server with return protection enabled can return the server in the following cases:
- Disabling high availability returns Standby Master Server automatically.
- Changing multi zone returns the current Standby Master Server automatically, and creates the same server on a new Subnet.
With return protection enabled, creating a new service transfers return protection settings. Return protection settings are delegated in the following cases:
- Create a new service with recovery server set up for MySQL Server recovery.
- Create a new service based on a backup file.
Manage operation system
Update operating system of created DB Server to the latest version. The operating system update is applied to the entire DB Service, and proceeds one server at a time in the following order: Hidden -> Recovery -> Slave -> Master. During the update process, server access is not available. To update the Master Server, click [Failover and OS version upgrade]. For more information, see the guide below.
- Operating system updates are only available when they are in a high availability configuration.
- During the update, the failover feature for automatic recovery will not operate in the event of a failure.
- Once the update starts, rolling back to the previous operating system version is not possible.
- Even if you restore to a backup created before the update, the new creation will be made with the current operating system version.
- If the OS version is not the latest, kernel updates are not available; only OS version updates can be performed.
- OS version updates proceed by replacing the servers in the cluster with new servers.
- Kernel updates proceed by rebooting the existing servers in the cluster without replacing them.
Updating the operating system of non-Master Servers
Updates the operating systems of the Hidden Server, Slave Server, and Recovery Server, excluding the Master Server.
The update proceeds one server at a time in the following order: Hidden Server, Recovery Server, then Slave Server.
- The time required for the operating system update may vary depending on the number of DB Servers.
- The more Recovery Servers you have, the longer the update may take.
- To update the operating system of non-Master Servers, click [OS management], review the popup window, and then click [Next].
- Operating system update
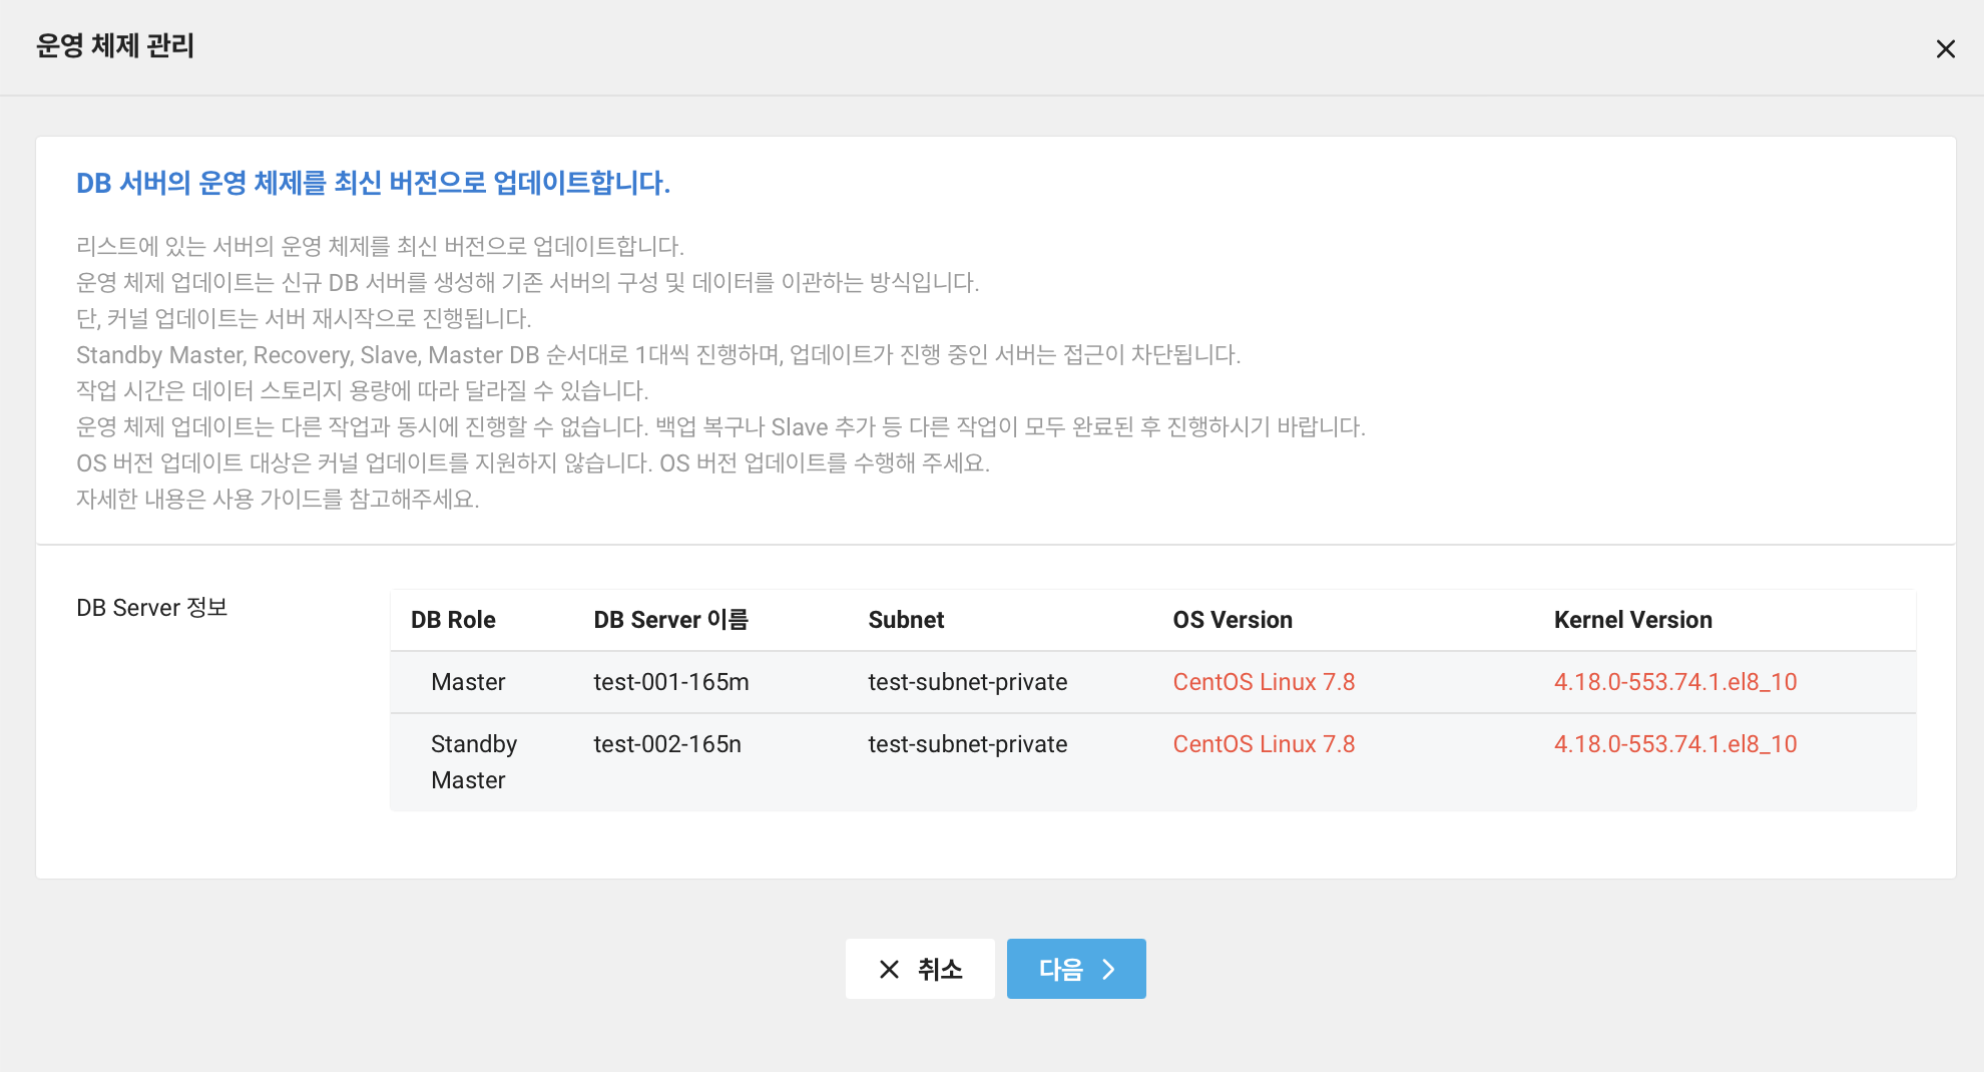
- Kernel update
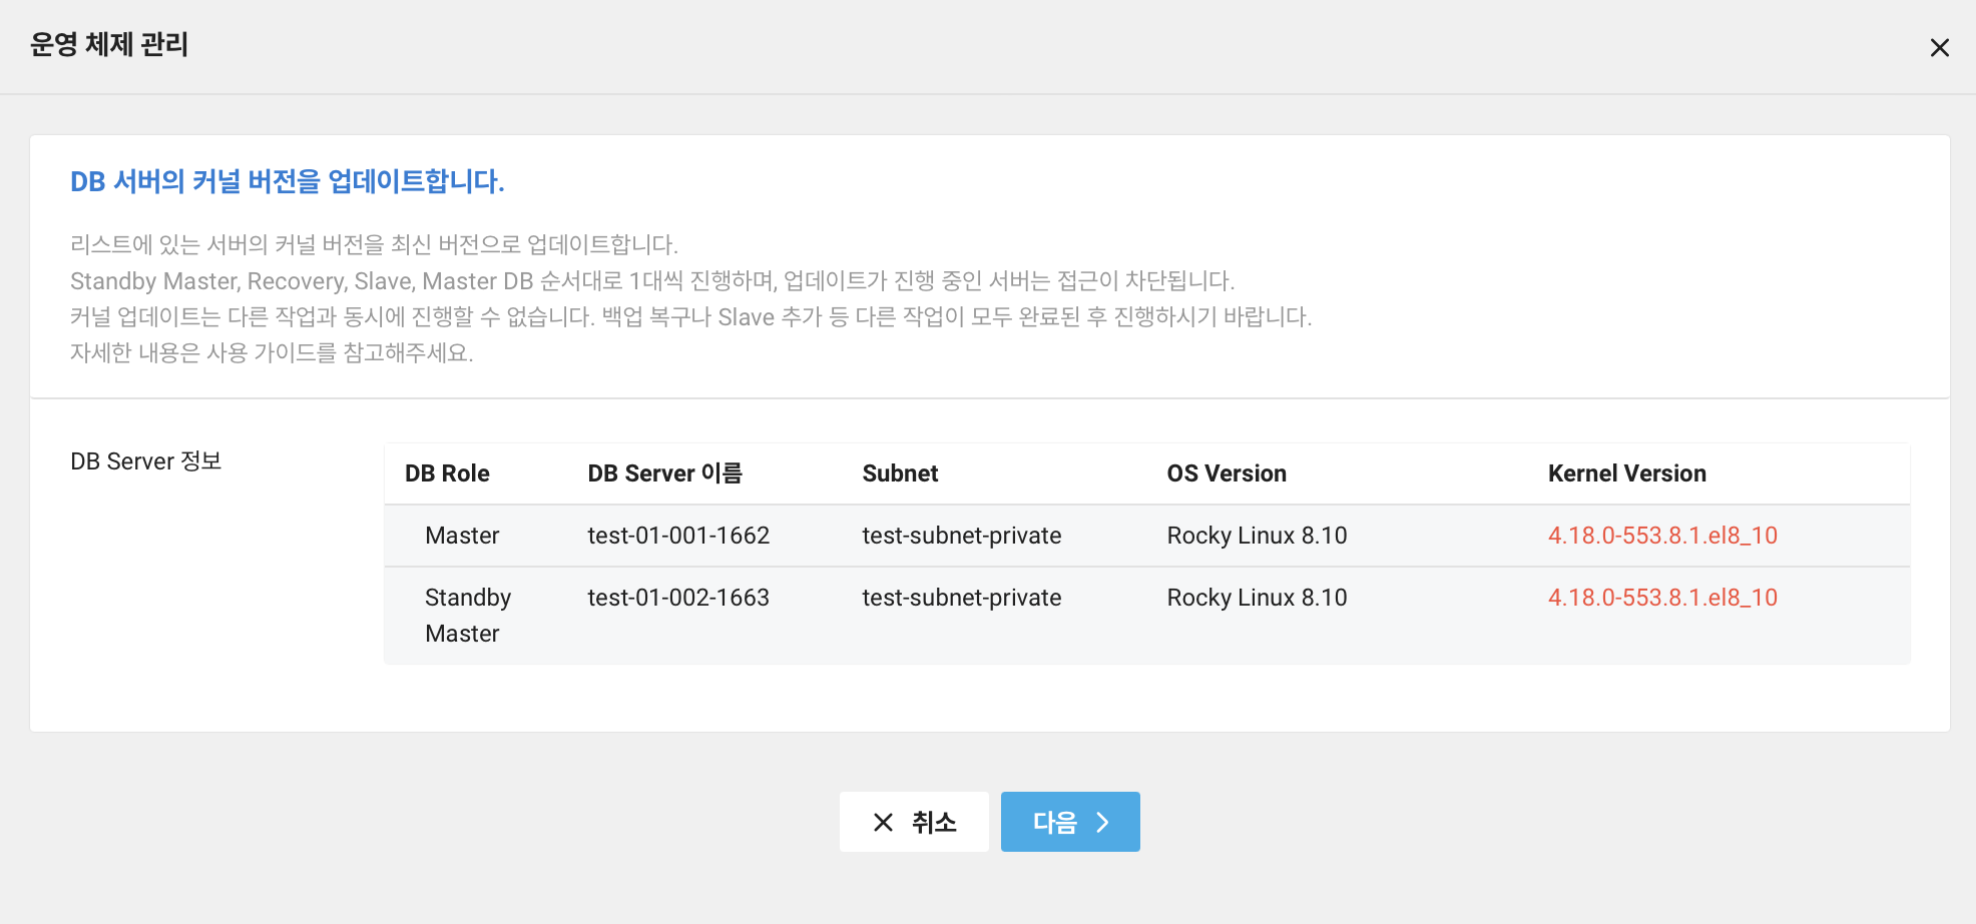
- Operating system update
- After reviewing the precautions for the operating system update, click the checkbox.
- Once you have reviewed all precautions, click [Yes].
- Operating system update
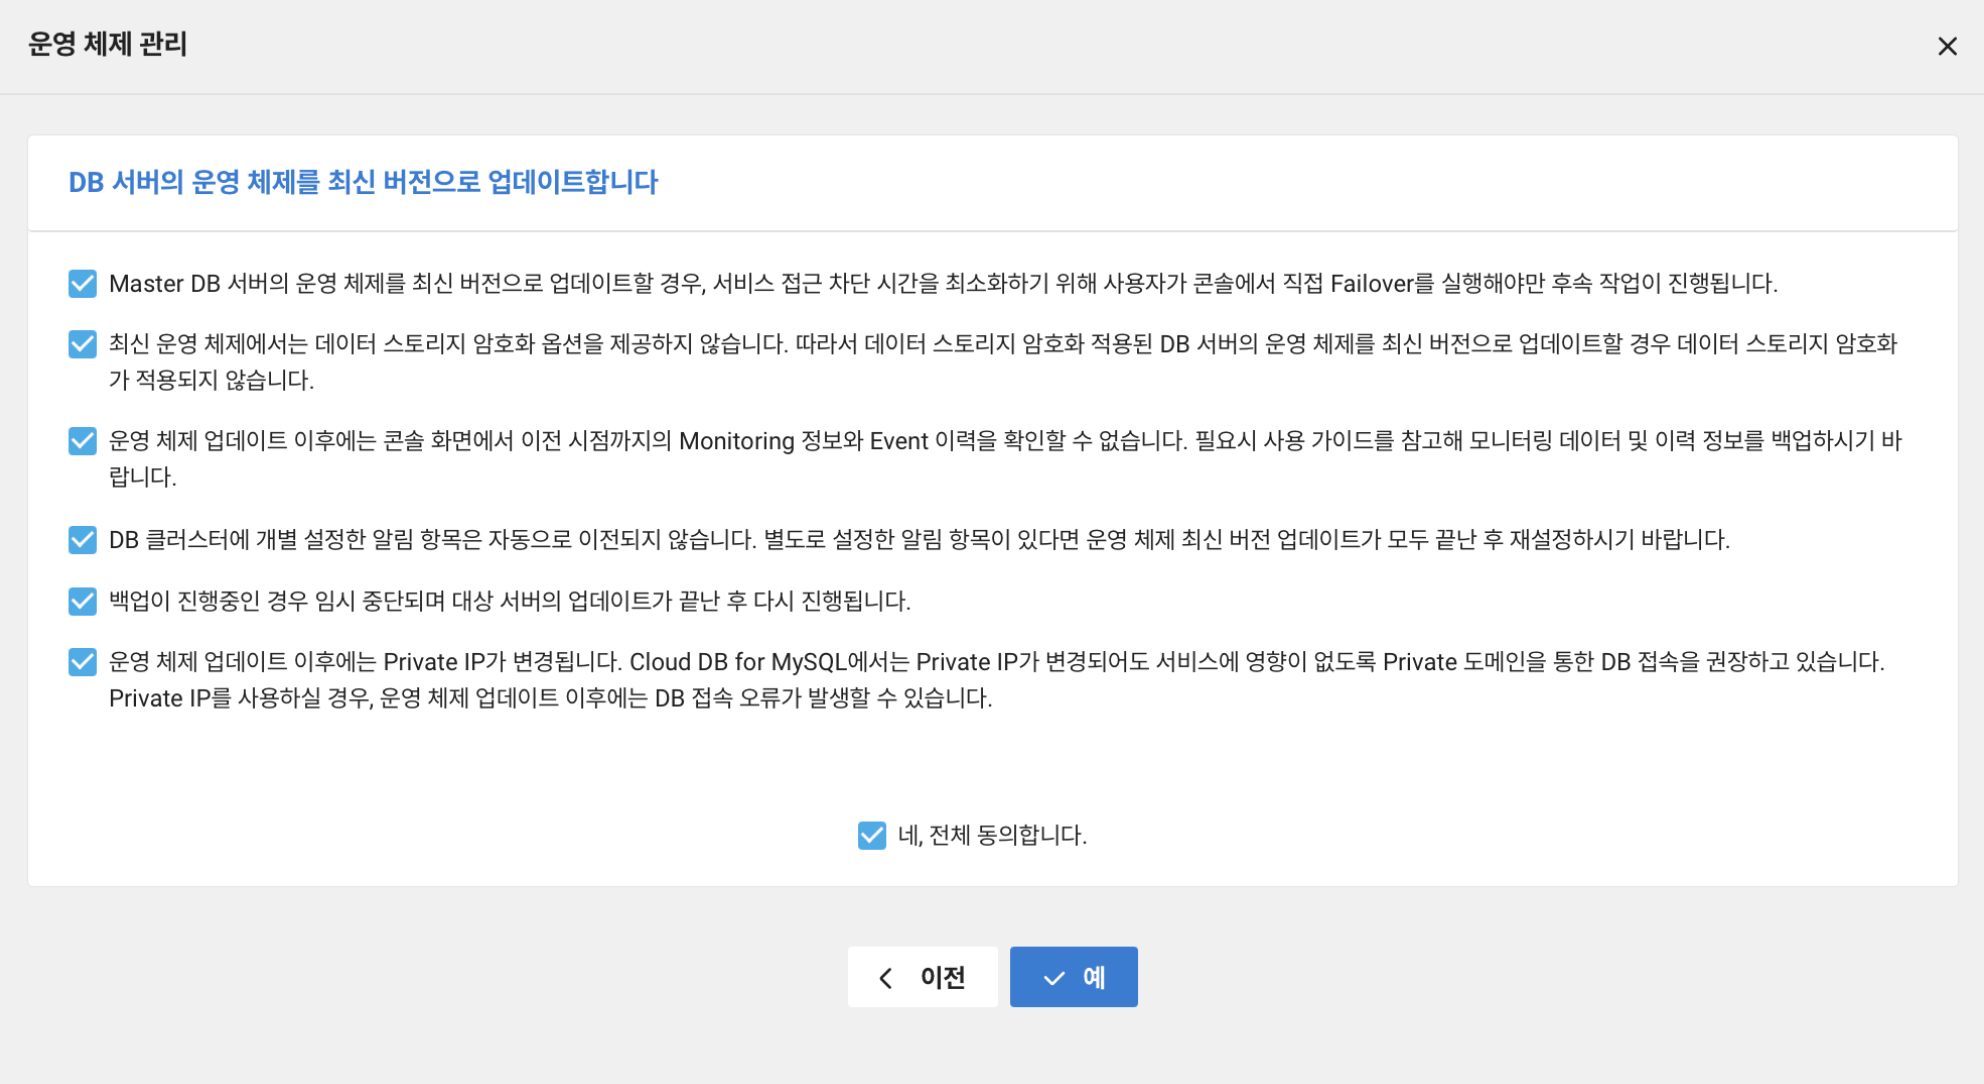
- Kernel update
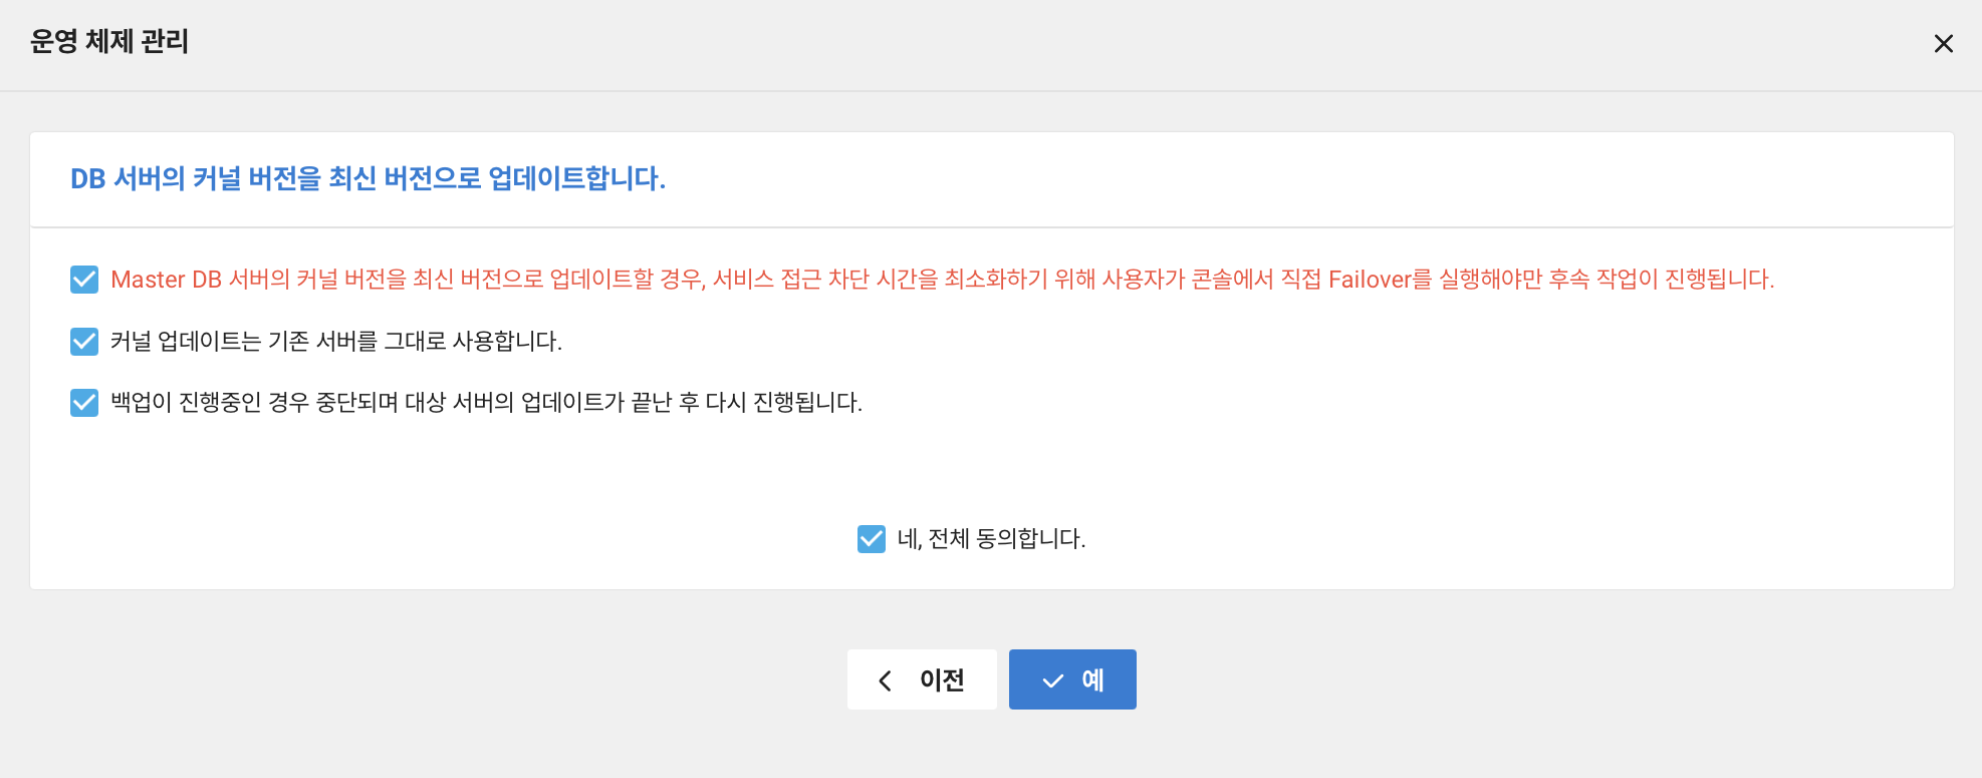
- Operating system update
- After reviewing the precautions for updating the operating system of the Master Server, click [Yes].
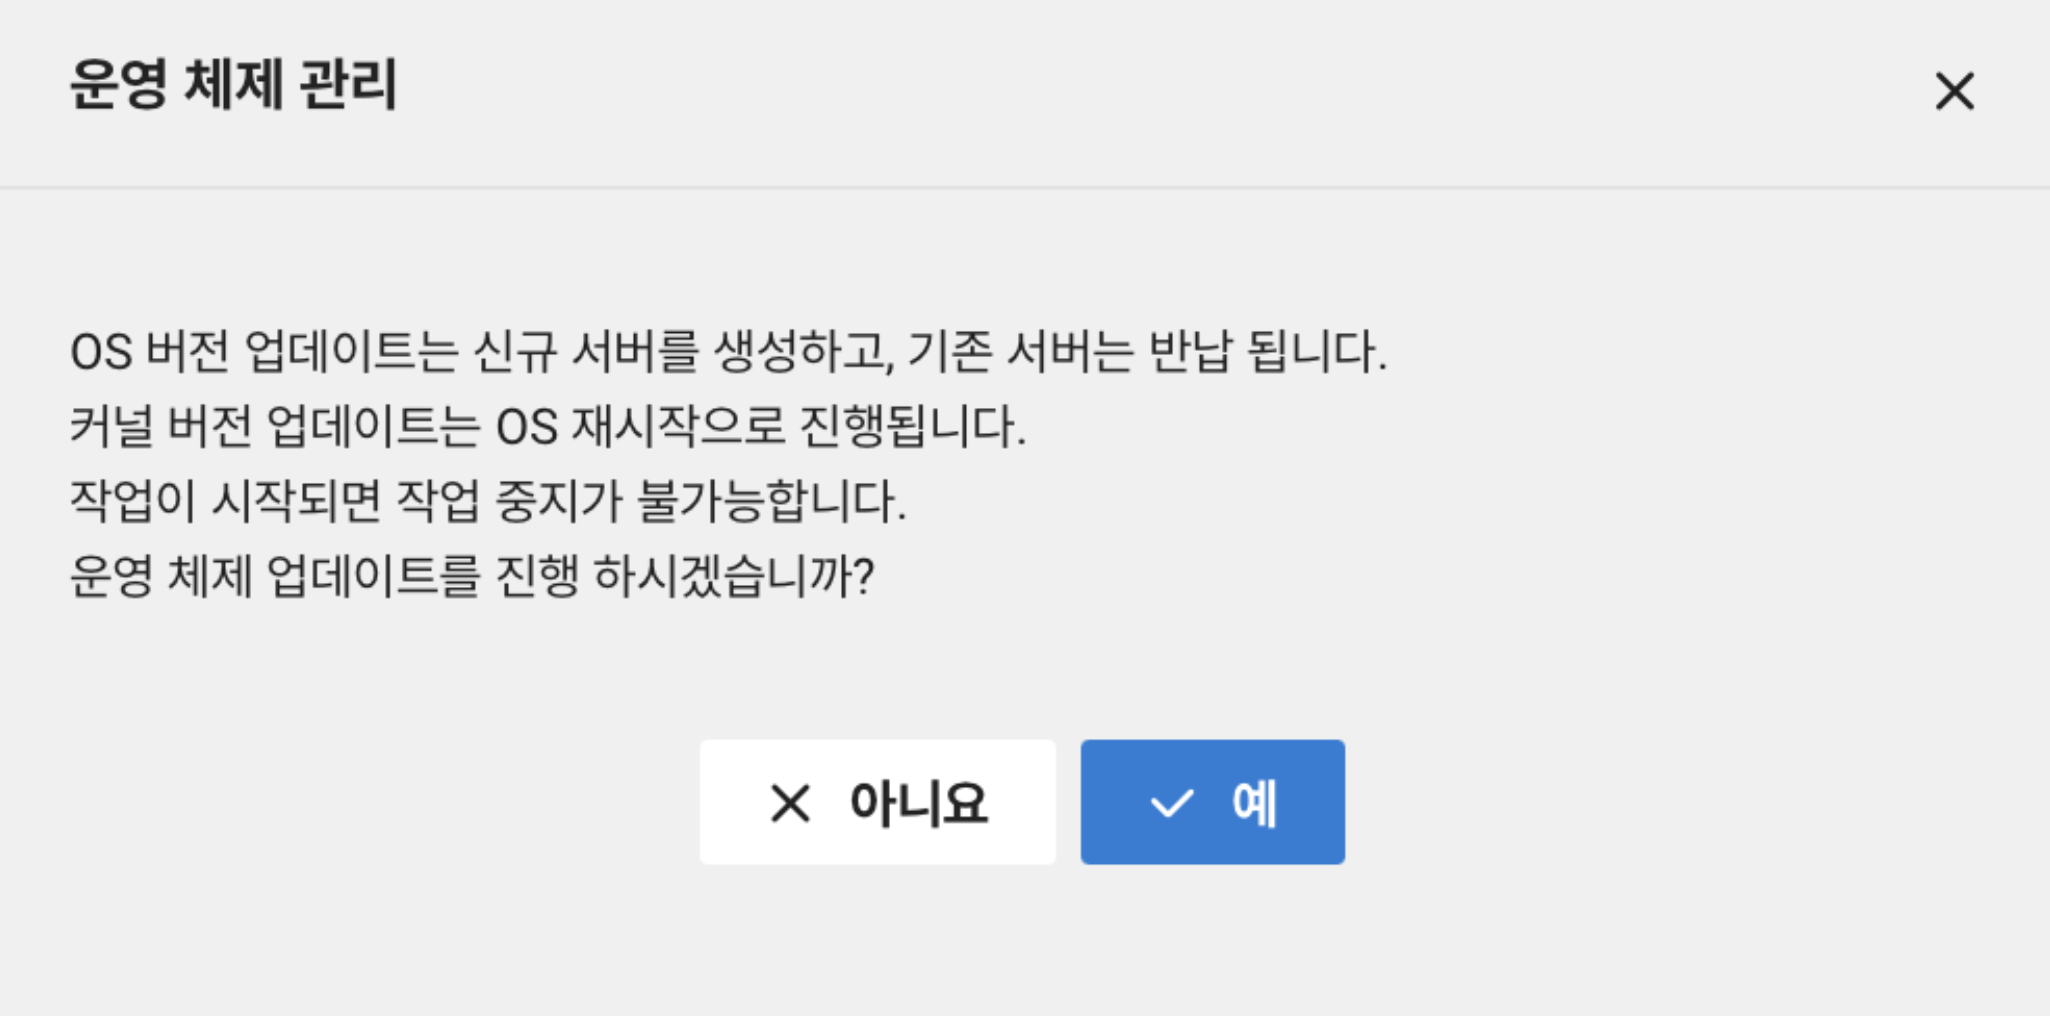
- You can view the update in progress through DB Server status.
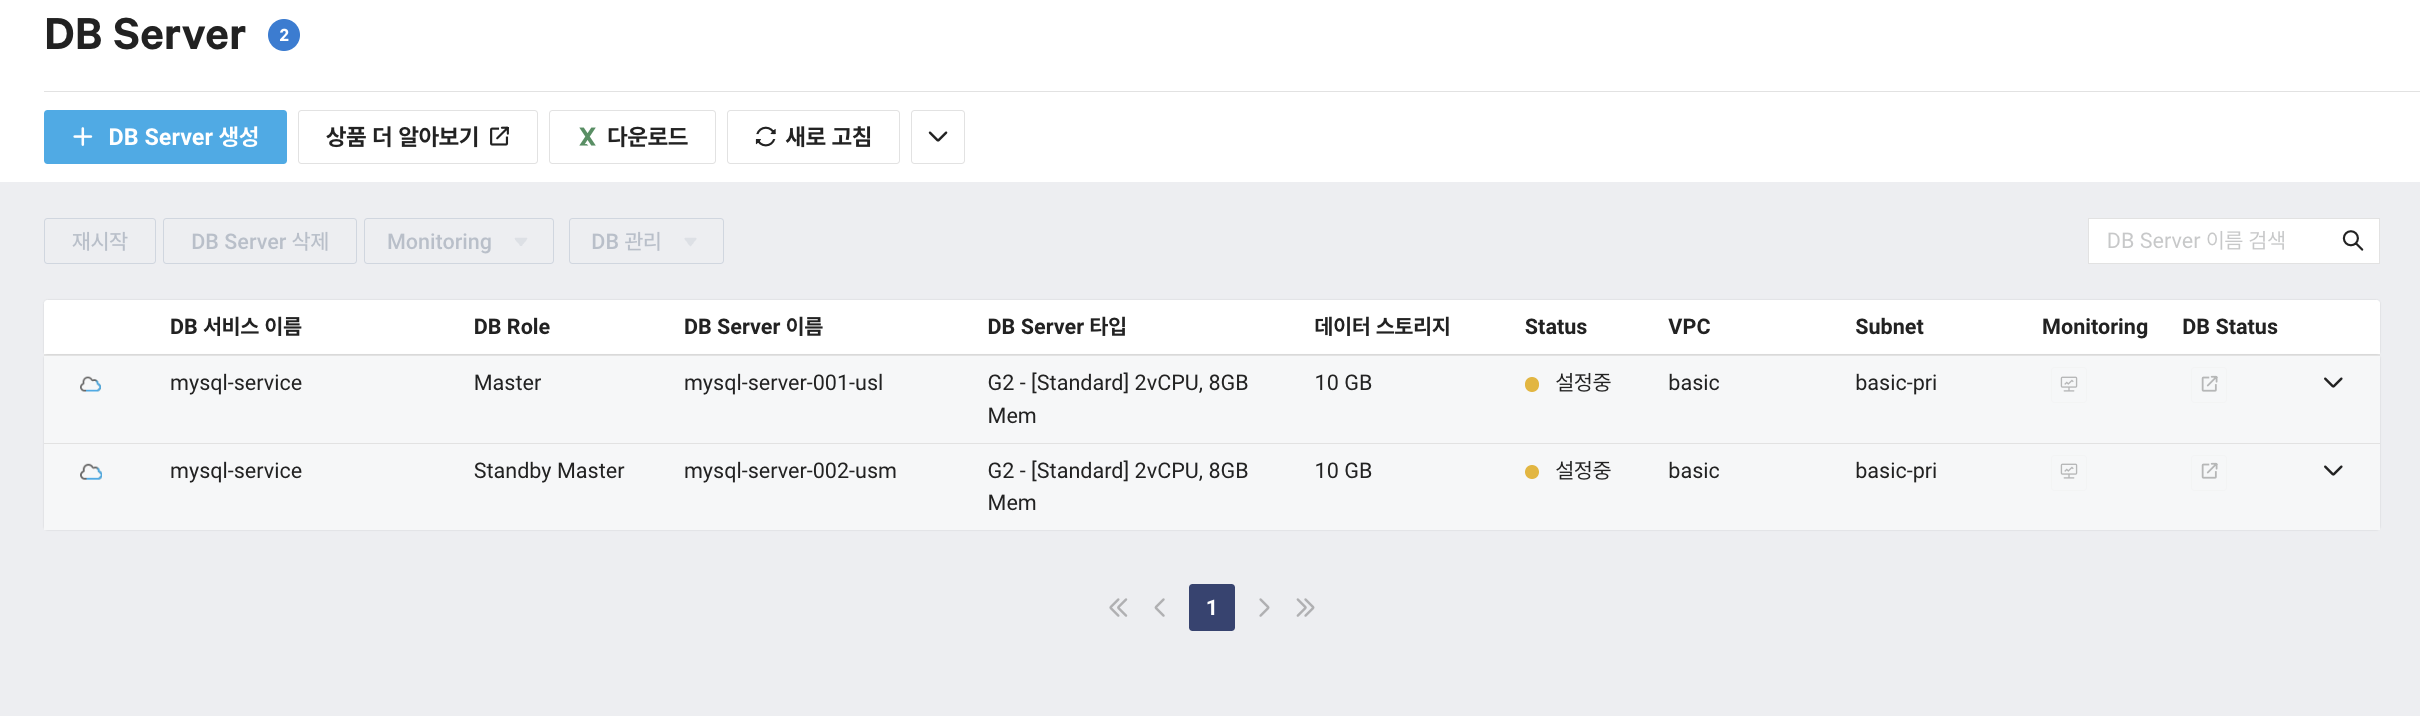
Updating the operating system of the Master Server
Updates the operating system of the Master Server.
- Access to the Master Server will be unavailable for approximately 3 minutes during failover for the operating system update.
-
To update the operating system of the Master Server, select the Master Server and click [Failover and OS version upgrade].
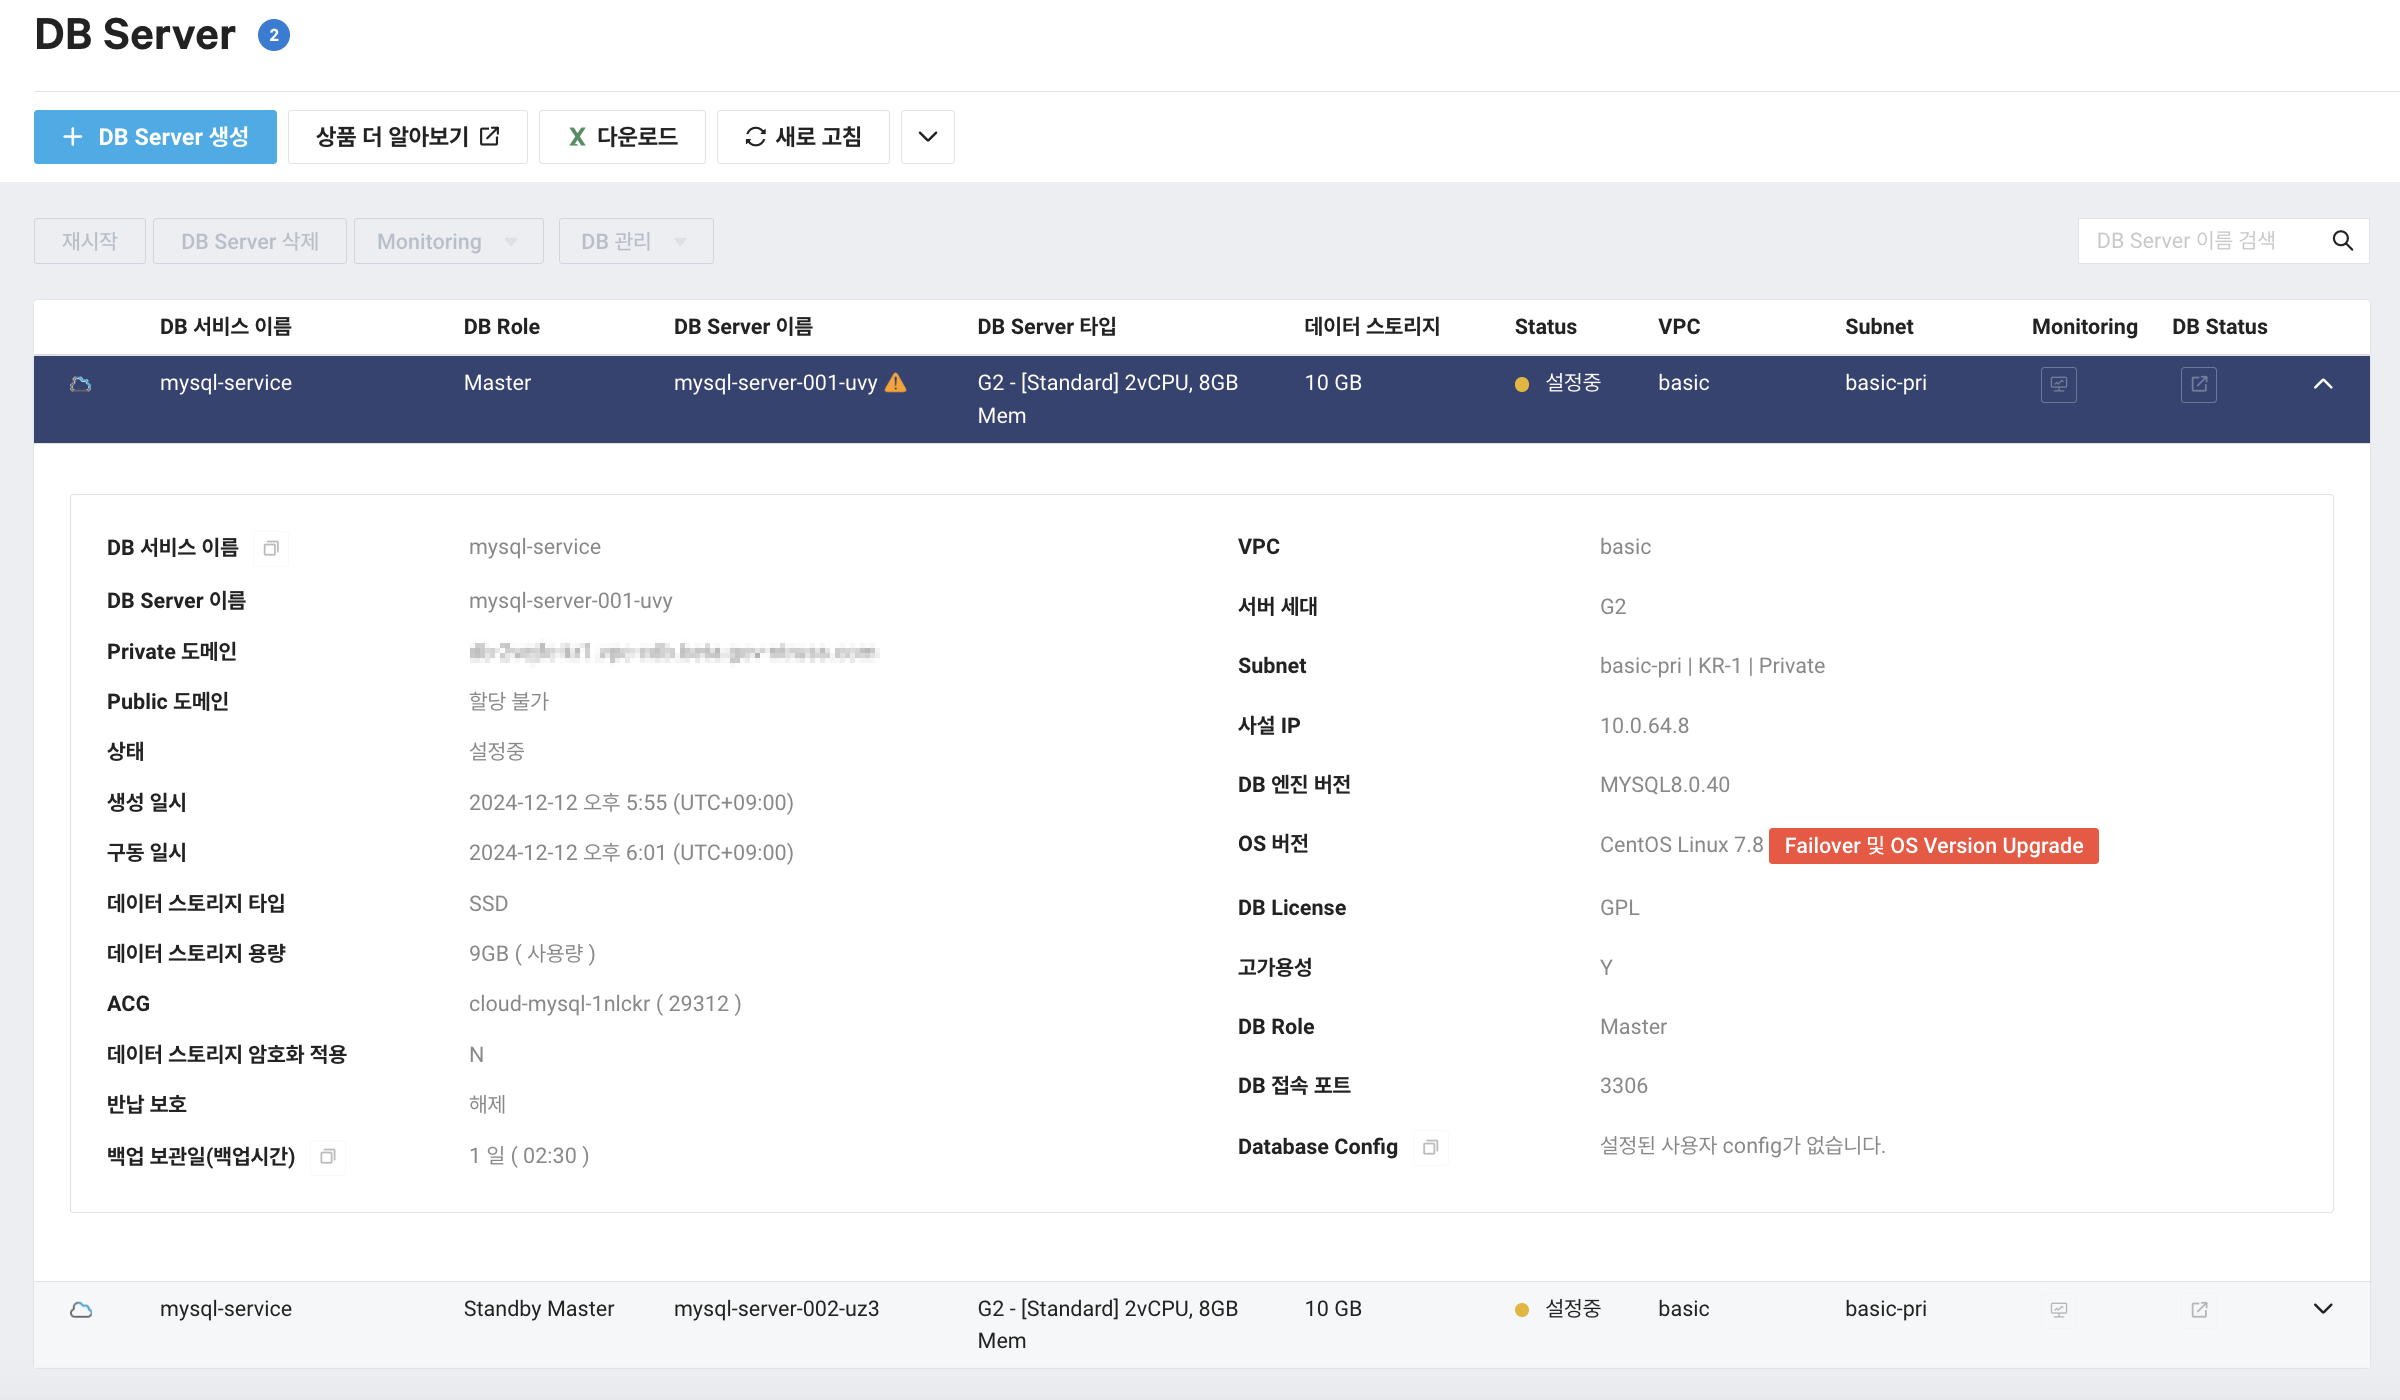
-
After reviewing the precautions for updating the operating system of the Master Server, click [Upgrade].
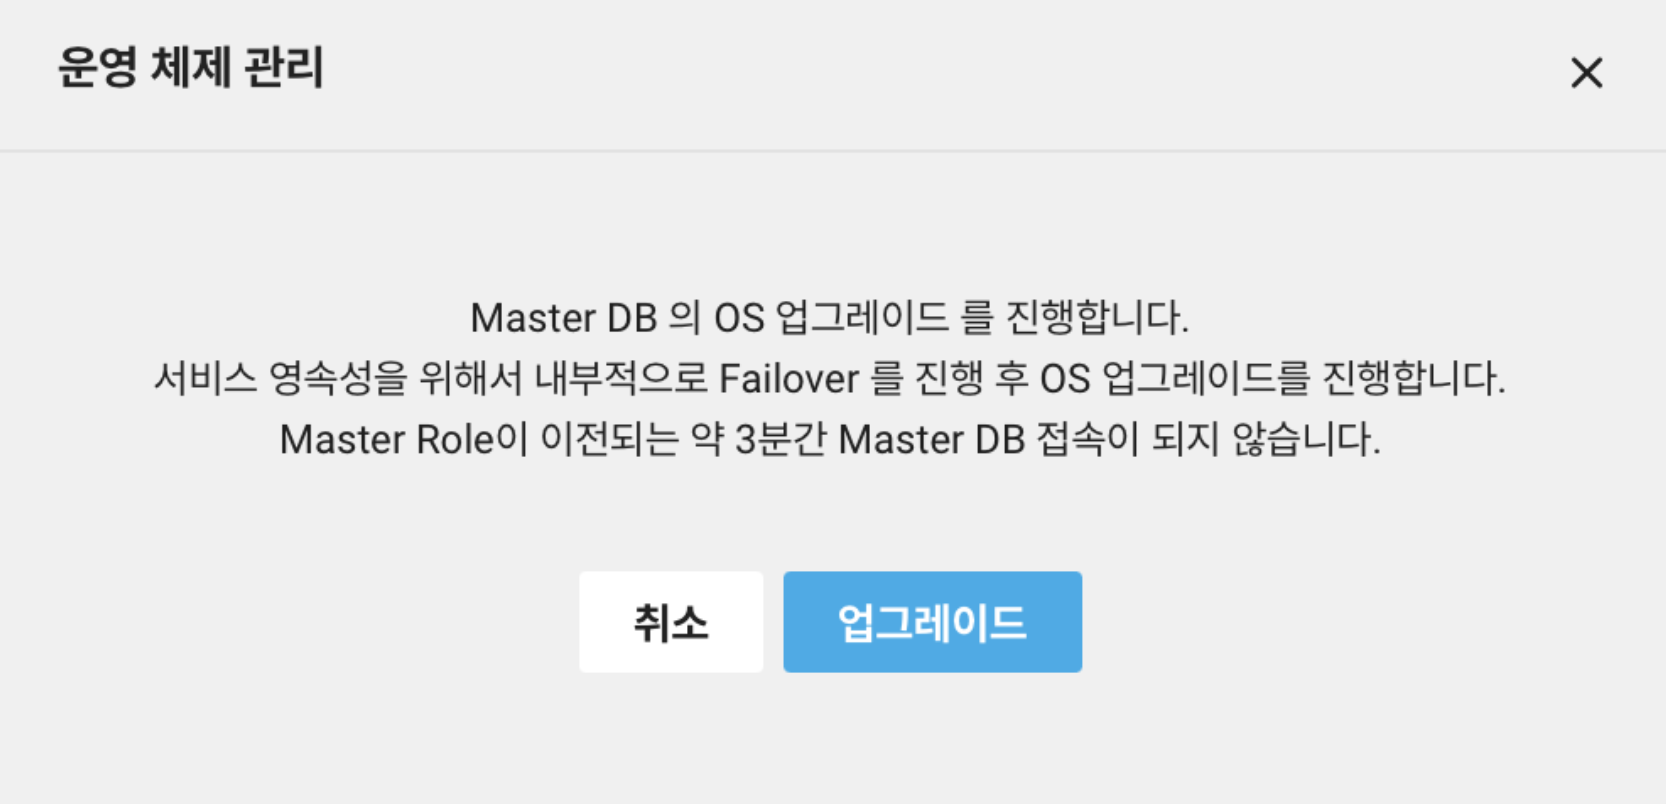
-
You can view the update in progress through DB Server status.
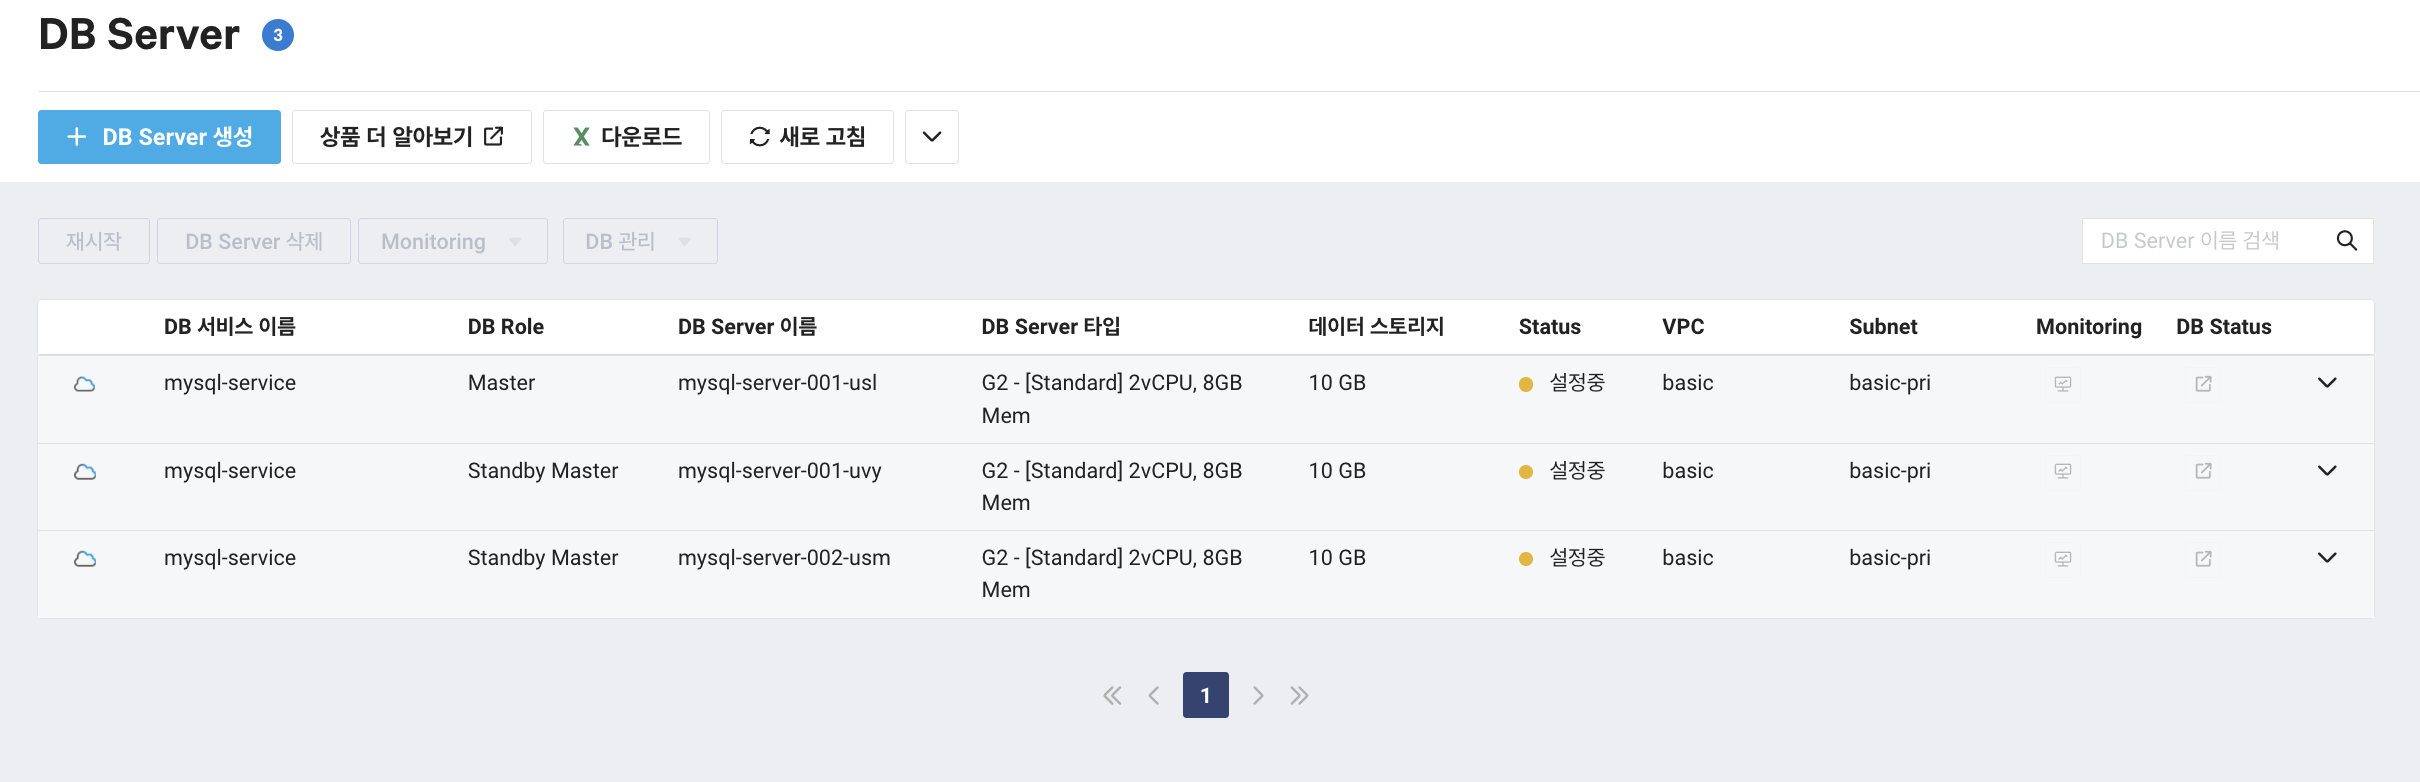
Set read load balancing
You can apply for NAVER Cloud Platform's Load Balancer to distribute the read load on the MySQL Server and connect it to a Slave Server. After creating the Load Balancer, proceed in the order of adding settings to the ACG of MySQL Server so that the created Load Balancer can have normal access.
- Additional fees apply when you request a subscription to Load Balancer. To access information about Load Balancer introduction and pricing plans, see Services > Storage > Load Balancer on NAVER Cloud Platform portal.
- Only Slave Server can be connected to the Load Balancer, and only the Slave Servers that belong to the same DB Service can be bound to a single Load Balancer.
The following briefly describes how to set Load Balancer: For more information on how to set up Load Balancer, see Load Balancer user guide.
Create Load Balancer
To create a Load Balancer within the VPC environment on the NAVER Cloud Platform console:
- Load balancing of Cloud DB for MySQL is performed through Network Load Balancers and Network proxy Load Balancers.
- Load balancing of Cloud DB for MySQL through an application Load Balancer is not available.
In this section, we will briefly introduce how to create a Load Balancer. For more information on full creation methods, see the following guides:
- In the VPC environment of the NAVER Cloud Platform console, navigate to Menu > Services > Networking > Load Balancer.
- Click [Create Load Balancer] and select the desired Load Balancer type.
- Enter the information required for the creation of the Load Balancer by referring to the Load Balancer user guide in the Note section, and then click [Next].
- Add Load Balancer listeners, and click [Next].
- Select the target group, and click [Next].
- View the settings, and then click [Create Load Balancer].
You can group Slave Servers created in multi zone with one Load Balancer and disperse the read load for a MySQL Server. You can use 1 domain for the Load Balancer to access each Slave Server. To proceed:
- Group the Slave Servers created separately in zone1 and zone2 when you create a target group in step 5.
Set ACG
Add ACG rules to the Access Control Group (ACG) of the DB Server so that the Load Balancer can access it properly. To set:
In this section, we will briefly introduce how to set up ACG. For more information on how to set ACG, see ACG user guide.
- In the VPC environment of the NAVER Cloud Platform console, navigate to Menu > Services > Compute > Server.
- Click the ACG menu.
- Select the ACG name of the MySQL Server, and click [Set ACG].
- Enter the following ACG rules for Load Balancer access:
- Protocol: TCP
- Access source
- VPC: IP address range of the Load Balancer subnet
- Classic: ncloud-load-balancer
- Allowed port: MySQL Server Port
- Click [Add].
- Click [Apply].
View Load Balancer
Views the details and access information of created Load Balancers. The access information is used to confirm the IP for accessing the Load Balancer and when accessing it for read balancing.